8
Attach Warming Rack
14
15
Insert Grease Cup Support and Grease Cup
13
Insert Heat Plates and Cooking Grids
Страница 1: ...ot which are known to the State of California to cause cancer birth defects and other reproductive harm For more information go to www P65Warnings ca gov GBC1306J E OM E F103 Never operate this appliance unattended FOR YOUR SAFETY For Outdoor Use Only outside any enclosure FOR YOUR SAFETY 1 Do NOT store or use gasoline or other flammable liquids or vapors in the vicinity of this or any other appli...
Страница 2: ...a hot car or trunk Heat will cause the gas pressure to increase which may open the relief valve and allow gas to escape W W Place dust cap on cylinder valve outlet whenever the cylinder is not in use Only install the type of dust cap on the cylinder valve outlet that is provided with the cylinder valve Other types of caps or plugs may result in leakage of propane W W If grill is not in use the gas...
Страница 3: ...appliance while in operation W W Use caution when placing anything on the grill while the appliance is in operation W W Do NOT attempt to move grill when in use Allow the grill to cool before moving or storing W W LP gas cylinder must be properly disconnected and removed prior to moving this grill W W Storage of grill indoors is permissible only if the cylinder is disconnected removed from the gri...
Страница 4: ...rame G1205 120 22 Condiment Basket G0900 160 23 Upper Front Panel G1306 170 24 Right Lower Cart Frame G1205 210 25 Axle G1205 220 26 Wheel 2 B0302 E01 27 Lower Front Panel G1306 190 28 Cart Frame Support 4 G0900 110 Pre assembled Parts List A Screw ST4 8x10 Nickel Plated Phillips Truss Head 4 pcs B Screw M5x15 Nickel Plated Phillips Truss Head 12 pcs C Screw M5x15 Nickel Plated Phillips Step 4 pcs...
Страница 5: ...en before completing each step go back and fully tighten all hardware Be careful not to over tighten That could damage surfaces or strip threads 4 For best results complete each step in the order presented To complete assembly you will need 1 Leak detection solution instructions on how to make the solution are included in the Operating Instructions section of this manual 1 Precision filled LP gas ...
Страница 6: ...6 Attach Cart Frame Support Wire 6 Attach LP Gas Tank Retainer Wire 7 Attach Front Panels and Rear Cart Support 5 8 B x 11 G x 1 Attach Handle Control Knobs and Temperature Gauge D x 2 H x 2 I x 2 ...
Страница 7: ...7 Secure QCC Clip 10 11 Attach Grill Body Assembly and Lighting Hook 9 E x 1 D x 5 H x 2 B x 1 Attach Condiment Basket 12 Attach Side Shelves C x 4 ...
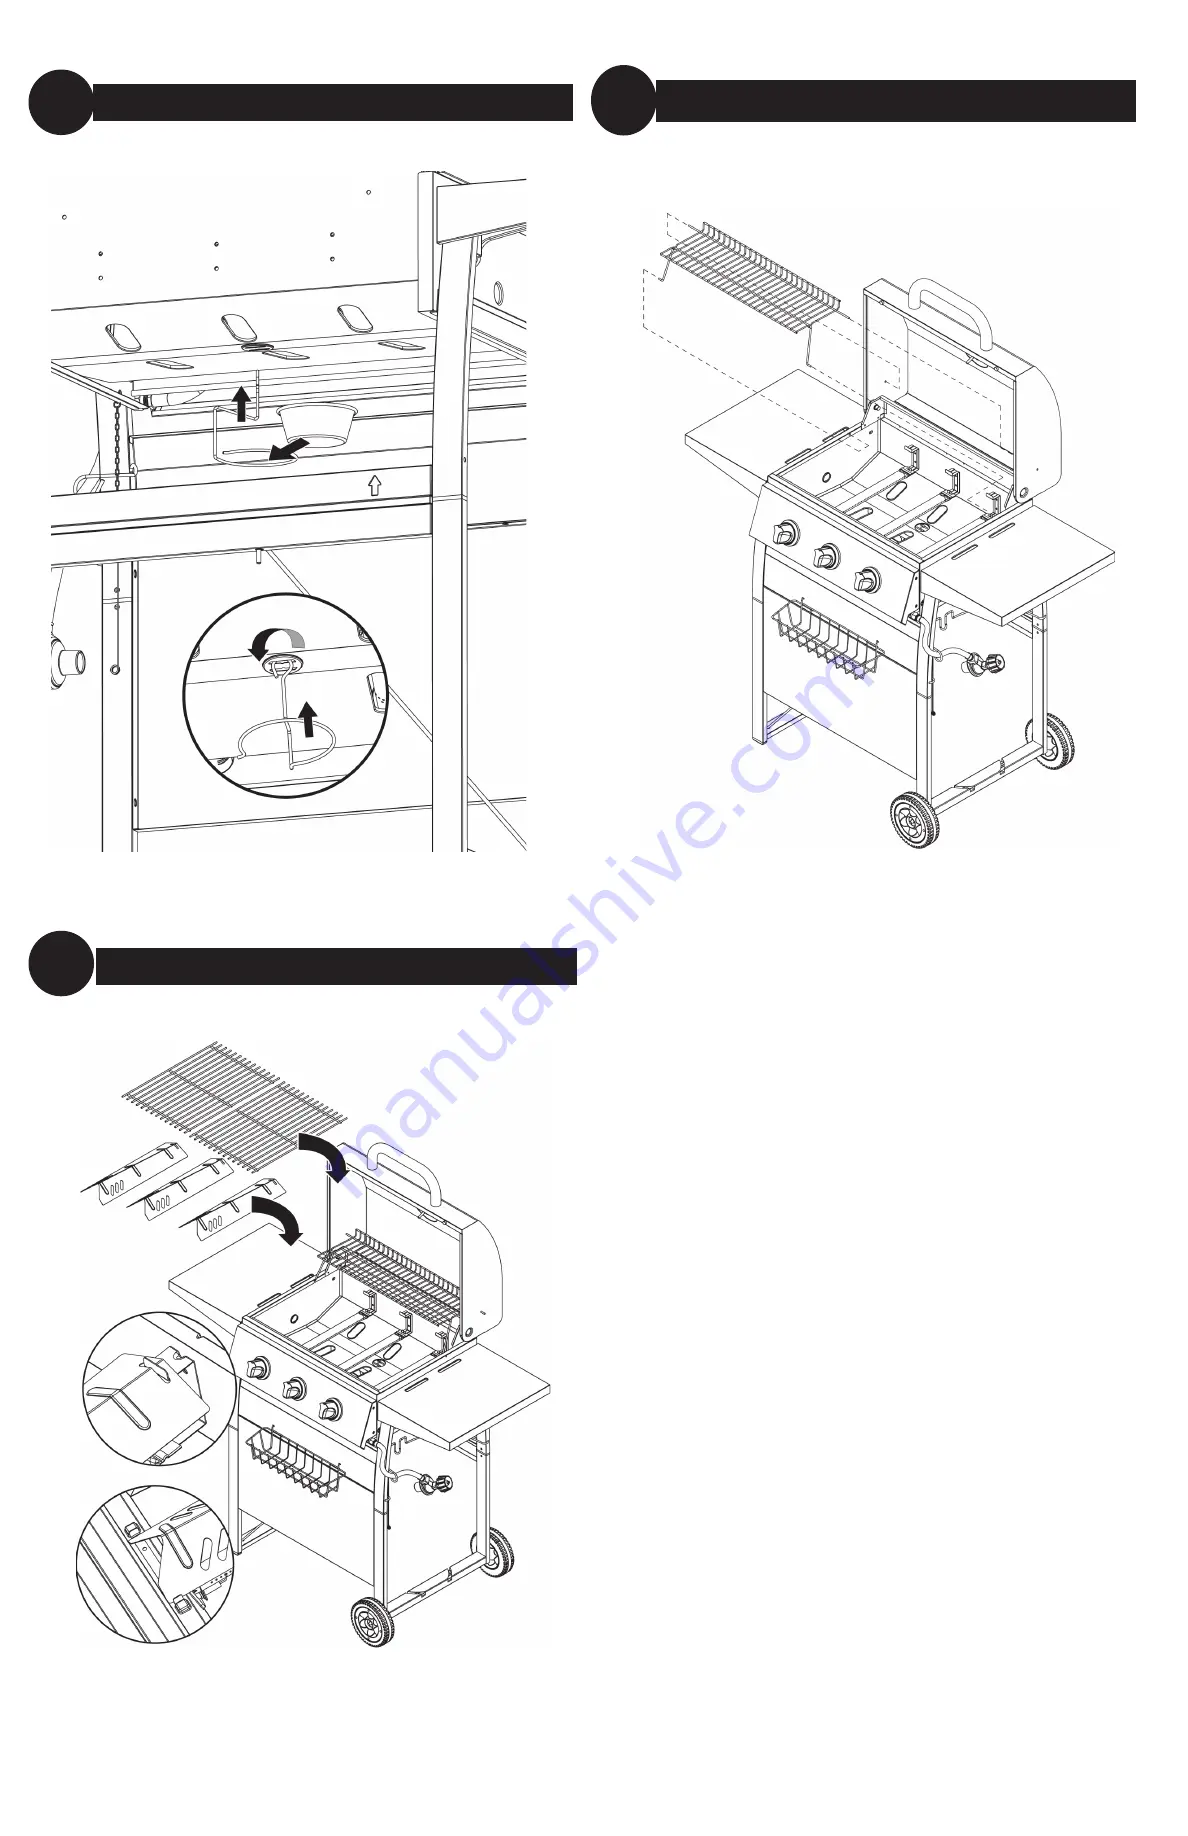
Страница 8: ...8 Attach Warming Rack 14 15 Insert Grease Cup Support and Grease Cup 13 Insert Heat Plates and Cooking Grids ...
Страница 9: ...ks Burner Connections 1 Make sure the regulator hose and valve connections are securely fastened to the burner and the tank 2 Visually check the connection between the burner venturi tube and orifice 3 Make sure the burner venturi tube fits over the orifice W W WARNING Failure to inspect this connection or follow these instructions could cause a fire or an explosion which can cause death serious b...
Страница 10: ...Gas Tank section 4 Remove cooking grids and heat plates 5 Remove burners by removing the fasteners which secure the burners to the grill bottom Figure 6 Burner Flame Conditions Use this chart to see if your burners need to be cleaned 1 2 in 25 4 50 8 mm Normal Soft blue flames with yellow tips between 1 in 2 in height Needs cleaning Noisy with hard blue flames Has to be replaced Wavy with yellow f...
Страница 11: ...ore returning any parts you should contact manufacturer s Customer Service Department using the contact information listed below If manufacturer confirms after examination a defect covered by this Limited Warranty in any returned part and if manufacturer approves the claim manufacturer will replace such defective part without charge If you return defective parts transportation charges must be prep...
Страница 12: ... burner ports Sudden drop in gas flow or reduced flame height Out of gas Exchange refill or replace LP gas tank Overfilling prevention device may have been activated 1 Turn control knobs to OFF 2 Wait 30 seconds and light grill 3 If flames are still too low reset the overfilling prevention device a Turn control knob s OFF b Turn LP gas tank valve to CLOSED c Disconnect regulator d Turn control kno...