


Problem
Possible Cause
Solution
The ma-
chine
stops
when you
cut.
The guard is not
attached to the
machine.
Remove the battery
pack and attach the
guard to the machine.
Heavy cutting
line is used.
Use only with the nylon
cutting line of 0.08" (2
mm) diameter.
The grass winds
around the motor
shaft or the trim-
mer head.
1. Stop the machine.
2. Remove the battery
pack.
3. Remove the grass
from the motor shaft
and trimmer head.
The motor is
overloaded.
1. Remove the trimmer
head from the grass.
2. The motor will recov-
er to work as soon as
the load is removed.
3. When you cut, move
the trimmer head in
and out of the grass to
be cut and remove no
more than 8" in pass.
The battery pack
or machine is too
hot.
1. Cool the battery
pack until its function
returns to normal.
2. Cool the machine for
approximately 10 mi-
nutes.
The battery pack
is disconnected
from the tool.
Install the battery pack
again.
The battery pack
is depleted.
Charge the battery
pack.
The line
does not
forward.
Lines are welded
to themselves.
Lubricate with silicone
spray.
Not enough line
on spool.
Install more line.
Lines are worn
too short.
Advance the cutting
line.
Lines are tan-
gled on spool.
1. Remove the lines
from the spool.
2. Wind the lines.
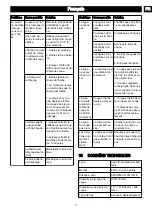
Problem
Possible Cause
Solution
The line
keeps
breaking.
The machine is
used incorrectly.
1. Cut with the tip of
the line, avoid stones,
walls and other hard
objects.
2. Advance the cutting
line regularly to keep
full cutting width.
The grass
winds
around the
trimmer
head and
motor
housing.
Cut tall grass at
ground level.
1. Cut tall grass from
the top down.
2. Remove no more
than 8" in each pass to
prevent wrapping.
The line
does not
cut well.
The cut-off blade
becomes dull.
Sharpen the cut-off
blade with a file or re-
place it.
Vibration
increases
obviously.
The line is worn
down at one side
and not ad-
vanced in time.
Make sure that the line
at two sides is normal.
Advance the line.
13
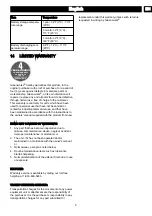
TECHNICAL DATA
Type
Cordless, battery powered
Motor
48V DC, Brushless
No load speed
6500/5500 ±10% RPM
Cutting line diameter
0.08" (2 mm)
Cutting path diameter
14" / 16" (356 mm / 406
mm)
Feed Type
Bump feed
Weight (without battery
pack)
3.9 kg
The recommended ambient temperature range:
Item
Temperature
String trimmer storage
temperature range
-4°F (-20°C) - 158°F
(70°C)
String trimmer operation
temperature range
6.8°F (-14°C) - 104°F
(40°C)
Battery charging tempera-
ture range
39°F (4°C) - 104°F (40°C)
Charger operation temper-
ature range
39°F (4°C) - 113°F (45°C)
8
English
EN
Содержание STE456
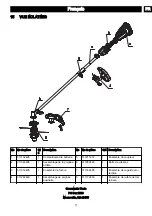
Страница 1: ...1 2 3 4 5 6 7 C B A 8 9 STE456...
Страница 2: ...10 11 12 13 14 15 16 17 18 19 20 21 STE456...
Страница 4: ......
Страница 26: ......
Страница 38: ......


