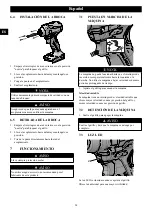
background image

8

MAINTENANCE


CAUTION

Do not let brake fluids, gasoline, petroleum-based materials

touch the plastic parts. Chemicals can cause damage to the

plastic, and make the plastic unserviceable.


CAUTION

Do not use strong solvents or detergents on the plastic

housing or components.


WARNING

Remove the battery pack from the machine before

maintenance.

8.1

CLEAN THE MACHINE


CAUTION

The machine must be dry. Humidity can cause risks of

electrical shocks.

• Clear the unwanted material out of the air vent with a

vacuum cleaner.

• Do not spray the air vent or put the air vent in solvents.
• Clean the housing and the plastic components with a

moist and soft cloth.

9

TECHNICAL DATA

Voltage

24 V

Motor

Brushless

No Load Speed

0 - 2800 RPM

Torque

2666 In-lbs. / 300 N.m

Weight Without Battery

2.6 lbs ( 1.18 kg)

Battery Model

BAG711 and other BAG ser-

ies

Charger Model

29862 / 29972

The recommended ambient temperature range:

Item

Temperature

Appliance storage tempera-

ture range

32°F (0°C) - 158°F (70°C)

Appliance operation temper-

ature range

32°F (0°C) - 104°F (40°C)

Battery charging temperature

range

39°F (4°C) - 104°F (40°C)

Charger operation tempera-

ture range

39°F (4°C) - 104°F (40°C)

Item

Temperature

Battery storage temperature

range

32°F (0°C) - 73°F (23°C)

Battery discharging tempera-

ture range

32°F (0°C) -  113°F (45°C)

10

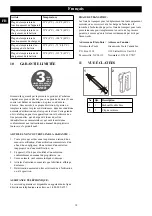
LIMITED WARRANTY

YEAR 

ANS 

AÑOS

LIMITED WARRANTY

GARANTIE LIMITÉE

GARANTÍA 

LIMITADA

3

Greenworks hereby warranties this product, to the original

purchaser with proof of purchase, for a period of three (3)

years against defects in materials, parts or workmanship.

Greenworks, at its own discretion will repair or replace any

and all parts found to be defective, through normal use, free

of charge to the customer. This warranty is valid only for

units which have been used for personal use that have not

been hired or rented for industrial/commercial use, and that

have been maintained in accordance with the instructions in

the owners’ manual supplied with the product from new.

ITEMS NOT COVERED BY WARRANTY:

1. Any part that has become inoperative due to misuse,

commercial use, abuse, neglect, accident, improper

maintenance, or alteration; or

2. The unit, if it has not been operated and/or maintained in

accordance with the owner's manual; or

3. Normal wear, except as noted below;
4. Routine maintenance items such as lubricants, blade

sharpening;

5. Normal deterioration of the exterior finish due to use or

exposure.

HELPLINE:

Warranty service is available by calling our toll-free helpline,

at 1-888-909-6757.

TRANSPORTATION CHARGES:

Transportation charges for the movement of any power

equipment unit or attachment are the responsibility of the

purchaser. It is the purchaser’s responsibility to pay

transportation charges for any part submitted for replacement

under this warranty unless such return is requested in writing

by Greenworks.

USA address:

Canadian address:

Greenworks Tools

Greenworks Tools Canada Inc.

9

English

EN

Содержание IS24L00

Страница 1: ...ISD401 EN OPERATOR MANUAL FR MANUEL D OP RATEUR IMPACT DRIVER PERCEUSE VISSEUSE ES MANUAL DEL OPERADOR TALADRO ATORNILLADOR IS24L00 www greenworkstools com 24V 1 4 Brushless Impact Driver...

Страница 2: ......

Страница 3: ...on the product 6 4 Risk levels 6 5 Proposition 65 6 6 Installation 7 6 1 Unpack the machine 7 6 2 Install the battery pack 7 6 3 Remove the battery pack 7 6 4 Install the bit 7 6 5 Remove the bit 7 7...

Страница 4: ...or unplugging the power tool Keep cord away from heat oil sharp edges and moving parts Damaged or entangled cords increase the risk of electric shock When operating a power tool outdoors use an exten...

Страница 5: ...her may cause burns or fire Under abusive conditions liquid may be ejected from the battery avoid contact If contact accidentally occurs flush with plenty of soap and water If liquid contacts eyes imm...

Страница 6: ...Symbol Explanation V Voltage Direct current Read all safety warnings and all in structions Safety alert Wear eye protection Wear ear protection Low speed High speed Symbol Explanation Do not touch ro...

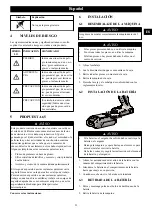
Страница 7: ...n the battery pack with the grooves in the battery compartment 2 Push the battery pack into the battery compartment until the battery pack locks into place 3 When you hear a click the battery pack is...

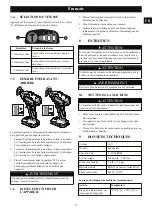
Страница 8: ...level Lights Speed level 3 Green Lights The machine is in high speed setting 2 Green Lights The machine is in medium speed set ting 1 Green Light The machine is in low speed setting 7 5 FORWARD REVER...

Страница 9: ...RANT A LIMITADA 3 Greenworks hereby warranties this product to the original purchaser with proof of purchase for a period of three 3 years against defects in materials parts or workmanship Greenworks...

Страница 10: ...P O Box 1238 1110 Stellar Drive Unit 102 Mooresville NC 28115 Newmarket ON L3Y 7B7 11 EXPLODED VIEW 1 2 No QTY Description 1 1 Double Sided Bit 2 1 Belt Clip 10 English EN...

Страница 11: ...13 3 Symboles figurant sur la machine 14 4 Niveaux de risques 14 5 Proposition 65 15 6 Installation 15 6 1 D ballez la machine 15 6 2 Installez la batterie 15 6 3 Retirez la batterie 15 6 4 Installez...

Страница 12: ...ec des surfaces mises la terre comme les tuyaux les radiateurs les cuisini res et les r frig rateurs Il y a un risque accru de choc lectrique si votre corps est en contact avec la terre N exposez pas...

Страница 13: ...ris pour des op rations diff rentes de celles pr vues pourrait entra ner une situation dangereuse Veillez ce que les poign es restent propres s ches et exemptes d huile et de graisse Les poign es et s...

Страница 14: ...s fil tout pr s d une flamme Une batterie qui explose peut propulser des d chets et des substances chimiques Si vous tes expos rincez imm diatement l eau Ne chargez pas la batterie de l outil dans un...

Страница 15: ...its chimiques travaillez dans un endroit bien ventil et utilisez un quipement de s curit approuv comme des masques anti poussi re sp cialement con us pour filtrer les particules microscopiques Conserv...

Страница 16: ...ilisez pas d autres pi ces ou d accessoires non recommand s par le fabricant de ce produit 7 1 D MARREZ LA MACHINE REMARQUE La machine ne peut fonctionner qu une fois que le bouton marche arri re est...

Страница 17: ...sir e pour l utilisation 2 Tenez fermement la machine avec la main 3 Ins rez la m che d sir e dans le coupleur et appuyez lentement sur la g chette D marrez lentement pour un meilleur contr le 8 ENTR...

Страница 18: ...neuf ARTICLES NON COUVERTS PAR LA GARANTIE 1 Toute pi ce qui est devenue inop rante en raison d une mauvaise utilisation d une utilisation commerciale d un abus d une n gligence d un accident d un en...

Страница 19: ...22 3 S mbolos en el producto 22 4 Niveles de riesgo 23 5 Propuesta 65 23 6 Instalaci n 23 6 1 Desembalaje de la m quina 23 6 2 Instalaci n de la bater a 23 6 3 Retirada de la bater a 23 6 4 Instalaci...

Страница 20: ...tomas de corriente adecuadas reducir el riesgo de descarga el ctrica Evite el contacto del cuerpo con superficies conectadas a tierra como tuber as radiadores estufas y refrigeradores Existe un riesgo...

Страница 21: ...otra condici n que pueda afectar al funcionamiento de la herramienta el ctrica Si ha sufrido da os lleve a reparar la herramienta el ctrica antes del uso Numerosos accidentes se deben a herramientas e...

Страница 22: ...las herramientas a bater a o sus bater as cerca del fuego o el calor Esto reducir el riesgo de explosi n y posibles lesiones No aplaste deje caer ni da e la bater a No utilice una bater a o un cargad...

Страница 23: ...estas sustancias qu micas var a seg n la frecuencia con la que realice este tipo de trabajo Para reducir su exposici n a estas sustancias qu micas trabaje en una zona bien ventilada y trabaje con equi...

Страница 24: ...AMIENTO AVISO Lleve siempre protecci n ocular AVISO No utilice ning n accesorio no recomendado por el fabricante de este producto 7 1 PUESTA EN MARCHA DE LA M QUINA NOTA La m quina no puede funcionar...

Страница 25: ...l interruptor avance retroceso en la posici n deseada para el funcionamiento 2 Sujete firmemente la m quina con la mano 3 Inserte la punta deseada en el acoplamiento y apriete lentamente el gatillo Em...

Страница 26: ...nto tal y como se indica en las instrucciones del manual del usuario suministrado con el producto nuevo LO QUE NO CUBRE LA GARANT A 1 Cualquier pieza que no funcione debido al uso incorrecto uso comer...

Страница 27: ......

Страница 28: ......

Отзывы: