GreenWorks 21272 Скачать руководство пользователя страница 5

carefully checked to determine that it will operate

properly and perform its intended function. Check

for alignment of moving parts, binding of moving

parts, breakage of parts, damaged mountings, and

any other condition that may affect its operation. A

guard or other part that is damaged should be

properly repaired or replaced by an authorized

service center unless indicated elsewhere in this

manual.

• Do not operate cordless tools in damp or wet

locations or in the rain. Following this rule will

reduce the risk of electric shock.

• When servicing use only identical replacement part.
• To reduce the risk of electric shock, this tool has a

polarized plug (one blade is wider than the other)

and will require the use of a polarized extension

cord. The plug will fit into a polarized extension cord

only one way. If the plug does not fit fully into the

extension cord, reverse the plug. If the plug still

does not fit, obtain a correct polarized extension

cord. A polarized extension cord will require the use

of a polarized wall outlet. This plug will fit into the

polarized wall outlet only one way. If the plug does

not fit fully into the wall outlet, reverse the plug. If

the plug still does not fit, contact a qualified

electrician to install the proper wall outlet. Do not

change the equipment plug, extension cord

receptacle, or extension cord plug in any way.

• Ground Fault Circuit Interrupter (GFCI) protection

should be provided on the circuit(s) or outlet(s) to be

used for the gardening appliance. Receptacles are

available having built-in GFCI protection and may be

used for this measure of safety.

• Warning – To reduce the risk of electric shock, use

only with an extension cord intended for outdoor

use, such as an extension cord of cord type SW-A,

SOW-A, STW-A, STOW-A, SJW-A, SJOW-A,

SJTW-A, or SJTOW-A.

• Disconnect Appliance – Remove appliance from

power source before storing, servicing, changing

accessories such as cutting line. Such preventive

safety measures reduce the risk of starting the tool

accidentally.

• Do not abuse the cord – Never carry the unit by the

extension cord or yank extension cord to disconnect

unit. Keep the cord clear of operator and obstacles

at all times. Do not expose cords to heat, oil, water,

or sharp edges. Do not handle plug with wet hands.

SAVE THESE INSTRUCTIONS

3

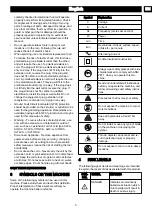
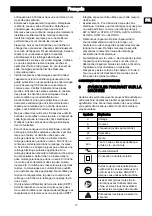
SYMBOLS ON THE MACHINE

Some of the following symbols can be used on this

machine. Please study them and learn their definition.

Proper interpretation of these symbols will let you

operate the machine better and safer.

Symbol

Explanation

V

Voltage

A

Current

Hz

Frequency (cycles per second)

W

Power

min

Time

/min

Revolutions, strokes, surface speed,

orbits etc., per minute

Alternating Current

Double-insulated construction

Always wear safety glasses with side

shields marked to comply with ANSI

Z87.1 when you operate this ma-

chine.
Read and understand all instructions

before you operate the machine, and

follow all warnings and safety instruc-

tions.

Precautions that involve your safety.

Do not expose the machine to rain or

moist conditions.

Keep all bystanders at least 15m

away.

Do not install or use any type of blade

on the machine or displaying this

symbol.
Thrown objects can ricochet and re-

sult in personal injury or property

damage.
Do not expose to rain or use in damp

locations.

4

RISK LEVELS

The following signal words and meanings are intended

to explain the levels of risk associated with this product.

SYM-

BOL

SIGNAL

MEANING

DANGER

Indicates an imminently

hazardous situation,which,

if not avoided, will result in

death or serious injury.

5

English

EN

Содержание 21272

Страница 1: ...STA806 21272 EN OPERATOR MANUAL FR MANUEL D OP RATEUR STRING TRIMMER COUPE HERBE ES MANUAL DEL OPERADOR CORTABORDES...

Страница 2: ......

Страница 3: ...top the machine 8 9 3 Adjust the length of the cutting line 8 9 4 Adjust the length of the cutting line manually 8 9 5 Operation tips 8 9 6 Cutting tips 9 9 7 Change to the edging mode 9 9 8 Pivoting...

Страница 4: ...al footwear is recommended when working outdoors Wear protective hair covering to contain long hair Do not operate the equipment while barefoot or when wearing sandals or similar lightweight footwear...

Страница 5: ...d intended for outdoor use such as an extension cord of cord type SW A SOW A STW A STOW A SJW A SJOW A SJTW A or SJTOW A Disconnect Appliance Remove appliance from power source before storing servicin...

Страница 6: ...NTION CORDS When using a power tool at a considerable distance from a power source be sure to use an extension cord that has the capacity to handle the current the product will draw An undersized cord...

Страница 7: ...ice center 1 Open the package 2 Read the documentation in the box 3 Remove all the unassembled parts from the box 4 Remove the machine from the box 5 Discard the box and package in compliance with loc...

Страница 8: ...When the machine is on release the trigger 2 Wait two seconds push the trigger again 3 Resume trimming NOTE The line will extend approximately 0 4 in with each stop and start of the switch trigger un...

Страница 9: ...o keep patios driveways and sidewalks well groomed 1 Stop the machine 2 Push on the edge button 1 and turn the trimmer head 90 degrees until the trimmer head locks into position 1 90 3 Release the edg...

Страница 10: ...EAN THE MACHINE Clean the machine after use with a moist cloth dipped in neutral detergent Do not use aggressive detergents or solvents to clean the plastic parts or handles Keep the trimmer head free...

Страница 11: ...GE WARNING Remove the battery pack from the machine before tranportation and storage 11 1 STORE THE MACHINE Remove the battery pack from the machine Make sure that children cannot come near the machin...

Страница 12: ...use Solution The line keeps breaking The machine is used incorrectly 1 Cut with the tip of the line avoid stones walls and other hard objects 2 Advance the cutting line regularly to keep full cutting...

Страница 13: ...pt as noted below 4 Routine maintenance items such as lubricants blade sharpening 5 Normal deterioration of the exterior finish due to use or exposure HELPLINE Warranty service is available by calling...

Страница 14: ...cription 1 31106727 1 Tool assembly 5 33301504 1 Edge guide 2 34107727 1 Auxiliary handle 6 31105727 1 Spool with line assy 3 31103727 1 Guard assembly 7 34108178A 6 1 Spool Cover 4 34114727 1 Knob Gr...

Страница 15: ...2 Arr tez la machine 20 9 3 R glez la longueur de la ligne de coupe 20 9 4 R glez manuellement la longueur de la ligne de coupe 21 9 5 Conseils sur l utilisation 21 9 6 Conseils de coupe 21 9 7 Passag...

Страница 16: ...llez dans des endroits poussi reux vitez les endroits dangereux N exposez pas les outils lectriques des conditions humides ou mouill es L eau qui p n tre dans un outil lectrique augmente le risque de...

Страница 17: ...e Cette fiche ne s ins re dans la prise murale polaris e que dans un sens Si la fiche ne rentre pas correctement dans la prise murale inversez la Si la fiche ne s ins re toujours pas dans la prise com...

Страница 18: ...osants m talliques internes du moteur avec une protection de l isolation Les outils double isolation ne n cessitent pas de mise terre AVERTISSEMENT Le syst me double isolation est destin prot ger l ut...

Страница 19: ...e ce qu il ne se coince pas dans le bois les outils ou d autres obstructions lorsque vous travaillez avec un outil lectrique Le non respect de cette consigne peut entra ner des blessures corporelles A...

Страница 20: ...mprenez les consignes de s curit et les instructions d utilisation AVERTISSEMENT Soyez prudent lorsque vous utilisez la machine 9 1 D MARREZ LA MACHINE REMARQUE N utilisez que des rallonges ext rieure...

Страница 21: ...es conseils pour l utilisation de la machine Tenez fermement la machine avec les deux mains pendant son utilisation Coupez l herbe haute du haut vers le bas Si de l herbe s enroule autour de la t te d...

Страница 22: ...rer ou d effectuer des travaux d entretien sur la machine IMPORTANT Assurez vous que tous les crous les boulons et les vis sont bien serr s V rifiez r guli rement que les poign es sont bien serr es IM...

Страница 23: ...5 Passez les extr mit s des lignes de coupe travers les trous 6 Rallongez la ligne de coupe pour la d gager de la fente de guidage de la bobine Line exit hole 7 Poussez les languettes et installez le...

Страница 24: ...produits chimiques de jardin et les sels de d gla age Prot gez la machine pendant le transport pour viter tout dommage ou blessure Nettoyez la machine et v rifiez qu elle n est pas endommag e 12 D PA...

Страница 25: ...ble Solution La ligne n avance pas Les lignes sont soud es entre elles Lubrifiez avec du sili cone en vaporisateur Pas assez de lig nes sur la bo bine Installez plus de lignes Les lignes sont devenues...

Страница 26: ...isation commerciale d un abus d une n gligence d un accident d un entretien inappropri ou d une modification ou 2 L appareil s il n a pas t utilis et ou entretenu conform ment au manuel du propri tair...

Страница 27: ...semble d outils 5 33301504 1 Guidage du bord 2 34107727 1 Poign e auxiliaire 6 31105727 1 Bobine avec ligne d assem blage 3 31103727 1 Ensemble de la garde pro tectrice 7 34108178A 6 1 Couvercle de bo...

Страница 28: ...enci n de la m quina 33 9 3 Ajuste de la longitud del hilo de corte 33 9 4 Ajuste manual de la longitud del hilo de corte 33 9 5 Consejos de funcionamiento 34 9 6 Consejos de corte 34 9 7 Cambio al mo...

Страница 29: ...el ctricas a condiciones de humedad Si penetra agua en una herramienta el ctrica aumentar el riesgo de descarga el ctrica No utilice bajo la lluvia Mantenga a todos los transe ntes ni os y mascotas a...

Страница 30: ...e sigue sin encajar contacte con un electricista cualificado para instalar una toma de pared adecuada No cambie en modo alguno el enchufe del equipo el recept culo del cable alargador ni el enchufe de...

Страница 31: ...ISO El sistema de doble aislamiento se ha dise ado para proteger al usuario de descargas que resulten de una ruptura en el aislamiento interno de la herramienta Respete todas las precauciones de segur...

Страница 32: ...e no quede atrapado en madera herramientas u otras obstrucciones mientras trabaja con una herramienta el ctrica De no hacerlo podr an producirse lesiones personales graves AVISO Compruebe los cables a...

Страница 33: ...de la sujeci n del cable 3 2 3 1 2 Conecte el extremo de salida 1 de un cable alargador al enchufe en la parte posterior de la m quina 3 Apriete el gatillo 2 para arrancar la m quina 9 2 DETENCI N DE...

Страница 34: ...cortar Utilice la punta del hilo de corte para cortar hierba Mueva la m quina de derecha a izquierda para evitar que los residuos despedidos golpeen al operario No corte en la zona peligrosa No fuerc...

Страница 35: ...ladas IMPORTANTE Utilice nicamente las piezas de repuesto y los accesorios del fabricante original 10 1 INFORMACI N GENERAL IMPORTANTE nicamente un distribuidor o un centro de servicio autorizado pued...

Страница 36: ...pesta as e instale la cubierta del carrete en la carcasa del carrete 8 Introduzca la cubierta del carrete hasta que encaje en su posici n 10 4 SUSTITUCI N DEL HILO DE CORTE NOTA Retire el hilo de cor...

Страница 37: ...eo y suj telo 2 Apriete el gatillo para poner en marcha la m quina Problema Posible causa Soluci n La m qui na se de tiene cuando corta La protecci n no est fijada a la m quina Retire la bater a y fij...

Страница 38: ...compra durante un periodo de tres 3 a os frente a defectos en materiales piezas o mano de obra A su entera discreci n Greenworks reparar o sustituir cualquiera y todas las piezas que resulten ser def...

Страница 39: ...106727 1 Conjunto de herramienta 5 33301504 1 Gu a de borde 2 34107727 1 Asa auxiliar 6 31105727 1 Carrete con conj de hilo 3 31103727 1 Conjunto de protecci n 7 34108178A 6 1 Cubierta de carrete 4 34...

Страница 40: ......

Отзывы: