background image


WARNING

If the battery pack or charger is damaged, replace the
battery pack or the charger.

Stop the machine and wait until the motor stops before
you install or remove the battery pack.

Read and understand the instructions in the battery and
charger manual.


NOTE

Optimize the power and performance of your new 2x24
machine by running with both batteries charged to 100%.

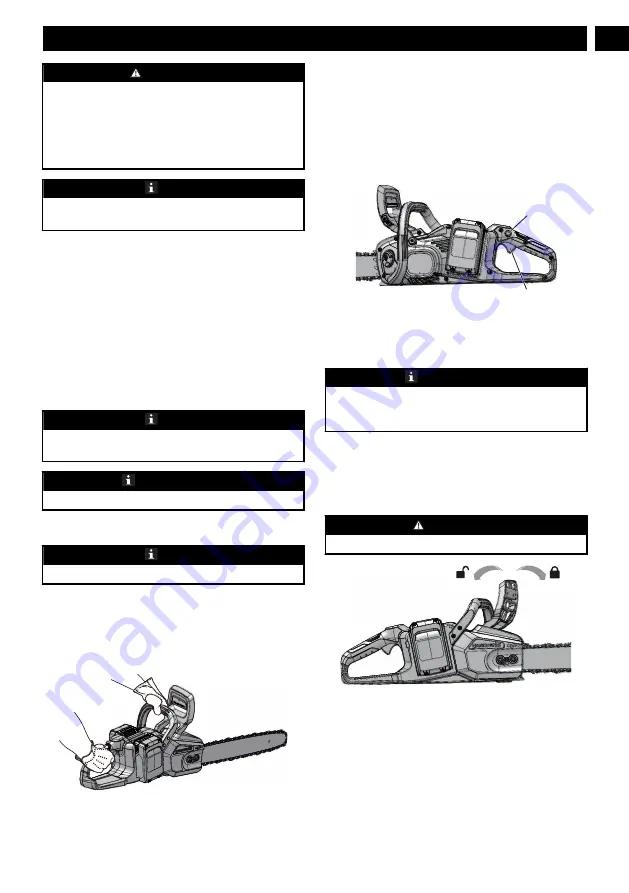
1. Align the lift ribs on the battery pack with the grooves in

the battery compartment.

2. Push the battery pack into the battery compartment until

the battery pack locks into place.

3. When you hear a click, the battery pack is installed.

8.4

REMOVE THE BATTERY PACK

1. Push and hold the battery release button (18).
2. Remove the battery pack from the machine.

9

OPERATION


NOTE

Remove the battery pack and keep hands clear of the lock
out button when you move the machine.


IMPORTANT

Examine the chain tension before each use.

9.1

EXAMINE THE CHAIN OIL


NOTE

Do not use the machine without sufficient chain oil.

1. Examine the oil level of the machine from the oil

indicator.

2. Add oil if necessary.

9.2

HOLD THE MACHINE

1. The grip area is within 100 mm behind the lock out

button.

2. Hold the chainsaw with your right hand on the rear

handle and left hand on the front handle.

3. Hold the handles with the thumbs and the fingers around

them.

4. Make sure that your left hand holds the front handle and

your thumb is below the handle.

9.3

START THE MACHINE

4

5

1. Press the lock-out button (4).
2. Press the trigger (5) while you hold the lock-out button.
3. Release the lock-out button.


IMPORTANT

The chain brake must be disengaged for the chain saw to
start. Activate the brake by moving the front hand guard
forwards.

9.4

STOP THE MACHINE

1. Release the trigger to stop the machine.

9.5

OPERATE THE CHAIN BRAKE


WARNING

Make sure that your hands are on the handles at all times.

1. Start the machine.
2. Push the guard forward to engage the chain brake.
3. Pull the handle guard / chain brake backwards to

disengage the chain brake.

4. Call approved service center for repair before use if

The chain brake does not stop the chain immediately.

The chain brake does not stay in the disengaged
position without aid.

9

English

EN

Содержание CS48L4410

Страница 1: ...CSE405 CS48L4410 EN OPERATOR MANUAL FR MANUEL DE L UTILISATEUR ES MANUAL DEL OPERADOR www greenworkstools com www shopgreenworksgear com CHAINSAW SCIE À CHAÎNE SIERRA DE CADENA ...

Страница 2: ...ks other than Greenworks 24V Using only one battery pack will not start the machine Ensure both batteries are charged 100 If each battery has a different charge state the run time of the machine is subject to the lowest powered battery For example one battery is charged 100 and the other is charged 50 the unit will only run until the 50 battery is depleted When using 2 batteries with different amp...

Страница 3: ...y disposal 7 7 Proposition 65 8 8 Installation 8 8 1 Unpack the machine 8 8 2 Add the bar and chain oil 8 8 3 Install the battery pack 8 8 4 Remove the battery pack 9 9 Operation 9 9 1 Examine the chain oil 9 9 2 Hold the machine 9 9 3 Start the machine 9 9 4 Stop the machine 9 9 5 Operate the chain brake 9 9 6 Fell a tree 10 9 7 Limb a tree 10 9 8 Buck a log 10 10 Maintenance 11 10 1 Replace the ...

Страница 4: ...as in the presence of flammable liquids gases or dust Power tools create sparks which may ignite the dust or fumes Keep children and bystanders away while operating a power tool Distractions can cause you to lose control 2 2 ELECTRICAL SAFETY Power tool plugs must match the outlet Never modify the plug in any way Do not use any adapter plugs with earthed grounded power tools Unmodified plugs and m...

Страница 5: ...ired before use Many accidents are caused by poorly maintained power tools Keep cutting tools sharp and clean Properly maintained cutting tools with sharp cutting edges are less likely to bind and are easier to control Use the power tool accessories and tool bits etc in accordance with these instructions taking into account the working conditions and the work to be performed Use of the power tool ...

Страница 6: ...w to avoid them Serious injury could occur to the operator or bystanders while felling a tree This chain saw is not intended for tree felling Use of the chain saw for operations different than intended could result in serious injury to the operator or bystanders Do not operate a chain saw in a tree unless you have been specifically trained to do so Operation of a chain saw in a tree without proper...

Страница 7: ...c and corrosive materials below are in the batteries used in this machine Lithium Ion a toxic material WARNING Discard all toxic materials in a specified manner to prevent contamination of the environment Before discarding damaged or worn out Li ion battery contact your local waste disposal agency or the local Environmental Protection Agency for information and specific instructions Take the batte...

Страница 8: ...s 8 1 UNPACK THE MACHINE WARNING Make sure that you correctly assemble the machine before use WARNING If parts of the machine are damaged do not use the machine If you do not have all the parts do not operate the machine If parts are damaged or missing contact the service center 1 Open the package 2 Read the documentation provided in the box 3 Remove all the unassembled parts from the box 4 Remove...

Страница 9: ...e the oil level of the machine from the oil indicator 2 Add oil if necessary 9 2 HOLD THE MACHINE 1 The grip area is within 100 mm behind the lock out button 2 Hold the chainsaw with your right hand on the rear handle and left hand on the front handle 3 Hold the handles with the thumbs and the fingers around them 4 Make sure that your left hand holds the front handle and your thumb is below the ha...

Страница 10: ... when you make the second notch 2 Make the felling cut 28 no less than 2 in 50 mm or higher than the level notching cut Make sure that this cut a Is parallel to the level notching cut b Keeps sufficient wood 2 in 50 mm or 1 10 the diameter of the tree to become a hinge 29 which prevents the tree from twisting and felling in the wrong direction When the felling cut 28 gets near the hinge 29 the tre...

Страница 11: ... 35 38 39 When the log is on a slope 1 Stand on the uphill side 2 Control the chainsaw completely 3 Hold the chainsaw handles tightly 4 Release the cutting pressure near the end of the cut When bucking is complete 38 1 Wait for the chain to stop 39 2 Ensure the chainsaw is turned off 3 Check for hazards before you move to another tree 10 MAINTENANCE CAUTION Do not let brake fluids gasoline petrole...

Страница 12: ...st use examine the tension and tighten the chain if necessary 10 2 ADJUST THE CHAIN TENSION The more you use a chain the longer it becomes It is therefore important to adjust the chain regularly to take up the slack Tension the chain so that it can only just be pulled away from the bar at its center point WARNING A slack chain may jump off and cause serious or even fatal injury CAUTION Wear protec...

Страница 13: ...a flat file 4 File all the cutters to the specified angles and the same length NOTE During the process Keep the file flat with the surface to be sharpened Use the midpoint of the file bar Use light but firm pressure when sharpening the surface Lift the file away on each return stroke Sharpen the cutters on one side and then move to the other side Replace the chain if The length of the cutting edge...

Страница 14: ...s garden chemicals and de icing salts 12 TROUBLESHOOTING Problem Possible cause Solution The guide bar and the chain become hot and release smoke The chain is too tight Adjust the chain tension The oil tank is empty Add oil Contamination causes a blockage of the discharge port Remove the guide bar and clean the discharge port Contamination causes a blockage of the oil tank Clean the oil tank Add n...

Страница 15: ...oce dures The chain is not lubricated Lubricate the chain to decrease the friction Do not let the guide bar and the chain operate without sufficient oil Incorrect battery storage tempera ture Cool the battery pack until it de creases to the am bient temperature 13 TECHNICAL DATA Voltage 48V 2 x 24V No load speed 20 m s Guide bar length 14 356 mm Chain pitch 3 8 LP 9 5 mm Chain gauge 043 1 09 mm Dr...

Страница 16: ...e with the owner s manual or 3 Normal wear except as noted below 4 Routine maintenance items such as lubricants blade sharpening 5 Normal deterioration of the exterior finish due to use or exposure HELPLINE Warranty service is available by calling our toll free helpline at 1 888 909 6757 TRANSPORTATION CHARGES Transportation charges for the movement of any power equipment unit or attachment are th...

Страница 17: ...1 R0202094 00 1 Bar Chain 6 RB333001890 1 Wrench 2 R0200302 00 1 Sprocket Kit 7 R0202107 00 1 Sprocket Cover Assembly 3 R0200303 00 1 Oil Cap Assembly 8 R0202108 00 1 Auxiliary Handle Kit 4 R0202105 00 1 Chain Brake Handle 9 R0200888 00 1 Scabbard 5 R0202106 00 1 Tensioner Kit 17 English EN ...

Страница 18: ...sques 22 6 Élimination des batteries sans danger pour l environnement 23 7 Proposition 65 23 8 Installation 24 8 1 Déballer la machine 24 8 2 Ajouter le lubrifiant du guide chaîne et chaîne 24 8 3 Installer le bloc batterie 24 8 4 Retirer le bloc batterie 25 9 Utilisation 25 9 1 Examiner la lubrification de la chaîne 25 9 2 Tenir la machine 25 9 3 Démarrer la machine 25 9 4 Arrêter la machine 25 9...

Страница 19: ...ervez tous les avertissements et instructions pour référence ultérieure Le terme outil électrique dans les avertissements fait référence à votre outil électrique sans fil fonctionnant sur batterie 2 1 SÉCURITÉ DE LA ZONE DE TRAVAIL Gardez la zone de travail propre et bien éclairée Les endroits encombrés ou sombres favorisent les accidents N utilisez pas les outils électriques dans des environnemen...

Страница 20: ...ipes de sécurité Une action négligente peut provoquer de graves blessures en une fraction de seconde 2 4 UTILISATION ET ENTRETIEN DES OUTILS ÉLECTRIQUES Ne forcez pas l outil électrique Utilisez l outil l électrique adapté à votre application L outil électrique approprié fera mieux le travail et sera plus sécuritaire au rythme pour lequel il a été conçu N utilisez pas l outil électrique si l inter...

Страница 21: ...rateur risque d être électrocuté Portez des lunettes de protection Il est recommandé de porter des équipements de protection supplémentaires pour protéger lʼouïe la tête les mains les jambes et les pieds Des équipements de protection appropriés permettent de réduire les blessures corporelles pouvant se produire suite à la projection de débris ou à un contact accidentel avec la chaîne Ne faites jam...

Страница 22: ...vos bras de façon à résister aux forces de rebond L utilisateur peut contrôler les forces de rebond s il prend des précautions appropriées Ne lâchez pas la scie à chaîne Ne vous étirez pas pour étendre votre portée et ne coupez pas au dessus des épaules Cette mesure aide à prévenir le contact accidentel de l extrémité et offre une meilleure maîtrise de la scie à chaîne dans des situations inattend...

Страница 23: ...dhésif résistant NE PAS essayer d enlever ou de détruire les composants de la batterie NE PAS essayer d ouvrir ou de réparer la batterie En cas de fuite les électrolytes rejetés sont corrosifs et toxiques NE laissez PAS entrer la solution dans les yeux ou en contact avec la peau et ne l avalez pas NE PAS jeter vos batteries usagées dans votre poubelle à ordures ménagères N incinérez PAS les batter...

Страница 24: ...e chaîne REMARQUE La machine sort de l usine sans lubrifiant pour le guide chaîne et la chaîne 1 Desserrez et retirez le bouchon 6 du réservoir d huile 6 7 2 Versez de l huile dans le réservoir d huile 3 Surveillez l indicateur d huile 7 pour vous assurer qu il n y a pas de saleté dans le réservoir d huile pendant que vous ajoutez l huile 4 Placez le capuchon d huile 5 Serrez le capuchon d huile 6...

Страница 25: ... votre main gauche tient la poignée avant et que votre pouce est sous la poignée 9 3 DÉMARRER LA MACHINE 4 5 1 Appuyez sur le bouton de verrouillage 4 2 Appuyez sur la gâchette 5 pendant que vous maintenez le bouton de verrouillage de sécurité enfoncé 3 Relâchez sur le bouton de verrouillage IMPORTANT Le frein de la chaîne doit être désengagé pour que la scie à chaîne démarre Activez le frein en d...

Страница 26: ...uide chaîne lorsque vous faites la deuxième entaille 2 Effectuez la coupe d abattage 28 à au moins 2 po 50 mm ou à un niveau supérieur à la coupe d entaille Assurez vous que cette coupe a Est parallèle au niveau de la coupe d entaille b Conserve suffisamment de bois 2 po 50 mm ou 1 10 du diamètre de l arbre pour devenir une charnière 29 qui empêche l arbre de gauchir et de s abattre dans la mauvai...

Страница 27: ...oupe 35 38 39 Lorsque la bûche se trouve sur une pente 1 Mettez vous du côté élevé 2 Contrôlez complètement la scie à chaîne 3 Tenez fermement les poignées de la scie à chaîne 4 Relâchez la pression de coupure vers la fin de la coupe Lorsque la coupe est terminée 38 1 Attendez que la chaîne s arrête 39 2 Assurez vous que la scie à chaîne est éteinte 3 Avant de passer à un autre arbre vérifiez s il...

Страница 28: ...remière utilisation Vérifiez fréquemment la tension de la chaîne et ajustez la au besoin 10 2 RÉGLER LA TENSION DE LA CHAÎNE Plus vous utilisez une chaîne plus elle devient longue Il est donc important de régler régulièrement la chaîne pour la rendre plus souple Tendez la chaîne de manière à ce qu elle ne puisse être retirée du guide chaîne qu au niveau de son point central AVERTISSEMENT Une chaîn...

Страница 29: ...ur affûter les coins coupants 3 Affûtez la plaque supérieure la plaque latérale et la jauge de profondeur avec une lime plate 4 Limez tous les couteaux aux angles spécifiés et à la même longueur REMARQUE Pendant le processus Maintenez la lime à plat avec la surface à affûter Utilisez le point médian de la barre de fichier Utilisez une pression légère mais ferme pour affûter la surface Soulevez la ...

Страница 30: ... qui suit Retirez toute l huile résiduelle de la machine Retirez le bloc batterie de la machine Nettoyez la machine de toute matière indésirable Assurez vous que le lieu d entreposage n est pas accessible aux enfants est loin des agents qui peuvent causer de la corrosion tels que les produits chimiques de jardin et les sels de déglaçage 12 DÉPANNAGE Problème Cause possible Solution Le guide chaîne...

Страница 31: ... la batterie ne sont pas connectées correctement Assurez vous que le bouton de dé verrouillage de la pile s enclenche lorsque vous in stallez le bloc batterie La batterie est fai ble Rechargez le bloc batterie Le bouton de ver rouillage et la gâchette ne sont pas enfoncés en même temps 1 Appuyez sur le bouton de verrouillage et maintenez le enfoncé 2 Appuyez sur la gâchette pour démarrer la machin...

Страница 32: ...utilisation sans frais pour le client Cette garantie n est valable que pour les appareils qui ont été utilisés à des fins personnelles qui n ont pas été loués à des fins industrielles ou commerciales et qui ont été entretenus conformément aux instructions du manuel du propriétaire fourni avec le produit neuf ARTICLES NON COUVERTS PAR LA GARANTIE 1 Toute pièce qui est devenue inopérante en raison d...

Страница 33: ...haîne 6 RB333001890 1 Clé 2 R0200302 00 1 Ensemble pignon 7 R0202107 00 1 Ensemble du couvercle du pignon 3 R0200303 00 1 Ensemble du capuchon d huile 8 R0202108 00 1 Ensemble de la poignée auxiliaire 4 R0202105 00 1 Poignée de frein de la chaîne 9 R0200888 00 1 Fourreau 5 R0202106 00 1 Ensemble tendeur 33 Français FR ...

Страница 34: ...egura para el medio ambiente 39 7 Propuesta 65 39 8 Instalación 39 8 1 Desembalaje de la máquina 40 8 2 Adición del aceite para barras y cadenas 40 8 3 Instalación de la batería 40 8 4 Retirada de la batería 40 9 Funcionamiento 40 9 1 Examen del aceite de la cadena 41 9 2 Sujeción de la máquina 41 9 3 Puesta en marcha de la máquina 41 9 4 Detención de la máquina 41 9 5 Accionamiento del freno de l...

Страница 35: ...u consulta posterior El término herramienta eléctrica empleado en las advertencias se refiere a su herramienta eléctrica con funcionamiento a batería inalámbrica 2 1 SEGURIDAD DE LA ZONA DE TRABAJO Mantenga limpia y bien iluminada la zona de trabajo Las zonas desordenadas u oscuras fomentan los accidentes No utilice herramientas eléctricas en atmósferas explosivas como en la presencia de líquidos ...

Страница 36: ... ignorar los principios de seguridad de las herramientas Una acción descuidada puede provocar lesiones graves en una fracción de segundo 2 4 UTILIZACIÓN Y CUIDADO DE HERRAMIENTAS ELÉCTRICAS No fuerce la herramienta eléctrica Utilice la herramienta eléctrica correcta para su aplicación La herramienta eléctrica correcta hará el trabajo mejor y con mayor seguridad a la velocidad para la que se diseñó...

Страница 37: ...ersonales Esto no debe hacerse nunca Sujete la motosierra solo por las superficies de agarre aisladas ya que la cadena de la sierra puede entrar en contacto con cableado oculto o con su propio cable Si la cadena de la sierra entra en contacto con un cable con corriente esto puede hacer que las piezas metálicas expuestas de la motosierra tengan corriente y podrían producir una descarga eléctrica al...

Страница 38: ...rre firme con los pulgares y los dedos rodeando las asas de la motosierra con ambas manos en la sierra y el cuerpo y el brazo colocados para permitirle resistir las fuerzas de retroceso Las fuerzas de retroceso pueden ser controladas por el operario si se toman las precauciones adecuadas No suelte la motosierra No se estire y no corte por encima de la altura del hombro Esto ayuda a evitar el conta...

Страница 39: ...destruir ninguno de los componentes de la batería NO intente abrir la batería Si se produce una fuga los electrolitos liberados son corrosivos y tóxicos NO deje que la solución entre en contacto con los ojos o la piel y no la ingiera NO deseche estas baterías con la basura doméstica normal NO incinere NO lleve las baterías a lugares donde formarán parte de vertederos de residuos o flujos de residu...

Страница 40: ... Supervise el indicador de aceite 7 para asegurarse de que no haya suciedad en el depósito mientras añade el aceite 4 Ponga la tapa del aceite 5 Apriete la tapa del aceite 6 El depósito de aceite entero durará aproximadamente 20 40 minutos IMPORTANTE No utilice aceite sucio usado o contaminado Pueden producirse daños en la barra o la cadena 8 3 INSTALACIÓN DE LA BATERÍA 18 AVISO Si la batería o el...

Страница 41: ...oqueo 3 Suelte el botón de desbloqueo IMPORTANTE El freno de la cadena debe estar desacoplado para arrancar la motosierra Active el freno moviendo la protección de la mano delantera hacia delante 9 4 DETENCIÓN DE LA MÁQUINA 1 Suelte el gatillo para detener la máquina 9 5 ACCIONAMIENTO DEL FRENO DE LA CADENA AVISO Asegúrese de que sus manos estén en las asas en todo momento 1 Ponga en marcha la máq...

Страница 42: ...te madera 2 in 50 mm o 1 10 del diámetro del árbol para formar una bisagra 29 que evite que el árbol se tuerza y caiga en la dirección equivocada Cuando el corte de tala 28 se acerca a la bisagra 29 el árbol cae Detenga el corte de tala si el árbol No cae en la dirección correcta o Se mueve hacia atrás haciendo que la barra de corte y la cadena se atasquen en el corte 3 Utilice la cuña de tala par...

Страница 43: ...a motosierra esté apagada 3 Compruebe si hay riesgos antes de pasar a otro árbol 10 MANTENIMIENTO PRECAUCIÓN No permita que líquidos de frenos gasolina y otros derivados del petróleo toquen las piezas de plástico Las sustancias químicas pueden dañar el plástico y hacer que quede inservible PRECAUCIÓN No utilice disolventes o detergentes fuertes en la carcasa o los componentes de plástico AVISO Ret...

Страница 44: ...su punto central AVISO Una cadena floja puede saltar y producir lesiones graves o incluso fatales PRECAUCIÓN Lleve guantes de protección si toca la cadena la barra o las zonas alrededor de la cadena 1 Detenga la máquina 2 Afloje las contratuercas con la llave NOTA No es necesario retirar la cubierta de la cadena para ajustar la tensión de la cadena 3 Gire el tornillo de ajuste de la cadena en sent...

Страница 45: ... de retorno Afile los cortadores en un lado y posteriormente pase al otro lado Sustituya la cadena si La longitud de los filos de corte es inferior a 1 5 in 5 mm Hay demasiado espacio entre los eslabones de accionamiento y los remaches La velocidad de corte es lenta Se ha afilado la cadena muchas veces pero no aumenta la velocidad de corte La cadena está desgastada 10 4 MANTENIMIENTO DE LA BARRA D...

Страница 46: ...ie el or ificio de descarga La contaminación produce una ob strucción del de pósito de aceite Limpie el depósito de aceite Añada aceite nuevo La contaminación produce una ob strucción de la barra de guía y la tapa del depósito de aceite Limpie la barra de guía y la tapa del depósito de aceite La contaminación produce una ob strucción del pi ñón o de las rue das de guía Limpie el piñón y las ruedas...

Страница 47: ...ud de barra de guía 14 356 mm Paso de cadena 3 8 LP 9 5 mm Calibre de cadena 043 1 09 mm Eslabones de accionamiento 52 Capacidad de aceite para ca dena 180 ml Peso sin batería 8 15 lbs 3 7 kg Cadena 90PX052X CL14352 Barra de guía 144MLEA041 M1431452 1041TL Modelo de batería BAG709 y otras series BAG Modelo de cargador CAG817 y otras series CAG El intervalo de temperatura ambiente recomendado Eleme...

Страница 48: ...EA DE ASISTENCIA TELEFÓNICA Puede contactar con el servicio de garantía llamando a nuestra línea de asistencia telefónica gratuita a 1 888 909 6757 COSTES DE TRANSPORTE Los costes de transporte por el desplazamiento de cualquier unidad o accesorio de equipos eléctricos son responsabilidad del comprador Es responsabilidad del comprador pagar los costes de transporte de cualquier pieza enviada para ...

Страница 49: ...2094 00 1 Barra Cadena 6 RB333001890 1 Llave 2 R0200302 00 1 Kit de piñón 7 R0202107 00 1 Conjunto de cubierta de pi ñón 3 R0200303 00 1 Conjunto de tapa de aceite 8 R0202108 00 1 Kit de asa auxiliar 4 R0202105 00 1 Asa de freno de cadena 9 R0200888 00 1 Vaina 5 R0202106 00 1 Kit de tensor 49 Español ES ...

Страница 50: ......

Страница 51: ......

Страница 52: ......

Отзывы: