GreenSmart 864 HO NB Скачать руководство пользователя страница 16

16 Maintenance 

© Travis Industries 

4140221 

100-01300 

Maintaining Your Fireplace's Appearance  

Fingerprints or other marks left on the optional plated surface may become etched in place if they are not wiped clean 
prior to turning the fireplace on.  Clean the plated surface with denatured alcohol and a soft cloth (with the fireplace 
cool).  Other cleaners may leave a film that may become etched into the surface. 

Accent Light Replacement 

The accent lights in your fireplace provide additional lighting.  The bulbs will burn out over time.  To replace, follow 
the directions below: 


Shut off gas to the fireplace and let it cool for 15 minutes.  


Remove the glass (see page 19) and media.


Replace the halogen bulbs with the following bulbs: 
 (

NOTE

: .Take care to not touch the bulbs with your fingers – use foam packing or paper towel to hold the bulb):


35 Watt 120 Volt T4 Halogen Bulb (G6.35 Base)


Bulb Location 


Located behind the logs on the EmberFyre and DancingFyre Burners. 


Located below the media tray (firebox floor) on the DiamondFyre Burner. 


Remove the bulb from the socket as shown above. 

NOTE

: Take care to not touch the bulb with your fingers – use foam packing or paper towel to hold the bulb. 

Yearly Service Procedure 


Failure to inspect and maintain the fireplace may lead to improper combustion and a potentially dangerous 
situation.  We recommend the following procedures be done by a qualified technician.


1.  Turn the pilot flame to continuous.  It should touch approximately 3/8" of the top of the flame sensor.  If it does 

not, contact your dealer for service. 

2.  Shut off gas to the fireplace and let it cool for 15 minutes.  Remove the glass (see page 19). 

3.  Remove the media (

NOTE: the logs are very fragile

).  If severely deteriorated, replace.  Check the logs for 

sooting.  A small amount of soot along the bottom of the logs is normal.  If excessive sooting is found, the 
fireplace will require adjustment.  Contact your dealer. 

4.  Inspect the burner and remove any debris. 


Make sure the burner is not warped, cracked, or damaged.   


Check the firebox and area around the pilot to make sure there is no warping or damage. 


If any problem is found, discontinue use and contact your dealer for service. 

5.  Replace the media.  Clean and replace the glass (see 

Glass Cleaning

 on page 21).  If the glass is damaged, 

replace.  Make sure the gasket along the perimeter of the glass contacts the face of the firebox and forms an air-
tight seal.  If it does not, re-align or replace the gasket to insure an air-tight seal.   

6.  Inspect the area behind the access door.  Clean if necessary.  Check the gas 

control valve and the gas lines.  If damage is found, discontinue use and contact 
your dealer for service.  Clean the air channels, ducts, and blower (if applicable). 

7.  Start the main burner.  Inspect the main burner and pilot flame.  After 15 minutes 

the flames should be orange/yellow and not touch the top of the firebox.  If the 
pilot or main burners do not burn correctly, contact your dealer for service.  
Monitor blower operation.   

8.  Remove any debris or vegetation near the vent termination.  Contact your dealer 

if any sooting or deterioration is found near the vent termination.  Venting system 
should be examined by a qualified agency. 


Содержание 864 HO NB

Страница 1: ...any phone in your building Immediately call gas supplier from a neighbor s phone Follow the gas supplier s instructions If you cannot reach your gas supplier call the fire department Installation and...

Страница 2: ...ave all the information you need in one place should the need for service or information occur Installation Warnings Installation requirements are printed in the 864 HO GSR2 Installation Manual part 1...

Страница 3: ...ransmitter Battery Installation 14 Power Outages 14 Child Proof Feature 15 Normal Operating Sounds 15 Normal Operating Odors 15 Maintaining Your Fireplace s Appearance 16 Accent Light Replacement 16 B...

Страница 4: ...rect questions about the type of fuel used to your dealer Check for a label on the flame adjust knob on the gas control valve this is the best place to check You may also check for a label on the gas...

Страница 5: ...included in this manual If the main burners do not start correctly turn the gas off at the gas control valve and call your dealer for service Instruct everyone in the house how to shut gas off to the...

Страница 6: ...art in standing pilot mode If this occurs when the heater is in Remote Mode you will not be able to turn the heater off manually from the battery box If you need to replace dead batteries make sure to...

Страница 7: ...times 2 Press the ON button on the transmitter IFC will beep 3 times Figure 2 NOTE If power is cut off to the IFC for an extended period of time you may need to re synchronize the remote Clearing the...

Страница 8: ...e battery holder switch is turned to ON or OFF the mode settings Flame Height Comfort Control will remain in the same state as before the switch was moved i e the IFC remembers the last setting If you...

Страница 9: ...very cold conditions you may notice that the burner does not light quickly and the flames lift off the burner If this is situation we recommend you switch to continuous pilot This will create a slight...

Страница 10: ...Figure 5 Figure 5 Listen for the Beep Each time you press a button on the transmitter that controls the fireplace a beep will come from the IFC When you change thermostat target settings the IFC will...

Страница 11: ...8 STANDARD THERMOSTAT While in standard thermostat setting the transmitter will turn the burner on and off to achieve the target temperature see Figure 9 below To adjust the target temperature press...

Страница 12: ...splay will display the 7 settings from OFF to HI for full on Figure 12 MANUAL MODE BLOWER OPERATION When in Manual Mode the blower will remain on even if the burner is turned off and the heater cools...

Страница 13: ...ned on and off using the up and down buttons when in Comfort Control Mode see Figure 14 The center display will display either ON or OFF Figure 14 Display Fahrenheit or Celsius With the system in the...

Страница 14: ...In applications where the appliance is required to provide heat we recommend replacing the batteries before each heating season Battery Replacement Battery Installation Install four AA batteries into...

Страница 15: ...ore acute if the appliance was left idle for a long period MAX F OFF Child Proof Indicator Blowers The optional blowers push heated air into the room You will hear the sound of air movement increase a...

Страница 16: ...flame sensor If it does not contact your dealer for service 2 Shut off gas to the fireplace and let it cool for 15 minutes Remove the glass see page 19 3 Remove the media NOTE the logs are very fragi...

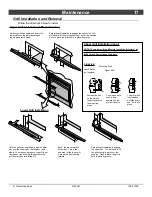
Страница 17: ...the bushing this prevents the grill from accidentally falling off Bend the tab outward on both sides This is the end stop for the lower grill it allows the grill to swing forward Swing the grill upwar...

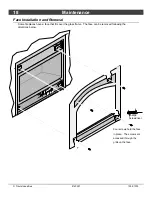
Страница 18: ...ce Installation and Removal Some fireplaces have a face that fits over the glass frame The face can be removed following the directions below Phillips Screwdriver Four screws hold the face in place Th...

Страница 19: ...olding the glass frame in place start with the bottom three follow the directions shown to the right a Lift the glass frame up and pull it forward to remove b Re Attaching the Glass Frame a Hang the g...

Страница 20: ...llow the directions below to re install the latch if it comes loose Top of Firebox Hold the latch at an angle and insert it into the slot on the glass frame anchor NOTE this slot may be at a different...

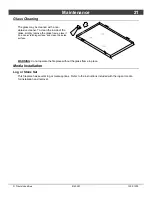
Страница 21: ...e glass simply remove the glass frame place it on a non scratching surface and clean the inside surface WARNING do not operate the fireplace without the glass frame in place Media Installation Log or...

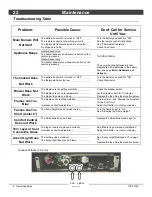
Страница 22: ...ON Check thermostat Blower Does Not Work The fireplace is not getting electricity The fireplace is not up to temperature The blower fuse may be blown Check the breaker switch Let the fireplace burn f...

Страница 23: ...d be done by a licensed or qualified service person Contact your local Travis Industries Dealer for a Replacement Parts List Orange Yellow System Jumper Purple Grey Pilot Sensor Spark Rod Comfort Cont...

Страница 24: ...ents lack of proper and regular maintenance damage incurred while the appliance is in transit alteration or act of God 8 This 7 Year warranty excludes damage caused by normal wear and tear such as pai...

Страница 25: ...Limited 7 Year Warranty 25 Travis Industries 4140221 100 01300...

Страница 26: ...19 Grill Installation and Removal 17 Installation Warnings 2 Intermittent Continuous Pilot 9 Location of Controls 8 Low Battery Indicator 14 Maintaining Your Fireplace s Appearance 16 Media Installati...

Отзывы: