Greenhouse Style Pride of the Pacific PLT612SG Скачать руководство пользователя страница 28

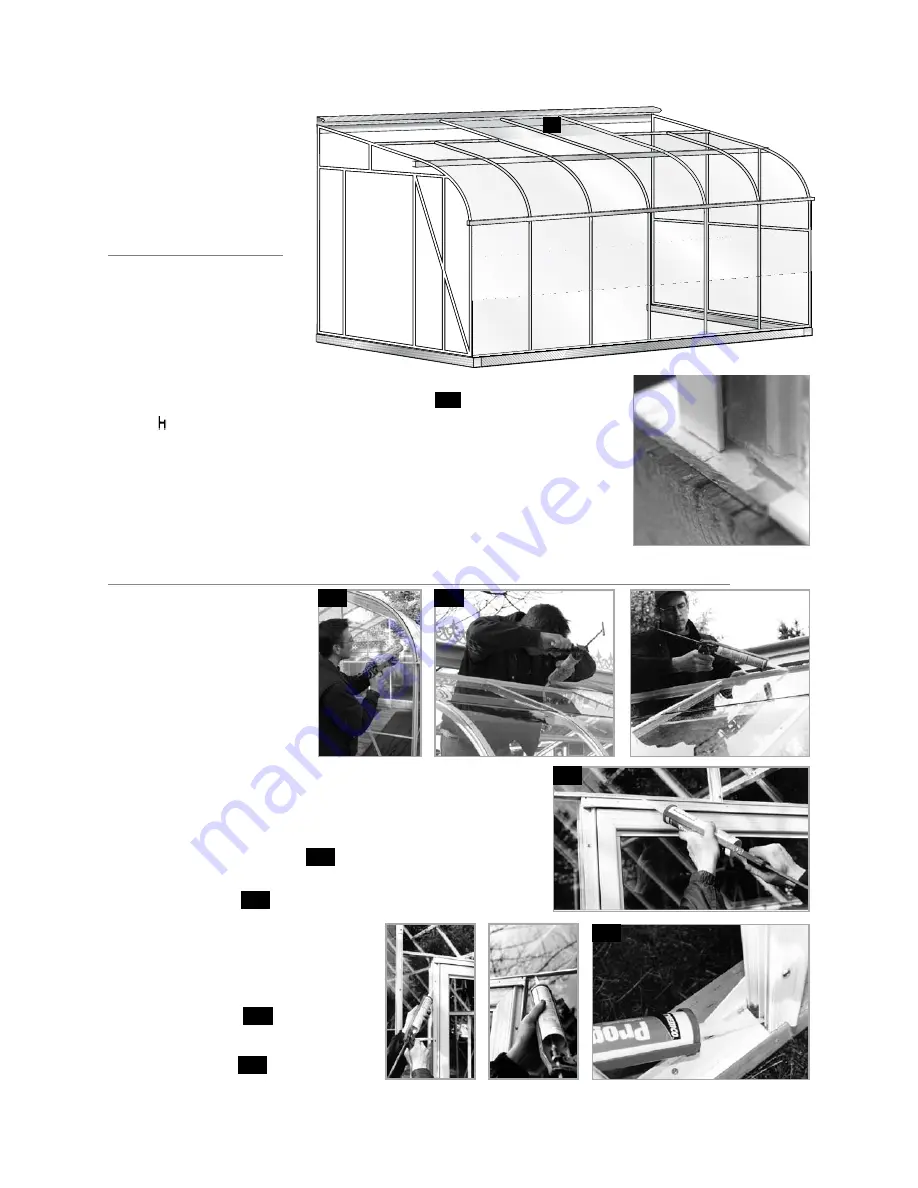
15 .  SeALInG The GreenhouSe 

(after all the glass is installed)


 Caulking is used for 
sealing aluminum to 
the wood/concrete 
base and against the 
wall 

(see picture on 

page 12)

 .  

For most people, 
silicone is easier to 
use for sealing glass 
to aluminum . The areas that need to be sealed with 
silicone include:


• on the front and the 


  back of the endbars * 


• around the 


  ventframe 


• Below the gutter


• along the ridge where the 


  glass slides under the flange 


• around the 


  doorframe  


• doorframe beside the 


  base / sill  

15

14

13

12

e . 

 Install the last row 
of glass . The top 
edge of the glass 
slips under the 
ridge flange .

14 .  enDS


BACK:


 The first row of 
glass is the same 
height as the side 
glass . The corner 
glass slides behind 
the end bar flange . (no cap is required .) 

11

 Put on the plastic  

“ ” and install the next rows . 

(See the glass sketch.)


FronT:


 Glazing is exactly the same for the front as it is for the back except 
that the front has the door . The glass beside the door fits into the 
first slot in the doorframe . 

(See the glass sketch.)

p r i d e   o f   t h e   p a c i f i c   S e r i e S   c U r V e d   G L a S S   L e a N   t o   M o d e L   •   G r e e N h o U S e   i N S t r U c t i o N S

12

13

E

– 26 –

NOTE:


Do not 

seal the glass to 

the base as the 

water needs to 

drain out.

14

15

Содержание Pride of the Pacific PLT612SG

Страница 1: ...w bcgreenhouses com Email inquiries bcgreenhouses com Pride of the Pacific Series Curved Glass Lean To Model PLT612SG GreenhouSe InSTruCTIonS B C G T H E G A R D E N E R S C H O I C E S I N C E 1 9 5...

Страница 2: ...Vents Intake Shutter and Exhaust Fan Installation if necessary See Appendix B E Glass And Cap Installation General Information 22 12 Glazing 22 13A E Side Walls 22 26 14 Ends 26 15 Sealing The Greenh...

Страница 3: ...video and follow the steps in this manual for your greenhouse installation Remember if all else fails read the instructions User Notes The Pride of the Pacific greenhouse structure has been designed t...

Страница 4: ...1 10 15 21 Glass Installation Steps 12 14 22 26 Door Installation 28 Vent Assembly Exploded View 30 Greenhouse Architectural Details 31 32 Truss Installation Appendix A Vent Opener Appendix B Exhaust...

Страница 5: ...ionals Automatic Opener Circulating Fan Max Min thermometer Benches Eyebolts Motorized Intake Shutter Exhaust Fan Thermostat Heater 4 p r i d e o f t h e p a c i f i c S ERIE S C U R V ED G L A S S L...

Страница 6: ...location A Square and Level Foundation Check the width and length of the foundation s outside dimensions Then square the foundation by measuring diagonally from opposite corners in the form of an X N...

Страница 7: ...ing steel weather flashing a rubber or foam weather membrane or a row of weather resistant non treated wood such as cedar or hemlock 2 Other weather resistant non treated woods are popular alternative...

Страница 8: ...ottom of the Glass Bars See Detail 2 Page 8 4 The angle brace is bolted approximately 56 from the base The slider brackets that have already been fastened to the poly end bar curve will determine the...

Страница 9: ...p r i d e o f t h e p a c i f i c S ERIE S C U R V ED G L A S S L EA N TO M ODE L G r e e n h o us e Ins t r u c t i o ns Back Gable End Detail Drawing Details 1 4 3 1 1A 4 2 8...

Страница 10: ...be sure to square up the sill to the door frame 3 Take all the Glass Bars and bolt them to the base sill The angle cut should match the roof slope See Detail 8 4 The 1 x 2 angle above the door 49 3 4...

Страница 11: ...G L A S S L EA N TO M ODE L G r e e n h o us e Ins t r u c t i o ns Front Gable End with door Line Drawing Assembly Procedure 1 2 3 4 5 6 7 Curved Glass End Bar Diagonal Angle Brace Door Frame Sides P...

Страница 12: ...C U R V ED G L A S S L EA N TO M ODE L G r e e n h o us e Ins t r u c t i o ns Front Gable End with door Detail Drawings Details 5 10 Curved Glass End Bar Curved Glass End Bar 9 10 5 6 7 8 Diagnol Br...

Страница 13: ...p r i d e o f t h e p a c i f i c S ERIE S C U R V ED G L A S S L EA N TO M ODE L G r e e n h o us e Ins t r u c t i o ns Door Frame Assembly...

Страница 14: ...the outer edge and press it down at the same time See pictures below Be careful because sometimes the edge of the paper is quite sharp Do not remove the paper until later Note Do not tape the place wh...

Страница 15: ...ail page 15 3 BACK GABLE END Follow the same procedure for the back gable end as you did for the front When you have bolted it to the side base and it lines up flush with your base sill or marked line...

Страница 16: ...e located about the center between the ridge and the top of the curve Always face the open end of the purlin up towards the ridge so that it can be used for hanging baskets Every Glass Bar has notches...

Страница 17: ...f t h e p a c i f i c S ERIE S C U R V ED G L A S S L EA N TO M ODE L G r e e n h o us e Ins t r u c t i o ns Step 1 Side Sill Base Assembly Outline Step 2 Front Gable End Step 3 Back Gable End Front...

Страница 18: ...p r i d e o f t h e p a c i f i c S ERIE S C U R V ED G L A S S L EA N TO M ODE L G r e e n h o us e Ins t r u c t i o ns Step 4 Ridge 16 4 4 1 1...

Страница 19: ...Step 5 Glass Bar with Vent Frame Sliders p r i d e o f t h e p a c i f i c S ERIE S C U R V ED G L A S S L EA N TO M ODE L G r e e n h o us e Ins t r u c t i o ns 17 3 2 2 3...

Страница 20: ...18 p r i d e o f t h e p a c i f i c S ERIE S C U R V ED G L A S S L EA N TO M ODE L G r e e n h o us e Ins t r u c t i o ns Step 6 Vent Frame Bottom Inside View...

Страница 21: ...19 p r i d e o f t h e p a c i f i c S ERIE S C U R V ED G L A S S L EA N TO M ODE L G r e e n h o us e Ins t r u c t i o ns Step 7 Install All Remaining Glass Bars 2 2...

Страница 22: ...20 p r i d e o f t h e p a c i f i c S ERIE S C U R V ED G L A S S L EA N TO M ODE L G r e e n h o us e Ins t r u c t i o ns Step 8 Gutter...

Страница 23: ...p r i d e o f t h e p a c i f i c S ERIE S C U R V ED G L A S S L EA N TO M ODE L G r e e n h o us e Ins t r u c t i o ns Step 9 Roof Purlin 21...

Страница 24: ...lass bar and push it gently toward the greenhouse see page 23 2 If the greenhouse is not square push the gutter over to square it If it is a warm day the foam will stick to the glass and you can walk...

Страница 25: ...t up with the top hole of the first row of caps Again do not tighten the screw too tightly For a standard greenhouse this row will finish off the sidewall below the gutter Sealing off the glass agains...

Страница 26: ...ave as much bending tolerance as flat glass When you fasten on the curved aluminum cap do not screw it too tightly You do not want to put too much pressure on the glass When an aluminum glass bar is b...

Страница 27: ...a slight bend in one end 10 This bend makes it easier to fasten it to the curved shape of the previous cap Again the bottom hole of the aluminum cap should line up with the top hole of the curved cap...

Страница 28: ...stall the last row of glass The top edge of the glass slips under the ridge flange 14 ENDS BACK The first row of glass is the same height as the side glass The corner glass slides behind the end bar f...

Страница 29: ...nd move the frame to make it square When it is in place tighten all the bolts Next install the door handle see the instructions inside the box To install the door catch angle slide in two bolts into t...

Страница 30: ...se Base Base Door Vertical Jamb Plate Base INSIDE GREENHOUSE OUTSIDE GREENHOUSE Z Bar Z Bar Z Bar 10 x 1 2 Screws Door p r i d e o f t h e p a c i f i c S ERIE S C U R V ED G L A S S L EA N TO M ODE L...

Страница 31: ...nd center bar Make sure that the Glass Bars fit tightly into the gutter and hinge after the vent is assembled 5 Turn it over and square it up 6 Put the 1 8 foam on the Glass Bars 7 Take the glass and...

Страница 32: ...e 10 stainless steel screws to fasten the Bayliss and the vent sill 1 and the vent 2 All holes are already drilled After the Bayliss is fastened in place install the threaded adjuster into the swivel...

Страница 33: ...E S C U R V ED G L A S S L EA N TO M ODE L G r e e n h o us e Ins t r u c t i o ns 31 p r i d e o f t h e p a c i f i c S ERIE S C U R V ED G L A S S L EA N TO M ODE L G r e e n h o us e Ins t r u c t...

Страница 34: ...32 p r i d e o f t h e p a c i f i c S ERIE S C U R V ED G L A S S L EA N TO M ODE L G r e e n h o us e Ins t r u c t i o ns Vent Assembly Exploded View...

Страница 35: ...p r i d e o f t h e p a c i f i c S ERIE S C U R V ED G L A S S L EA N TO M ODE L G r e e n h o us e Ins t r u c t i o ns 33 Appendix A Curved Lean To Truss...

Страница 36: ...ar 1 4 x 1 2 S S Bolt Inside Inside Louvre Motor Louvre Motor Louvre Motor Rip Flush Vertical Glazing Poly Bar 241 2 Vertical Glazing Poly Bar Electric Power 26 2 x 1 x 1 8 Aluminum Angle 25 5 8 Slide...

Страница 37: ...ical bars beside fan bottom Temporarily tighten Insert fan in square cutout of acrylic piece Slide bolts into slots on angle and tighten Seal around shutter on outside Appendix C Exhaust Fans 1 4 x 1...

Страница 38: ...dix D Side Vent Glass SIDE VENT ASSEMBLY 1 Slide slider on inside foam track of glass bar where side vent is going to be located 2 Install glass below side vent 3 Bolt on angle in place making sure sl...

Страница 39: ...37 p r i d e o f t h e p a c i f i c S ERIE S C U R V ED G L A S S L EA N TO M ODE L G r e e n h o us e Ins t r u c t i o ns Appendix D Side Vent CONTINUED...

Страница 40: ...38 p r i d e o f t h e p a c i f i c S ERIE S C U R V ED G L A S S L EA N TO M ODE L G r e e n h o us e Ins t r u c t i o ns Appendix E Glass Louvre Glass or POLYCARBONATE Glass Louvre ASSEMBLY...

Страница 41: ...Heavy perlin at least 1 4 thick requires 1 4 x 3 4 bolts Smaller greenhouses use a light channel bolts used are the same as the greenhouse bolts 1 4 x 1 2 Installation of a perlin is a simple matter o...

Страница 42: ...Appendix G Greenhouse Bench 40 p r i d e o f t h e p a c i f i c S ERIE S C U R V ED G L A S S L EA N TO M ODE L G r e e n h o us e Ins t r u c t i o ns...

Страница 43: ...Appendix H Roof Vent Screen 41 p r i d e o f t h e p a c i f i c S ERIE S C U R V ED G L A S S L EA N TO M ODE L G r e e n h o us e Ins t r u c t i o ns...

Страница 44: ...Appendix I Side Vent Screen 42 p r i d e o f t h e p a c i f i c S ERIE S C U R V ED G L A S S L EA N TO M ODE L G r e e n h o us e Ins t r u c t i o ns...

Страница 45: ...re Shelving Plastic Cup Wire Shelving Front View Plastic Clip Vertical Glazing Bar Vertical Glazing Bar Vertical Glazing Bar Shelving Bracket Plastic Clip Shelving Bracket Front View 43 p r i d e o f...

Страница 46: ...Miscellaneous Assembly Details 1 44 p r i d e o f t h e p a c i f i c S ERIE S C U R V ED G L A S S L EA N TO M ODE L G r e e n h o us e Ins t r u c t i o ns VENT FRAME 3D VIEW...

Страница 47: ...Miscellaneous Assembly Details 2 45 p r i d e o f t h e p a c i f i c S ERIE S C U R V ED G L A S S L EA N TO M ODE L G r e e n h o us e Ins t r u c t i o ns...

Страница 48: ...Miscellaneous Assembly Details 3 46 p r i d e o f t h e p a c i f i c S ERIE S C U R V ED G L A S S L EA N TO M ODE L G r e e n h o us e Ins t r u c t i o ns...

Страница 49: ...ger Curved Glass Glazing Caps 1 1 2 x 1 Gutter Channel Screwed to Glass Bar in Provided Recess Flat Side Glass Glazing Caps Foam Strip 3 x 1 Rafer Channel as Required 3 x 1 Purlin Channel Flat Roof Gl...

Страница 50: ...IE S C U R V ED G L A S S L EA N TO M ODE L G r e e n h o us e Ins t r u c t i o ns At this point stand back and enjoy your workmanship Your Pride of the Pacific Lean To Greenhouse should now be close...

Отзывы: