background image

98

Installation and Maintenance

Service Manual

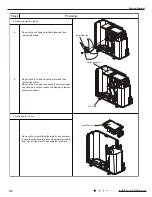
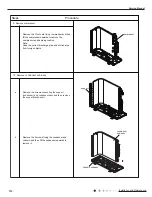
Procedure

Step

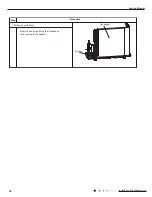
Screw

Condenser

Remove one screw fixing the condenser, 
then remove the condenser.

15.Remove condenser

Содержание GWH18AAD-K6DNA1A/I

Страница 1: ...Service Manual Change for life GREE ELECTRIC APPLIANCES INC OF ZHUHAI ...

Страница 2: ...CB Printed Diagram 20 6 Function and Control 23 6 1 Remote Controller Introduction 23 6 2 GREE App Operation Manual 27 6 3 Ewpe Smart App Operation Manual 28 6 4 Brief Description of Modes and Functions 29 Part Ⅱ Installation and Maintenance 38 7 Notes for Installation and Maintenance 38 8 Installation 42 8 1 Installation Dimension Diagram 42 8 2 Installation Parts checking 44 8 3 Selection of Ins...

Страница 3: ... List 70 10 1 Indoor Unit 70 10 2 Outdoor Unit 80 11 Removal Procedure 88 11 1 Removal Procedure of Indoor Unit 88 11 2 Removal Procedure of Outdoor Unit 93 Appendix 113 Appendix 1 Reference Sheet of Celsius and Fahrenheit 113 Appendix 2 Configuration of Connection Pipe 113 Appendix 3 Pipe Expanding Method 114 Appendix 4 List of Resistance for Temperature Sensor 115 Table of Contents ...

Страница 4: ...18AAD K6DNA1A I GWH24AAD K6DNA1A I Part Ⅰ Technical Information Outdoor Unit GWH18AAD K6DNA1A O GWH18AAD K6DNA1B O GWH24AAD K6DNA5A I GWH18AAD K6DNA5A I GWH18AAD K6DNA5B I GWH18AAD K6DNA4A I GWH18AAD K6DNA4B I GWH24AAE K6DNA4C I GWH24AAD K6DNA4A I GWH18AAD K6DNA2A I GWH24AAD K6DNA2A I ...

Страница 5: ... GWH24AAD K6DNA1A I CB476N00100 7 GWH24AAD K6DNA1A CB476000101 GWH24AAD K6DNA1A I CB476N00101 8 GWH24AAD K6DNA5A CB488000500 GWH24AAD K6DNA5A I CB488N00500 9 GWH24AAD K6DNA4A CB479000900 GWH24AAD K6DNA4A I CB479N00900 10 GWH24AAD K6DNA4A CB479000901 GWH24AAD K6DNA4A I CB479N00901 11 GWH24AAD K6DNA5A CB488000501 GWH24AAD K6DNA5A I CB488N00501 12 GWH24AAD K6DNA2A CB477001400 GWH24AAD K6DNA2A I CB477...

Страница 6: ...ndoor Unit Model of Indoor Unit 1 GWH18AAD K6DNA1A I 2 GWH18AAD K6DNA5A I 3 GWH18AAD K6DNA4A I 4 GWH18AAD K6DNA2A I Product Code of Indoor Unit 1 CB476N00200 CB476N00201 2 CB488N00700 3 CB479N00600 4 CB477N01300 Fan Type Cross flow Diameter Length DXL mm Φ106X706 Fan Motor Cooling Speed SH H M L SL r min 1230 1130 1030 800 Fan Motor Heating Speed SH H M L SL r min 1350 1200 1050 900 Output of Fan ...

Страница 7: ...l Length LXDXW mm 742X38 1X550 Fan Motor Speed rpm 780 Output of Fan Motor W 40 Fan Motor RLA A 0 62 Fan Motor Capacitor μF Air Flow Volume of Outdoor Unit m3 h 2400 Fan Type Axial flow Fan Diameter mm Φ445 Defrosting Method Climate Type T1 Isolation I Moisture Protection IPX4 Permissible Excessive Operating Pressure for the Discharge Side MPa 4 3 Permissible Excessive Operating Pressure for the S...

Страница 8: ...ndoor Unit 1 GWH24AAD K6DNA1A I 2 GWH24AAD K6DNA5A I 3 GWH24AAD K6DNA4A I 4 GWH24AAD K6DNA5A I 5 GWH24AAD K6DNA2A I Product Code of Indoor Unit 1 CB476N00100 CB476N00101 2 CB488N00500 3 CB479N00900 CB479N00901 4 CB488N00501 5 CB477N01400 Fan Type Cross flow Diameter Length DXL mm Φ106X706 Fan Motor Cooling Speed SH H M L SL r min 1230 1130 1030 800 Fan Motor Heating Speed SH H M L SL r min 1350 12...

Страница 9: ...ngth LXDXW mm 935X38 1X660 Fan Motor Speed rpm 780 Output of Fan Motor W 60 Fan Motor RLA A 0 49 Fan Motor Capacitor μF Air Flow Volume of Outdoor Unit m3 h 3200 Fan Type Axial flow Fan Diameter mm Φ520 Defrosting Method Climate Type T1 Isolation I Moisture Protection IPX4 Permissible Excessive Operating Pressure for the Discharge Side MPa 4 3 Permissible Excessive Operating Pressure for the Sucti...

Страница 10: ... Indoor Unit 1 GWH18AAD K6DNA1B I 2 GWH18AAD K6DNA5B I 3 GWH18AAD K6DNA4B I Product Code of Indoor Unit 1 CB476N00600 2 CB488N00600 CB488N00601 3 CB479N01300 CB479N01301 Fan Type Cross flow Diameter Length DXL mm Ф106X706 Fan Motor Cooling Speed SH H M L SL r min 1230 1130 1030 800 Fan Motor Heating Speed SH H M L SL r min 1350 1200 1050 900 Output of Fan Motor W Fan Motor RLA A 0 35 Fan Motor Cap...

Страница 11: ...otor Speed rpm 900 Output of Fan Motor W 30 Fan Motor RLA A 0 4 Fan Motor Capacitor μF Air Flow Volume of Outdoor Unit m3 h 2200 Fan Type Axial flow Fan Diameter mm Φ438 Defrosting Method Automatic Defrosting Climate Type T1 Isolation I Moisture Protection IPX4 Permissible Excessive Operating Pressure for the Discharge Side MPa 4 3 Permissible Excessive Operating Pressure for the Suction Side MPa ...

Страница 12: ...or Unit Indoor Unit Model GWH24AAE K6DNA4C I Indoor Unit Product Code CB479N00700 Fan Type Cross flow Fan Diameter Length DXL mm Φ108X830 Cooling Speed SH H M L SL r min 1250 1000 900 800 Heating Speed SH H M L SL r min 1250 1000 900 850 Fan Motor Power Output W 35 Fan Motor RLA A 0 35 Fan Motor Capacitor μF 3 Evaporator Form Aluminum Fin copper Tube Evaporator Pipe Diameter mm Ф7 Evaporator Row f...

Страница 13: ... W 60 Fan Motor RLA A 0 58 Fan Motor Capacitor μF Outdoor Unit Air Flow Volume m3 h 3200 Fan Type Axial flow Fan Diameter mm Ф520 Defrosting Method Automatic Defrosting Climate Type T1 Isolation I Moisture Protection IPX4 Permissible Excessive Operating Pressure for the Discharge Side MPa 4 3 Permissible Excessive Operating Pressure for the Suction Side MPa 2 5 Sound Pressure Level H M L dB A 58 S...

Страница 14: ...tion T1 Inlet and outlet pipe temperature of evaporator T2 Inlet and outlet pipe temperature of condenser P Pressure at the side of big valve Connection pipe length 5m Cooling Heating 32 33 34 35 36 37 38 39 43 15 10 5 40 41 42 100 105 95 90 85 80 75 70 65 60 55 50 110 100 90 80 70 60 50 40 0 5 7 10 Conditions Indoor DB27 C WB19 C Indoor air flow Super High Pipe length 5m Conditions Indoor DB20 C ...

Страница 15: ...oise Curve Indoor side noise 60 50 40 30 20 10 0 Indoor Fan Motor Rotating Speed Noice dB A low Middle High Super High Outdoor side noise Compressor frequency Hz Noise dB A 70 60 50 40 30 0 20 40 60 80 100 20 24K GWH18AAD K6DNA1B GWH18AAD K6DNA1A ...

Страница 16: ... Information Service Manual 104 685 181 140 190 38 Φ55 Φ55 38 79 154 43 206 685 187 Φ70 Φ70 43 24AAE 18 24AAD 3 Outline Dimension Diagram 3 1 Indoor Unit Unit mm Model W H D 18 24AAD 970 300 225 24AAE 1078 325 246 ...

Страница 17: ...14 Technical Information Service Manual 3 2 Outdoor Unit 899 818 596 378 303 343 550 Unit mm Unit mm 897 560 955 340 396 364 700 GWH18AAD K6DNA1A O 24K ...

Страница 18: ...15 Technical Information Service Manual GWH18AAD K6DNA1B O GWH24QE K6DNA1C O 257 780 596 848 286 540 320 257 340 963 700 396 890 560 364 Unit mm Unit mm ...

Страница 19: ...tor Heat exchanger condenser Valve Valve Liquid pipe side Gas pipe side Strainer Electric expand valve Strainer Compressor Accumlator Indoor unit Outdoor unit COOLING HEATING 4 Way valve Discharge Suction Heat exchanger evaporator Heat exchanger condenser Valve Valve Liquid pipe side Gas pipe side Strainer Capillary Strainer Accumlator Compressor GWH18AAD K6DNA1A GWH18AAD K6DNA5A GWH18AAD K6DNA4A ...

Страница 20: ...eed and the swing angle of horizontal lover for this model 60000700068802 7 6 1625 7 03 6 1625 7 03 6 1625 57 5220 78 67 33 1 63 35 17 5 8 7 2 5 5 9 5 1 63 2 5 211 7 1 6 1 8 02725 2 7 50 1 3 803 3 8 1 9 325 725 3 7 1 0 287 225 81 7 3 3 1 5 725 2 3 60 1 02725 0 5 8 7 1 7 3 63 63 1 1 57 1 20 287 8 1 02 8 3 0 1 7 5 1 All models is except GWH24AAE K6DNA4C I GWH18AAD K6DNA1A I CB476N00201 GWH24AAD K6DN...

Страница 21: ... 21752 5 20 0 18 7 6 1625 7 03 6 1625 7 03 6 1625 57 5220 78 67 33 1 63 35 17 5 8 7 2 5 5 9 5 1 63 2 5 211 7 1 6 1 8 02725 2 7 50 1 3 803 3 8 1 9 325 725 3 7 1 0 287 225 81 7 3 3 1 5 725 2 3 60 1 02725 0 5 8 7 1 7 3 63 63 1 1 57 1 20 287 8 1 02 8 3 3 3 5 225 237 21 5 217 7 0 1 7 5 1 GWH24AAE K6DNA4C I GWH18AAD K6DNA1A I CB476N00201 GWH24AAD K6DNA1A I CB476N00101 GWH18AAD K6DNA5B I GWH24AAD K6DNA5A...

Страница 22: ...LHV WR WKH 1RWH 0RWRU JURXQG These wiring diagrams are subject to change without notice please refer to the one supplied with the unit GWH18AAD K6DNA1A O GWH24AAD K6DNA1A O GWH24QE K6DNA1C O GWH18AAD K6DNA1B O 600007000884 1 225 81 7 127 0RWRU DSSOLHV WR WKH LURQ VKHOO PRWRU JURXQG RQO RI HOHFWULF VKRFN 3OHDVH GRQ W WRXFK DQ WHUPLQDO ZKHQ WKH PDFKLQH LV UXQQLQJ VWRSSLQJ RU KDV EHHQ SRZHUHG RII IRU...

Страница 23: ...e 5 Interface of fan 6 Interface of health function live wire 7 Jumper cap 8 Auto button 9 Up down swing interface 10 Feedback interface of indoor unit 11 Fuse 12 Interface of wifi 13 Needle stand for temperature sensor 14 Display interface 15 Interface of dry contact only for the model with this function 16 Wired controller only for the mode with this function Indoor Unit Top view Bottom view 1 2...

Страница 24: ...e input interface Terminal of system high pressure protection Compressor overload protection terminal Terminal of electronic expansion valve Terminal for low pressure protection Interface of fan 4 way valve terminal 2 way valve terminal Terminal of compressor electric heater Terminal of chassis electric heater Live wire 13 Communication wire 14 Grounding wire 15 Neutral wire GWH18AAD K6DNA1A O 24K...

Страница 25: ...om view No Name 1 Compressor 2 Reactor 2 3 Reactor 1 4 Chassis electric heating 5 Compressor electric heating 6 4 way valve 7 DC fan 8 Earthing wire 9 Communication wire 10 Neutral wire 11 Live wire 12 Electronic expansion valve 13 Temperature sensor 14 Overloard 15 DRED GWH18AAD K6DNA1B O ...

Страница 26: ...air conditioner will give out a de sound which means the signal has been sent to the air conditioner Under off status set temperature and clock icon will be displayed on the display of remote controller If timer on timer off and light functions are set the corresponding icons will be displayed on the display of remote controller at the same time Under on status the display will show the correspond...

Страница 27: ... directly Having set X FAN function off After turning off the unit by pressing ON OFFbutton the complete unit will be off directly X FAN function Hold fan speed button for 2s in COOL or DRY mode the icon is displayed and the indoor fan will continue operation for a few minutes in order to dry the indoor unit even though you have turned off the unit After energization X FAN OFF is defaulted X FAN i...

Страница 28: ...t will automatically adjust the indoor temperature according to the detected temperature Press this button again to close I FEEL function and will disappear When I FEEL function is turned on the remote controller should be put within the area where indoor unit can receive the signal sent by the remote controller will change quickly if holding or button Press this button again to confirm timer sett...

Страница 29: ... some models Replacement of batteries in remote controller Emergency operation If remote controller is lost or damaged please use auxiliary button to turn on or turn off the air conditioner When the air conditioner is turned on it will operate under auto mode aux button panel WARNING Use insulated object to press the auto button As shown in the fig Open panel press aux button to turn on or turn of...

Страница 30: ...ll it When GREE App is installed register the account and add the device to achieve long distance control and LAN control of Gree smart home appliances For more information please refer to Help in App Internet Cellular Other Wi FI Home Wi Fi Home wireless router Home Wi Fi Gree Gree Cloud GREE APP intelligent home appliances iOS system Support iOS7 0 and above version Android system Support Androi...

Страница 31: ... App is installed register the account and add the device to achieve long distance control and LAN control of smart home appliances For more information please refer to Help in App 6 3 Ewpe Smart App Operation Manual iOS system Support iOS7 0 and above version Android system Support Android 4 4 and above version App Download Linkage Internet Cellular Other Wi FI Home Wi Fi Home wireless router Hom...

Страница 32: ...et value under each condition Ambient temperature is Tamb Tcompensation for heat pump unit and Tamb for cooling only unit 4 If theres I feel function Tcompensation is 0 Others are same as above 5 Fan mode Under this mode indoor fan operates at set fan speed Compressor outdoor fan 4 way valve and electric heating tube stop operation Indoor fan can select to operate at high medium low or auto fan sp...

Страница 33: ...e still in standby mode after finishing refrigerant recycling if the unit is in ON status before refrigerant recycling it will still run in original operation mode 11 Ambient temperature display control mode 1 When user set the remote controller to display set temperature corresponding remote control code 01 current set temperature will be displayed 2 Only when remote control signal is switched to...

Страница 34: ...on 1 If the compressor is shut down and Tset up Tindoor ambient temperature Tcooling indoor ambient temperature compensation 0 5ºC start up the machine for cooling the cooling operation will start 2 During operations of cooling if 0ºC Tset up Tindoor ambient temperature Tcooling indoor ambient temperature compensation 2ºC the cooling operation will be still running 3 During operations of cooling i...

Страница 35: ...ched on 2 Defrosting a Defrosting starts the compressor is shut down and restarts it after 55 second delay b Defrosting ends the compressor stops then starts it after 55 second delay 2 Outer Fans Control Notes Only the outer fans run for at least 80s in each air flow speed can the air flow be switched After the outer fans run compulsively in high speed for 80s when the machine starts up control th...

Страница 36: ... it should not be started and should be stopped to treat according to the overload protection Clear the trouble at the mode of power turn off heating and the protection times are not counted 2 Frequency limited If TCooling overload frequency limited temperature Touter pipe TCooling overload frequency reducing temperature at normal speed you should limit the frequency raising of compressor 3 Reduci...

Страница 37: ...erature at normal speed during discharging you should limit the frequency raising of compressor 3 Reducing frequency at normal speed and stopping machine If Tfrequency reducing temperature at normal speed during discharging TDischarge Tfrequency reducing temperature at high speed during discharging you should adjust the compressor frequency by reducing 8Hz 90s till the lower limit After it was run...

Страница 38: ...the compressor frequency by reducing 30Hz 90s till the lower limit After it was running 90s at the lower limit if T frequency reducing temperature at normal speed of module TModule you should stop the machine for module overheating protection 5 Power turn off If the TPower turn off temperature of module TModule you should stop the machine for module overheating protection If TModule TLimited frequ...

Страница 39: ...d be regarded as four way valve reversion abnormity And then it can run if stop the reversion abnormity protection for four way valve 3 min and if it still cant run when the reversion abnormity protection for four way valve happens to stop working for 3 times in succession it is available if presses ON OFF Attention the protection shall be shielded during the testing mode and defrosting process an...

Страница 40: ... stop operation 3 When 0ºC Toutdoor amb 2ºC the electric heating of chassis will keep original status 7 Electric Heating Function of Compressor 1 When Toutdoor amb 5ºC compressor stops operation while the electric heating of compressor starts operation 2 When Toutdoor amb 2ºC the electric heating of compressor stops operation 3 When 5ºC Toutdoor amb 2ºC the electric heating of compressor will keep...

Страница 41: ...e unit adequately grounded The grounding wire cant be used for other purposes 6 Must apply protective accessories such as protective boards cable cross loop and wire clip 7 The live wire neutral wire and grounding wire of power supply must be corresponding to the live wire neutral wire and grounding wire of the air conditioner 8 The power cord and power connection wires cant be pressed by hard obj...

Страница 42: ...ay be leaked corrosive gas or flammable gas If there leaked gas around the unit it may cause explosion and other accidents 7 Do not use extension cords for electrical connections If the electric wire is not long enough please contact a local service center authorized and ask for a proper electric wire Poor connections may lead to electric shock or fire 8 Use the specified types of wires for electr...

Страница 43: ... is prohibited in the maintenance area and the no smoking warning board should be hanged Check whether the appliance mark is in good condition Replace the vague or damaged warning mark Welding If you should cut or weld the refrigerant system pipes in the process of maintaining please follow the steps as below a Shut down the unit and cut power supply b Eliminate the refrigerant c Vacuuming d Clean...

Страница 44: ...ing tape 4 Electroprobe 7 Electronic leakage detector 10 Pipe pliers pipe cutter 2 Screw driver 5 Universal meter 8 Vacuum pump 11 Pipe expander pipe bender 3 Impact drill drill head electric drill 6 Torque wrench open end wrench inner hexagon spanner 9 Pressure meter 12 Soldering appliance refrigerant container ...

Страница 45: ...At least 15cm At least 50cm At least 50cm At least 30cm At least 300cm Space to the obstruction Space to the obstruction Space to the obstruction Space to the ceiling Space to the obstruction Space to the obstruction At least 30cm At least 15cm At least 15cm Space to the wall Space to the wall Space to the wall At least 200cm ...

Страница 46: ...oor unit Make the bound pipes pass through the wall hole and then connect outdoor unit Neaten the pipes Vacuum pumping and leakage detection Check after installation and test operation Finish installation Note this flow is only for reference please find the more detailed installation steps in this section Select outdoor unit installation location Install the support of outdoor unit select it accor...

Страница 47: ...ble power supply or incorrect wiring may result in electric shock fire hazard or malfunction Please install proper power supply cables before using the air conditioner 4 Properly connect the live wire neutral wire and grounding wire of power socket 5 Be sure to cut off the power supply before proceeding any work related to electricity and safety 6 Do not put through the power before finishing inst...

Страница 48: ...t at the corresponding bellmouth As show in Fig 5 2 Pretightening the union nut with hand 3 Adjust the torque force by referring to the following sheet Place the open end wrench on the pipe joint and place the torque wrench on the union nut Tighten the union nut with torque wrench As show in Fig 6 4 Wrap the indoor pipe and joint of connection pipe with insulating pipe and then wrap it with tape A...

Страница 49: ... cord and drain hose with the band As show in Fig 14 2 Reserve a certain length of drain hose and power cord for installation when binding them When binding to a certain degree separate the indoor power and then separate the drain hose As show in Fig 15 3 Bind them evenly 4 The liquid pipe and gas pipe should be bound separately at the end 9 Hang the Indoor Unit 1 Put the bound pipes in the wall p...

Страница 50: ...house structure 2 Fix the support of outdoor unit on the selected location with expansion screws 5 Connect Outdoor Electric Wire 1 Remove the wire clip connect the power connection wire and signal control wire only for cooling and heating unit to the wiring terminal according to the color fix them with screws As show in Fig 23 6 Neaten the Pipes 1 The pipes should be placed along the wall bent rea...

Страница 51: ...T to check whether the operation is normal or not If the ambient temperature is lower than 16 the air conditioner cant start cooling 2 Leakage Detection 1 With leakage detector Check if there is leakage with leakage detector 2 With soap water If leakage detector is not available please use soap water for leakage detection Apply soap water at the suspected position and keep the soap water for more ...

Страница 52: ...r is open short circuited F1 Indoor evaporator temperature sensor is open short circuited F2 Module temperature sensor is open short circuited P7 Outdoor ambient temperature sensor is open short circuited F3 Outdoor condenser tube temperature sensor is open short circuited F4 Outdoor discharge temperature sensor is open short circuited F5 Communication malfunction between indoor and outdoor units ...

Страница 53: ...d then peformedischarging NOTE A large capacity electrolytic capacitor is used in the outdoor unit controller inverter Therefore if the power supply is turned off charge charging voltage DC280V to 380V remains and disc harging takes a lot of time After turning off the power source if touching the charging section before discharging an electrical shock may be caused Discharge the electrol ytic capa...

Страница 54: ...oard broken Malfunction diagnosis process Is the wiring terminal between the temperature sensor and the controller loosened or poorly contacted Start Insert the temperature sensor tightly Yes Yes Yes Yes Yes Yes No No No No No No Is malfunction eliminated Is malfunction eliminated Is malfunction eliminated Replace it with a temperature sensor with the same model Make the parts upright Is there sho...

Страница 55: ...he connection of PG motor control terminal is firm Turn on the unit again measure whether the output voltage on control terminal for PG motor is more than 50V within 1 min after the louvers are opened Tighten the screw reassemble the blade motor and shaft bearing rubber base sub assy to make sure there is no foreign object between them Yes Yes Yes Yes Yes Yes Yes Yes Yes Yes No No No No No No No N...

Страница 56: ...f the mainboard is defined abnormal Malfunction diagnosis process Start Is there jumper cap on the mainboard Is the jumper cap inserted correctly and tightly Replace the jumper cap with the same model Appearance of the jumper cap Assemble the jumper cap with the same model Insert the jumper cap tightly Is malfunction eliminated Is malfunction eliminated Is malfunction eliminated Replace the mainbo...

Страница 57: ...charges slowly The zero cross detectioncircuit of the mainboard is defined abnormal Malfunction diagnosis process Turn power off for 1minute the turn back on The unit returns to normal Conclusion U8 is displayed due to power off on while the capacitor discharges slowly U8 is still displayed The zero cross detection circuit of the mainboard is defined abnormal Replace the mainboard with the same mo...

Страница 58: ...e wiring diagram Is malfunction eliminated Is malfunction eliminated Is malfunction eliminated Is malfunction eliminated Main board matches with display board Main board of IDU matches with that of ODU Match correctly according to product specification Connection of communication wire is damaged or not Replace the connection wire Replace the main board of IDU Replace the main board of ODU End No N...

Страница 59: ...Manual Start Is malfunction eliminated The end check if the connection wire are correctly connected Replace the detecting plate with the same model Replace the mainboard with the same model Yes Yes No 6 Malfunction of detecting plate WIFI JF ...

Страница 60: ...ion occurs after de energizing and turning on the unit Whether stop time for compressor is more than 3min No No No No No No No Yes Yes Yes Yes Yes No Yes Yes Yes Yes Whether valve of outdoor unit is opened Whether wire connection for compressor is correct Open the valve Is malfunction eliminated Connect wire correctly Is malfunction eliminated Replace electronic expansion valve Is malfunction elim...

Страница 61: ...such as clean heat exchanger improve ventilation etc Turn on the unit again after the power voltage is resumed Charge refrigerant according to service manual Whether the outdoor fan can operate normally Whether the radiation for the unit is in good condition Whether the input voltage is normal Whether refrigerant is superfluous Replace main board of outdoor unit Is malfunction eliminated Replace c...

Страница 62: ...lfunction diagnosis process Start the troubleshooting for temperature sensor Check the connection between temperature sensor and wiring terminal is loose or in poor connection Check whether the temperature sensor is normal according to the Resistance Value Table for Temperature Sensor Insert the temperature sensor well Is malfunction eliminated Is malfunction eliminated Replace the temperature sen...

Страница 63: ...der ambient temperature Whether the resistance 1KΩ Whether wire connection wire electronic expansion valve is in good condition Check the coil of electronic expansion valve If its damaged please replace it Is malfunction eliminated If the refrigerant is leaking please add refrigerant according to Service Manual Is malfunction eliminated Replace main board of outdoor unit End Yes Yes Yes Yes No No ...

Страница 64: ...t for 1 min There is malfunction for the detection circuit on main board of outdoor unit Check the input power and resume the power supply normal Is malfunction eliinated Measure the voltage at both ends of big electrolytic capacitor with the DC notch of universal meter Is the voltage more than 100V Check whether the input voltage is within the normal range Replace main board of outdoor unit End N...

Страница 65: ... fan terminal is connected well Whether the fan is damaged Replace fan capacitor unavailable for DC fan Replace outdoor fan Whether outdoor ambient temperature is more than 53o C Whether radiation inside or outdoor the unit is good Whether outdoor fan operates normally Replace main board of outdoor unit End No Yes Yes Yes Yes No No No Remark When overload protection occurs under cooling mode its b...

Страница 66: ...e resume to the range of 210VAC 250VAC Correctly connect the wires of compressor according to the electric wiring diagram and then turn on the unit Check the connection between the control board and the compressor by referring to the electric wiring diagram Check whether wires of compressor UVW are connected correctly Measure the resistance value among three terminals UVW of compressor with a resi...

Страница 67: ...d of outdoor unit is damaged Malfunction diagnosis process Communication malfunction De energize the unit and then check whether connection wires between indoor unit and outdoor unit and wiring inside the electric box are correct Are wires are connected correctly Replace main board of indoor unit Is malfunction eliminated End Replace main board of outdoor unit Connect wire correctly according to c...

Страница 68: ...e stop time for compressor is more than 3min Whether compressor wires are connected correctly The stop time for unit is not enough high pressure and low pressure of system are unbalanced please wait for 3min and then restart up the unit Whether the refrigerant volume is superfluous Please charge the refrigerant according to Service Manual Is malfunction eliminated Replace main board of outdoor uni...

Страница 69: ...e the compressor Replace the mainboard with the same model End Is the supply voltage too low with overload Is the indoor outdoor heat exchanger dirty or are the air inlet and outlet blocked The fan is abnormal Fan speed is too low or fan doesnt rotate Measure the current of live wire on the main board with a clamp ampere meter Is the current higher than the value of the overcurrent protection Is t...

Страница 70: ...etection circuit malfunctions of phase current of compressor U1 Hardware of main board is damaged Please replace main board 4 DC busbar voltage is too high PH Input voltage is too high or unstable Hardware of main board is damaged 5 DC busbar voltage is too low PL Input voltage is too low or unstable Hardware of main board is damaged 6 Malfunction of ODU DC fan L3 The wire terminal of outdoor fan ...

Страница 71: ...od for details Malfunction of compressor Compressor cant operate Refer to point 5 of maintenance method for details 9 3 Maintenance method for normal malfunction 1 Air Conditioner Cant be Started Up 2 Poor Cooling Heating for Air Conditioner 3 Horizontal Louver Cant Swing Possible Causes Discriminating Method Air conditioner Status Troubleshooting No power supply or poor connection for power plug ...

Страница 72: ... pipe Replace drain pipe Wrapping is not tight Water leaking from the pipe connection place of indoor unit Wrap it again and bundle it tightly 5 Compressor Cant Operate Possible causes Discriminating method air conditioner status Troubleshooting Wrong wire connection or poor connection Check the wiring status according to circuit diagram Connect wires according to wiring diagram to make sure all w...

Страница 73: ...70 Installation and Maintenance Service Manual The component picture is only for reference please refer to the actual product 10 Exploded View and Parts List 10 1 Indoor Unit ...

Страница 74: ...000003 1 16 Cross Flow Fan 10352060 10352060 10352060 1 17 Fan Motor 1501214502 1501214502 1501214502 1 18 Motor Press Plate 26112511 26112511 26112511 1 19 Wall Mounting Frame 01362026 01362026 01362026 1 20 Connecting pipe clamp 2611218801 2611218801 2611218801 1 21 Crank 73012005 73012005 73012005 1 22 Stepping Motor 1521240210 1521240210 1521240210 1 23 Drainage Hose 05230014 05230014 05230014...

Страница 75: ...011001000207 1 16 Cross Flow Fan 10352060 10352060 1 17 Fan Motor 1501214502 1501214502 1 18 Motor Press Plate 26112511 26112511 1 19 Wall Mounting Frame 01362026 01362026 1 20 Connecting pipe clamp 2611218801 2611218801 1 21 Crank 73012005 73012005 1 22 Stepping Motor 1521240210 1521240210 1 23 Drainage Hose 05230014 05230014 1 24 Electric Box Assy 100002002337 100002002337 1 25 Lower Shield of E...

Страница 76: ...1000073 1 16 Cross Flow Fan 10352060 10352057 1 17 Fan Motor 1501214502 15012145 1 18 Motor Press Plate 26112511 26112515 1 19 Wall Mounting Frame 01362026 01252229 1 20 Connecting pipe clamp 2611218801 26112514 1 21 Crank 73012005 73012005 1 22 Stepping Motor 1521240210 1521240210 1 23 Drainage Hose 05230014 0523001405 1 24 Electric Box Assy 100002001513 100002003819 1 25 Lower Shield of Electric...

Страница 77: ... 01100100020401 1 16 Cross Flow Fan 10352060 10352060 1 17 Fan Motor 1501214502 1501214502 1 18 Motor Press Plate 26112511 26112511 1 19 Wall Mounting Frame 01362026 01362026 1 20 Connecting pipe clamp 2611218801 2611218801 1 21 Crank 73012005 73012005 1 22 Stepping Motor 1521240210 1521240210 1 23 Drainage Hose 05230014 05230014 1 24 Electric Box Assy 100002002337 100002002337 1 25 Lower Shield o...

Страница 78: ...07 01002000003 1 16 Cross Flow Fan 10352060 10352060 1 17 Fan Motor 1501214502 1501214502 1 18 Motor Press Plate 26112511 26112511 1 19 Wall Mounting Frame 01362026 01362026 1 20 Connecting pipe clamp 2611218801 2611218801 1 21 Crank 73012005 73012005 1 22 Stepping Motor 1521240210 1521240210 1 23 Drainage Hose 05230014 05230014 1 24 Electric Box Assy 100002061716 100002061717 1 25 Lower Shield of...

Страница 79: ...1 01002000003 1 16 Cross Flow Fan 10352060 10352060 1 17 Fan Motor 1501214502 1501214502 1 18 Motor Press Plate 26112511 26112511 1 19 Wall Mounting Frame 01362026 01362026 1 20 Connecting pipe clamp 2611218801 2611218801 1 21 Crank 73012005 73012005 1 22 Stepping Motor 1521240210 1521240210 1 23 Drainage Hose 05230014 05230014 1 24 Electric Box Assy 100002062100 100002001513 1 25 Lower Shield of ...

Страница 80: ...0003 01002000003 1 16 Cross Flow Fan 10352060 10352060 1 17 Fan Motor 1501214502 1501214502 1 18 Motor Press Plate 26112511 26112511 1 19 Wall Mounting Frame 01362026 01362026 1 20 Connecting pipe clamp 2611218801 2611218801 1 21 Crank 73012005 73012005 1 22 Stepping Motor 1521240210 1521240210 1 23 Drainage Hose 05230014 05230014 1 24 Electric Box Assy 100002062097 100002062097 1 25 Lower Shield ...

Страница 81: ...07 01002000003 1 16 Cross Flow Fan 10352060 10352060 1 17 Fan Motor 1501214502 1501214502 1 18 Motor Press Plate 26112511 26112511 1 19 Wall Mounting Frame 01362026 01362026 1 20 Connecting pipe clamp 2611218801 2611218801 1 21 Crank 73012005 73012005 1 22 Stepping Motor 1521240210 1521240210 1 23 Drainage Hose 05230014 05230014 1 24 Electric Box Assy 100002061716 100002061717 1 25 Lower Shield of...

Страница 82: ... Assy 01100100020401 1 16 Cross Flow Fan 10352060 1 17 Fan Motor 1501214502 1 18 Motor Press Plate 26112511 1 19 Wall Mounting Frame 01362026 1 20 Connecting pipe clamp 2611218801 1 21 Crank 73012005 1 22 Stepping Motor 1521240210 1 23 Drainage Hose 05230014 1 24 Electric Box Assy 100002062100 1 25 Lower Shield of Electric Box 01592139 1 26 Electric Box 20112211 1 27 Jumper 4202021912 1 28 Main Bo...

Страница 83: ...80 Installation and Maintenance Service Manual 10 2 Outdoor Unit The component picture is only for reference please refer to the actual product GWH18AAD K6DNA1A O ...

Страница 84: ...sy 07133774 1 11 Valve Cover 22243005 1 12 Big Handle 2623343106 1 13 Right Side Plate 0130324403P 1 14 4 Way Valve Coil 4300040087 1 15 Wire Clamp 71010103 1 16 Temperature Sensor 3900030902 1 17 Rear Grill 01473060 1 18 Condenser Assy 011002000417 1 19 Clapboard Sub Assy 01233168 1 20 Coping 01253034P 1 21 Reactor 22 Motor Support Sub Assy 0170339802 1 23 Fan Motor 1501371701 1 24 Condenser Supp...

Страница 85: ...82 Technical Information Service Manual 35 The component picture is only for reference please refer to the actual product 24K ...

Страница 86: ...130509001P 1 13 Valve Support 01705047 1 14 Handle 2623305301 1 15 Wire Clamp 71010003 1 16 Rear Grill 01475020 1 17 Condenser Assy 011002000177 1 18 Reactor 19 Clapboard Sub Assy 01235081 1 20 Coping 012049000007P 1 21 Supporting Board Condenser 01795031 1 22 Motor Support Sub Assy 01705067 1 23 Fan Motor 1501506402 1 24 Axial Flow Fan 10335008 1 25 Left Side Plate 01305093P 1 26 Left handle 2623...

Страница 87: ...allation and Maintenance Service Manual The component picture is only for reference please refer to the actual product 4 5 6 8 7 3 2 21 22 23 24 25 26 19 18 16 17 20 9 11 10 27 13 12 15 14 1 GWH18AAD K6DNA1B O ...

Страница 88: ... 9 Compressor and Fittings 00103925G 1 10 Compressor Gasket 76710287 3 11 4 Way Valve Assy 030152000158 1 12 Big Handle 2623343106 1 13 Cut off Valve Sub Assy 03005700067 1 14 Cut off Valve Assy 07133691 1 15 Valve Support 26113017 2 16 Front Grill 22413044 1 17 Cabinet 01433033 1 18 Axial Flow Fan 10333011 1 19 Chassis Sub assy 02803213 1 20 Electric Box Assy 017007000305 1 21 Electric Box 100002...

Страница 89: ...86 Installation and Maintenance Service Manual The component picture is only for reference please refer to the actual product GWH24QE K6DNA1C O ...

Страница 90: ... 22245002 1 14 Handle 2623525404 1 15 Wiring Clamp 16 Rear Grill 01475020 1 17 Condenser Assy 011002000049 1 18 Reactor 19 Clapboard Assy 01235081 1 20 Coping 01255005P 1 21 Supporting Board Condenser 01795031 1 22 Motor Support Sub Assy 01705067 1 23 Fan Motor 1501506402 1 24 Axial Flow Fan 10335008 1 25 Left Side Plate 01305093P 1 26 left handle 26233053 1 27 Electric Box Assy 100002000029 1 28 ...

Страница 91: ...en the panel Loosen the clasp shown in the fig and then pull the left filter and right filer outwards to remove them Push out the axile bush on horizontal louver Bend the horizontal louver with hand and then separate the horizontal louver from the crankshaft of step motor to remove it Horizontal louver Horizontal louver Location of step motor Location of step motor Caution discharge the refrigeran...

Страница 92: ...er 2 and detecting plate 5 Remove front case sub assy Front case sub assy Clasp Screw caps Screws Screws Remove the screws fixing front case Note 1 Open the screw caps before removing the screws around the air outlet 2 The quantity of screws fixing the front case sub assy is different for different models Loosen the clasps at left middle and right sides of front case Life the front case sub assy u...

Страница 93: ... power cord Remove the wiring terminal of power cord Lift up the main board and take it off Screw Wire clip Circlip Holder Connector Soft sheath Power cord Grounding screw Indoor tube temperature sensor Electric box assy Main board Wiring terminal of motor Wiring terminal of stepping motor Screw Wire binder Instruction Some wiring terminal of this product is with lock catch and other devices The p...

Страница 94: ...emove the connection pipe clamp First remove the left side of evaporator from the groove of bottom shell and then remove the right side from the clasp on the bottom shell Remove 3 screws fixing evaporator assy Adjust the position of connection pipe on evaporator slightly and then lift the evaporator upwards to remove it Connection pipe clamp Evaporator assy Clasp Groove Clasp Rear Case assy ...

Страница 95: ...tor lift the motor and cross flow blade upwards to remove them 8 Remove motor and cross flow blade Motor clasp Screws Remove 3 screws fixing motor clamp and then remove the motor clamp a Loosen the connection clasps between vertical louver and bottom case to remove vertical louver 9 Remove vertical louver Bottom case Vertical louver Vertical louver ...

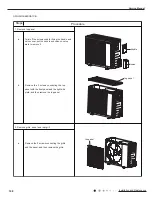
Страница 96: ...ve big handle Remove the screw fixing big handle slide out the big handle down wards to make the clasp of big handle separate from the groove of right side plate and then remove the big handle Remove the screws fixing top panel and then remove the top panel Remove connection screws between the front grille and the front panel Then remove the front grille Screw Big handle Big handle Screw Screw Top...

Страница 97: ... Screw Screw Remove the screws fixing right side plate and then remove the right side plate 5 Remove right side plate and rear grill Screw Screw Cabinet Right side plate Rear grill Remove the screws fixing cabinet and then remove the cabinet Remove the screws and then remove the grille ...

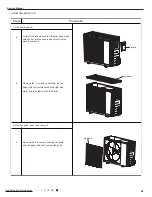
Страница 98: ... letf side plate 6 Remove lef side plate Procedure Step Nut Axial flow blade 7 Remove axial flow blade 8 Remove electric box assy Remove the screws fixing electric box assy pull out each wiring terminal lift the electric box assy upwards to remove it Note When pulling out the wiring terminal pay attention to loose the clasp and dont pull it so hard Screw Electric box assy Left side plate ...

Страница 99: ...otor support and then remove the motor support 10 Remove motor support Spot weld 4 way valve assy 11 Remove 4 way valve assy Unsolder the spot weld of 4 way valve assy compressor and condenser and then remove the 4 way valve assy Note When unsoldering the spot weld wrap the 4 way valve with wet cloth completely to avoid damaging the valve due to high temperature Procedure Step ...

Страница 100: ... discharge pipe and suction pipe to avoid foreign objects to enter it 12 Remove compressor Procedure Step 13 Remove clapboard Screw Clapboard Remove the screws fixing clapboard and then remove the clapboard 14 Remove valve support sub assy Foot nuts Screw Valve Support Sub Assy Screw off the screws that are locking the valve support sub assy Then remove it ...

Страница 101: ...98 Installation and Maintenance Service Manual Procedure Step Screw Condenser Remove one screw fixing the condenser then remove the condenser 15 Remove condenser ...

Страница 102: ... and valve cover up ward to remove it b a a 1 Remove top panel Remove handle top panel top panel the 3 screws connecting the top panel with the front panel and the right side plate and then remove the top panel 2 Remove grille panel and rear grill Remove the 2 screws connecting the grille and the panel and then remove the grille Steps Procedure ...

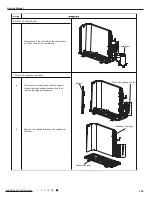
Страница 103: ...t and then remove the panel 3 Remove left side plate and right side plate Remove the screws t h g i r e h t g n i t c e n n o c side plate with the chassis the valve support and the electric box and then y s s a e t a l p e d i s t h g i r e h t e v o m e r Remove the screws connecting the left side plate and the chassis and then y s s a e t a l p e d i s t f e l e h t e v o m e r panel rear grill...

Страница 104: ...t the wiring terminals and then pull the electric box upwards to remove it Remove the 4 tapping screws fixing the motor disconnect the leading wire insert of the motor and then remove the motor Remove the 2 tapping screws fixing the motor support and then pull the motor support upwa t i e v o m e r o t s d r Remove the nuts fixing the blade and then remove the axial flow blade axial flow blade ele...

Страница 105: ...arefully soundproof sponge 7 Remove Isolation sheet t e e h s n o i t a l o s i e h t g n i x i f s w e r c s 3 e h t e v o m e R and then remove the Isolation sheet Isolation sheet 8 Remov e 4 way valve assy Discharge the refrigerant completely unsolder the pipelines connecting the compressor and the condenser assy and then remove the 4 way valve assy 4 way valve assy ...

Страница 106: ...e the compressor Remove the screws connecting the support condenser and condenser assy and then remove the support condenser 9 Remove compressor compressor 10 Remove condenser sub assy a support Electron expansion valve b Remove the chassis sub assy and condenser sub assy condenser sub assy chassis sub assy ...

Страница 107: ...fore disassembly 3 Remove top cover 2 Remove big handle top cover big handle big handle and then remove the handle Remove connection screws connecting the top panel with the front panel and the right side plate and then remove the top panel big handle GWH18AAD K6DNA1B O ...

Страница 108: ...105 Installation and Maintenance Service Manual ...

Страница 109: ...106 Installation and Maintenance Service Manual ...

Страница 110: ...107 Installation and Maintenance Service Manual ...

Страница 111: ...ard to remove it b a a 1 Remove top panel Remove handle valve top panel top panel the 3 screws connecting the top panel with the front panel and the right side plate and then remove the top panel 2 Remove grille panel and rear grill Remove the 2 screws connecting the grille and the panel and then remove the grille Steps Procedure GWH24QE K6DNA1C O ...

Страница 112: ...ide plate and left side plate and then remove the outer case Remove the screws connecting the right side plate with electric box assy valve support chassis and condenser side plate and then remove the right side plate Remove the screws connecting the left side plate with chassis and then remove the left side plate Steps Procedure left side plate outer case 3 Remove right left side plate right side...

Страница 113: ...the 2 screws connecting the motor support and chassis and then loosen the stopper to remove the motor support Remove the screws fixing the electric box sub assy loosen the wire bundle pull out the wiring terminals and then pull the electric box upwards to remove it Steps Procedure 5 Remove electric box 4 Remove axial flow blade axial flow fan motor support fan motor electric box a b ...

Страница 114: ...ng electronic expansion valve assy the 4 way valve assy with capillary sub assy compressor and condenser remove the electronic expansion valve assy and 4 way valve Note Before unsoldering the welding joint wrap the 4 way valve with a wet cloth completely to avoid damage to the valve caused by high temperature Steps Procedure 8 Remove 4 way valve assy and electronic expansion valve assy 7 Remove is...

Страница 115: ...s of discharge pipe and suction pipe from foreign objects Remove the screws connecting the support condenser and condenser assy and then remove the support condenser Remove the 2 screws fixing the condenser and chassis and then lift the condenser upwards to remove it Steps Procedure 10 Remove condenser sub assy 9 Remove compressor compressor support condenser chassis subassy sub assy a b ...

Страница 116: ...n length of connection pipeFor the unit with standard connection pipe of 5m there is no limitation for themin length of connection pipe For the unit with standard connection pipe of 7 5m and 8m the min length of connection pipe is 3m 3 Max length of connection pipe More details please refer to the specifications 4 The additional refrigerant oil and refrigerant charging required after prolonging co...

Страница 117: ...llowing steps A Cut the pip Confirm the pipe length according to the distance of indoor unit and outdoor unit Cut the required pipe with pipe cutter B Remove the burrs Remove the burrs with shaper and prevent the burrs from getting into the pipe C Put on suitable insulating pipe D Put on the union nut Remove the union nut on the indoor connection pipe and outdoor valve install the union nut on the...

Страница 118: ... 66 88 33 10 63 72 2 439 111 0 737 5 63 46 34 10 2 73 2 358 112 0 717 4 60 23 35 9 779 74 2 28 113 0 697 3 57 18 36 9 382 75 2 206 114 0 678 2 54 31 37 9 003 76 2 133 115 0 66 1 51 59 38 8 642 77 2 064 116 0 642 0 49 02 39 8 297 78 1 997 117 0 625 1 46 6 40 7 967 79 1 933 118 0 608 2 44 31 41 7 653 80 1 871 119 0 592 3 42 14 42 7 352 81 1 811 120 0 577 4 40 09 43 7 065 82 1 754 121 0 561 5 38 15 4...

Страница 119: ...1 0 983 5 84 61 34 13 59 73 3 144 112 0 956 4 80 31 35 13 04 74 3 04 113 0 93 3 76 24 36 12 51 75 2 94 114 0 904 2 72 41 37 12 76 2 844 115 0 88 1 68 79 38 11 52 77 2 752 116 0 856 0 65 37 39 11 06 78 2 663 117 0 833 1 62 13 40 10 62 79 2 577 118 0 811 2 59 08 41 10 2 80 2 495 119 0 77 3 56 19 42 9 803 81 2 415 120 0 769 4 53 46 43 9 42 82 2 339 121 0 746 5 50 87 44 9 054 83 2 265 122 0 729 6 48 4...

Страница 120: ... 74 62 11 32 101 3 22 15 362 9 24 51 41 63 10 93 102 3 13 14 342 8 25 49 19 64 10 54 103 3 04 13 323 9 26 47 08 65 10 18 104 2 96 12 306 2 27 45 07 66 9 83 105 2 87 11 289 6 28 43 16 67 9 49 106 2 79 10 274 29 41 34 68 9 17 107 2 72 9 259 3 30 39 61 69 8 85 108 2 64 8 245 6 31 37 96 70 8 56 109 2 57 7 232 6 32 36 38 71 8 27 110 2 50 6 220 5 33 34 88 72 7 99 111 2 43 5 209 34 33 45 73 7 73 112 2 37...

Страница 121: ...522218 Fax 86 756 8669426 E mail gree gree com cn www gree com HONG KONG GREE ELECTRIC APPLIANCES SALES LIMITED Add Unit 2612 26 F Miramar Tower 132 Nathan Road TST Kowloon HK Tel 852 31658898 Fax 852 31651029 For product improvement specifications and appearance in this manual are subject to change without prior notice ...

Отзывы: