26
Pushrod Farther Out
Pushrod Farther Out
LESS
THROW
Pushrod Closer In
MORE
THROW
MORE
THROW
Pushrod Closer In
LESS
THROW
❏
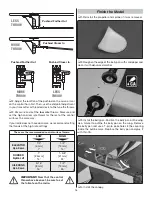
2. Adjust the location of the pushrod on the servo arm or
on the control horn fi rst. Then, use the endpoint adjustment
in your transmitter or threaded clevis to fi ne tune the throws.
❏
3. Measure and set the
low rate
throws. Measure and
set the high and low rate throws for the rest of the control
surfaces the same way.
If your radio does not have dual rates, we recommend setting
the throws at the high rate settings.
These are the recommended control surface throws:
ELEVATOR
HIGH
LOW
1/2"
[13 mm]
14°
1/4"
[ 6 mm]
7°
1/2"
[13 mm]
26°
5/16"
[ 8 mm]
16°
1-5/8"
[ 41mm]
24°
1"
[ 25 mm]
14°
RUDDER
AILERONS
Up & Down
Up & Down
Right & Left
IMPORTANT:
Now that the control
throws have been set, be sure to set
the failsafe on the radio.
Finish the Model
❏
1. Reinstall the propeller and spinner if it was removed.
❏
2. Roughen the edge of the belly pan with sandpaper and
clean it with denatured alcohol.
❏
3. Install the belly pan. Position the belly pan on the wing.
Us a marker to outline the belly pan on the wing. Remove
the belly pan and use a T-pin to poke holes in the covering
inside the outline mark. Replace the belly pan and glue it
with thin CA.
❏
4. Install the canopy.
Содержание ULTRA SPORT 46
Страница 31: ...Notes 31...


