GREAT PLANES Sequence 1.20 Скачать руководство пользователя страница 26

26

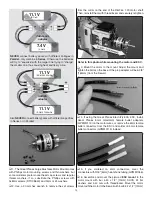
APC 17 x 8E propeller powered by a 5,000mAh 6S battery 

draws about 80A, 1,750 Watts @ 7,500rpm (these are the 

initial,

 static/non-fl ying readings using a fully charged battery). 

And in-fl ight data from the ELogger shows that the average 

current draw throughout a normal fl ight is about 40A with the 
maximum current draw during full-throttle events about 72A. 
Once you run your motor on the ground you can compare 

your numbers to these as well as the current specifi cations 
for the motor. The specifi ed limits for the RimFire 1.20 are 
50A 

constant

 current and 80A 

surge

 current. Because the 

setup we are using draws a maximum of 72A in the air, this 
is within the specifi ed 50A constant/80A surge limit and is an 
acceptable combination as long as full throttle is used only in 
short bursts (say, during up-lines or on takeoff). 

So, if you are using a RimFire 1.20 and your Watts-Up meter 
tells you it is pulling around 80A on the ground, you will know 
everything is working normally. However, if for some reason 
you are not getting close to those numbers, you will know 

something is wrong. It could be a greatly imbalanced propeller, 
too large of a propeller, a damaged motor, defective wiring, 
etc. Find and correct the problem before fl ying your Sequence.

CAUTION: 

Never run the motor on the ground for more 

than a few seconds. Otherwise, you may overload the 
motor, battery or ESC.

Another smart thing you can do is record the 

fl ight time

 and 

capacity

 used from the battery for each fl ight in a log book. 

Record the fl ight time (from the timer on your transmitter or 
other timer) immediately after each fl ight and record how 
much mAh (capacity) went back into the battery read from 
the display on your charger. (Number your fl ight packs so you 
will be able to correlate each battery to each fl ight.) When 
you know the fl ight time and recharge capacity (capacity 
used for the fl ight) you can calculate valuable data indicating 
how your motor is performing and whether or not your fl ight 
time is too long or too short. 

For the Sequence 1.20 for example, say we record a 6 
minute fl ight. And back in the shop we record that the battery 
took 4,000mAh to recharge. With these numbers we can 
calculate the average, in-fl ight current draw:

4,000mAh (used in fl ight) / 1,000 = 4 Ah / 6 minutes = 

.67Amps/minute x 60 minutes = 40A.

The average, in-fl ight current draw was 40 Amps. Even 

though we know the motor is drawing 72A during brief, full 
throttle bursts, the average current draw over the duration of 
the fl ight was only 40A so the motor and ESC are operating 
comfortably within their limits. 

Another calculation we can make is the percentage of charge 

remaining in the battery. If 4,000mAh was used from a 5,000mAh 
battery, 20% was remaining. This is generally accepted as a 
safe reserve. Flying your LiPos down to no further than 20% 
capacity is a good way to extend its life and performance. 

Based on this information, you may want to start out setting 
your fl ight timer to a conservative four or fi ve minutes. After 
the fl ight note the exact fl ight time and the recharge capacity 
in your log book. Calculate the percentage of charge that 
was left in your battery and adjust your fl ight time accordingly. 

Keep in mind that many variables can determine your in-
fl ight current consumption such as how much you used full-
throttle, weather conditions, battery condition, etc. Due to 
these variables it is always a good idea to calculate your 
maximum fl ight time 

conservatively

Range Check

Don’t forget to perform your usual ground range checks as 
written in the instruction manual that came with your radio 
system to be certain it is operating correctly.

ENGINE / MOTOR

SAFETY PRECAUTIONS

Failure to follow these safety precautions may result 
in severe injury to yourself and others.

Keep all engine fuel in a safe place, away from high heat, 
sparks or fl ames, as fuel is very fl ammable. Do not smoke 
near the engine or fuel; and remember that engine exhaust 
gives off a great deal of deadly carbon monoxide. Therefore


do not run the engine in a closed room or garage

.

Get help from an experienced pilot when learning to operate 
engines. 

Use safety glasses when starting or running engines.

Do not run the engine in an area of loose gravel or sand; the 
propeller may throw such material in your face or eyes.

Keep your face and body as well as all spectators away from the 
plane of rotation of the propeller as you start and run the engine.

Keep these items away from the prop: loose clothing, shirt 
sleeves, ties, scarfs, long hair or loose objects such as 
pencils or screwdrivers that may fall out of shirt or jacket 
pockets into the prop.

Use a “chicken stick” or electric starter to start the engine. 
Do not use your fi ngers to fl ip the propeller. Make certain the 

glow plug clip or connector is secure so that it will not pop off 
or otherwise get into the running propeller. 

Содержание Sequence 1.20

Страница 1: ...using the user assembled product the user accepts all resulting liability If the buyer is not prepared to accept the liability associated with the use of this product the buyer is advised to return t...

Страница 2: ...des liability insurance coverage protects modelers rights and interests and is required to fly at most R C sites Academy of Model Aeronautics 5151 East Memorial Drive Muncie IN 47302 9252 Tele 800 435...

Страница 3: ...of your finished model depends on how you build it therefore we cannot in any way guarantee the performance of your completed model and no representations are expressed or implied as to the performanc...

Страница 4: ...ill need a charger capable of approximately 75 Watts 3 x 4 2 x 5 63 63 x 2 75W But then you will have to charge each battery separately unless you purchase a charger with multiple charging ports If yo...

Страница 5: ...ght side of the page Follow the instructions provided on the page to locate a U S Canadian or International dealer Parts may also be ordered directly from Hobby Services by calling 217 398 0007 or via...

Страница 6: ...ith the wings and get to the rest of the model later 4 Use thin CA followed by a small fillet of medium CA to reinforce the servo mounting blocks to the hatch covers 5 With the servos plugged in and t...

Страница 7: ...large the holes Without any glue test fit the horns into the slots be certain the horns fit all the way down and make any adjustments for a proper fit 11 Cut and remove the covering from around the ba...

Страница 8: ...ge alignment pin into the end of each wing ASSEMBLE THE FUSELAGE CAUTION The turtledeck and fuselage bottom of the Sequence 1 20 are made from balsa covered foam Some solvents and adhesives will attac...

Страница 9: ...been doing all along be certain to use threadlocker on all the screws 6 Mount the tail wheel with a 3 32 2 4mm wheel collar and a 4 40 set screw and threadlocker Prepare the Fuselage for Mounting the...

Страница 10: ...will mount the cowl read ahead about what s involved to help you decide If mounting an electric brushless motor skip ahead to Mount an Electric Motor on page 13 Mount a Glow Engine Refer to this photo...

Страница 11: ...in the photo It s not necessary to mount the muffler yet but it s shown in the photo so you can see how it fits and where to position the exhaust Install the Fuel Tank 1 Prepare the stopper assembly...

Страница 12: ...ttery Precautions There are two ways to connect multiple battery packs In Series and in Parallel This is a SERIES battery adapter that connects two batteries in series 3 Cell 3200 mAh 2 Cell 3200 mAh...

Страница 13: ...hex wrench to remove the set screws from the collar on the end of the RimFire 1 20 motor shaft Then reinstall them with threadlocker and securely retighten Refer to this photo while mounting the moto...

Страница 14: ...nsert the arming plug right before you fly How to Make an Externally Accessible Arming Plug A First you ll need a short metal tab to bridge the tabs across a Deans male Ultra Plug A tab extracted from...

Страница 15: ...remount the ESC 10 If using the arming plug carefully cut the covering from the side of the fuselage over the location you will use for the receptacle Securely glue the receptacle plug into place wit...

Страница 16: ...1 2 sanding drum come in handy too 1 The cowl will be easier to start fitting if you can remove the head from your 2 stroke engine or remove the valve cover from your 4 stroke engine Also leave the mu...

Страница 17: ...n get it over the engine as you really zero in on the cutout switch to the sanding drum When you re really close install the spinner back plate for aligning the front of the cowl Replace the head or v...

Страница 18: ...solder to join the pushrod wire between the ends of the hexdriver with the brass tubes The key to a good soldering job is first to tin the ends of the hex driver and the pushrod wire for the hex drive...

Страница 19: ...h the fit of the cowl ring re mount it to the fuselage with the screws 7 Use coarse sandpaper to roughen the cowl all the way around the inside so glue will adhere Prime the inside of the cowl with a...

Страница 20: ...ring with medium CA wherever you can reach for now the cowl only needs to be tack glued well enough to hold during removal 13 Once you ve got the cowl glued to the cowl ring use your extended hex driv...

Страница 21: ...ile you hold the cowl D Holding the cowl in position use one of the templates as a guide to drill the first 3 32 2 4mm hole through the cowl into the fuselage E Enlarge the hole in the cowl only with...

Страница 22: ...paint Hook Up the Rudder and Elevators 1 Same as was done with the ailerons give a good pull on the rudder and look at the hinges to make sure they are all secure Use thin CA to wet any hinges that lo...

Страница 23: ...ushrods to a length of 2 50mm and solder on the threaded couplers to make the elevator pushrods Connect the elevators to the servos with the same hardware as the ailerons standoffs were not used under...

Страница 24: ...reat Planes C G Machine or lift the model with your fingers at the balance point Position the receiver battery over the fuselage and or shift the motor battery to get the model to balance 5 Securely m...

Страница 25: ...runs smoothly at full throttle and transitions reliably between the two With the engine running at full throttle have an assistant hold the plane in different orientations including nose up and inver...

Страница 26: ...ight current draw was 40 Amps Even though we know the motor is drawing 72A during brief full throttle bursts the average current draw over the duration of the flight was only 40A so the motor and ESC...

Страница 27: ...xperienced helper 3 At all flying sites a straight or curved line s must be established in front of which all flying takes place with the other side for spectators Only personnel involved with flying...

Страница 28: ...2 screws 4 flat washers and lock washers Great Planes 8mm to 3 8 24 thread propeller adapter for RimFire 1 20 GPMQ4971 1 Use medium grit sandpaper to roughen both sides of the FRP front bulkhead so g...

Страница 29: ...ress if available to drill 1 16 1 6mm pilot holes through the FRP motor mount plate If using a different motor mark then drill holes to fit your motor Hint For perfection fasten the template to the mo...

Страница 30: ...t plate motor assembly from the mounting box Cut Out Drill 7 32 5 6mm 10 Drill 7 32 5 6m holes through the firewall at the four marks and cut the rest of the way through the four partially cut slots f...

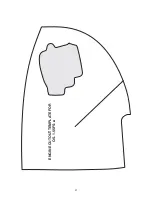
Страница 31: ...31 ENGINE CUTOUT TEMPLATE FOR O S 1 55FS a...

Страница 32: ......

Отзывы: