


CHECK LIST
Perform these basic checks to make sure the model is ready
to fl y. Where appropriate, refer to the instruction manual for
additional information required to complete the check.
❏
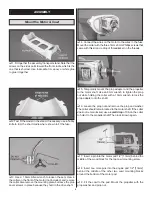
1. Check the C.G. according to the measurements provided.
❏
2.
Confi rm that all controls operate in the correct direction
and the throws are set according to the manual.
❏
3.
Be certain the battery and receiver are securely
mounted with the supplied adhesive-backed Velcro or
Velcro purchased separately.
❏
4.
Extend your receiver antenna all the way out the
antenna tube in the fuse.
❏
5. Balance the model laterally in the water as described.
❏
6.
Use thread-locking compound to secure all the screws
on the pushrod connectors.
❏
7. Make sure all hinges are securely glued in place.
❏
8.
Reinforce the holes for the servo mounting screws
with thin CA.
❏
9.
Make sure all servo arms are secured to the servos
with the screws that came with them.
❏
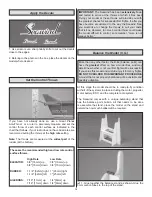
10. Balance the propeller.
❏
11. Tighten the propeller nut and glue on the spinner.
❏
12. Place your name, address, AMA number and telephone
number on or inside your model.
❏
13. If you wish to photograph your model, do so before
your fi rst fl ight.
❏
14. Range check your radio when you get to the fl ying site.
FLYING
The Seawind is a great-fl ying model that fl ies smoothly and
predictably. The Seawind does not, however, possess the self-
recovery characteristics of a primary R/C trainer and should
be fl own only by R/C pilots who have some experience.
CAUTION (THIS APPLIES TO ALL R/C AIRPLANES): If,
while fl ying, you notice an alarming or unusual sound such
as a low-pitched "buzz," this may indicate control surface
fl utter. Flutter occurs when a control surface (such as an
aileron or elevator) or a fl ying surface (such as a wing or
stab) rapidly vibrates up and down (thus causing the noise).
In extreme cases, if not detected immediately, fl utter can
actually cause the control surface to detach or the fl ying
surface to fail, thus causing loss of control followed by
an impending crash. The best thing to do when fl utter is
detected is to slow the model immediately by reducing
power, then land as soon as safely possible. Identify
which surface fl uttered (so the problem may be resolved)
by checking all the servo grommets for deterioration or
signs of vibration. Make certain all pushrod linkages are
secure and free of play. If it fl uttered once, under similar
circumstances it will probably fl utter again unless the
problem is fi xed. Some things which can cause fl utter are;
Excessive hinge gap; oversized holes in servo arms or
control horns where the pushrods connect, Excessive free
play in worn servo gears; Insecure servo mounting; and
one of the most prevalent causes of fl utter; Flying an over-
powered model at excessive speeds.
Preflight
Monitor and limit your fl ight time using the timer in your transmitter
or the timer on your wrist watch. When the batteries are getting
low the motor will usually provide a brief warning before the ESC
cuts off motor power, so when you notice the plane fl ying slower
you should land. Often (but not always!), after the motor cuts off,
power can be briefl y restored after holding the throttle stick all
the way down for a few seconds.
To avoid an unexpected dead-stick landing on your fi rst fl ight,
set your alarm or timer 2 to 3 minutes less than the average
fl ight time shown in the “Average Maximum Flight Time”
chart below, for the battery you are using. When the alarm
sounds you can land; or if you are an experienced pilot you
may continue to fl y, planning for a dead-stick landing to see
just how long the motor will run. Circle the plane upwind of
the landing area until the motor quits. Note the run time, and
then land and reprogram your timer.
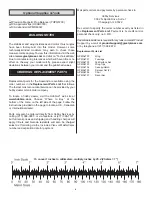
Average Maximum Flight Time
ElectriFly Power Series 910mAh 11.1V LiPo
8 min
ElectriFly Power Series 1250mAh 11.1V LiPo
10 min
ElectriFly Power Series 1500mAh 11.1V LiPo
13 min
15


