❏
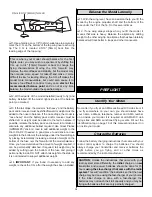
1. Locate the pre-hinged horizontal stab and elevator.
Measure and mark the center of the stabilizer as shown.
❏
2. Carefully cut a slot for the elevator control horn in the
area marked on the sketch.
❏
3. Insert the stab into the fuselage. Align the mark with
the centerline of the fuselage.
❏
4. With the model sitting on a flat surface, measure the
distance from each stab tip to the surface. The measurements
should be equal. Sand the slot in the rear of the fuse as
needed for a proper fit.
❏
5. Using a piece of string, measure the distance from the
center of the nose of the fuselage to each of the stab tips. These
distances must be equal. Mark the stab where it enters the
fuselage. Trim the covering from the stab inside the marks.
❏
6. Glue the stab in place once it is aligned with thin CA.
❏
7. Locate the fin. Glue it in place along the centerline of
the fuselage as shown. The fin must be perfectly straight up
and down and at a 90° angle to the stabilizer.
A=A
A
A
Install the Tail Surfaces
ASSEMBLE THE FUSELAGE
6

