GREAT PLANES Revolver 50cc Скачать руководство пользователя страница 5

5

PREPARATIONS

❏ 

1. If you have not done so already, remove the major parts 

of the kit from the box and inspect for damage. If any parts 
are damaged or missing, contact Product Support at the 
address or telephone number listed in the “Kit Inspection” on 
the previous page.

❏ 

2. Use a covering iron with a covering sock on high heat to 

tighten the covering if necessary. Apply pressure over sheeted 
areas to thoroughly bond the covering to the wood.

BUILD THE WING

We recommend you begin with the right wing so that your 

assembly matches the photos.

❏ ❏ 

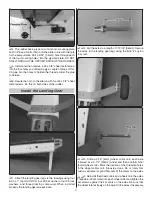
1. Use your servo as a guide for the servo placement. 

Place the servo so the servo arm is centered in the opening 

in the cover. Use epoxy to glue the 11/16" x 11/16" x 5/16" 
[20mm x 20mm x 8mm] hardwood servo mounting blocks to 
the insides of the hatch covers. Allow the epoxy to cure.
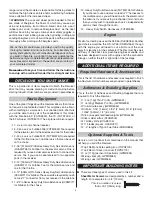
KIT CONTENTS

 1. 

Right 

Wing 

w/ Aileron

 2. 

Left 

Wing 

w/ Aileron

 3. 

Wing 

Tube

 4. 

Spinner

 5. 

Wheels

 6. 

Wheel 

Pants

 7. 

Landing 

Gear

 8. 

Fuel 

Tank

  9. Right Stab & Elevator
 10. Left Stab & Elevator
 11. 19 - 3/4" [ 501mm] Stab Tube
 12. 9 -1/2" [ 241mm] Stab Tube

 13. Rudder
 14. Tail Wheel Assembly
 15. Fuselage
 16. Cowl

Kit Contents

1

9

6

14

2

10

4

12

8

16

7

15

3

11

5

13

Содержание Revolver 50cc

Страница 1: ...d product the user accepts all resulting liability If the buyer is not prepared to accept the liability associated with the use of this product the buyer is advised to return this kit immediately in n...

Страница 2: ...onsidered as correct 3 You must take time to build straight true and strong 4 You must use an R C radio system that is in good condition a correctly sized engine and other components as specified in t...

Страница 3: ...servos Two if you use a separate lead to two separate ports in the receiver 3 12 305mm Pro Series Heavy Duty Servo Extensions HCAM2711 for Futaba Two for the aileron servos and one for the throttle 2...

Страница 4: ...te at www greatplanes com and click on Technical Data Due to manufacturing tolerances which will have little or no effect on the way your model will fly please expect slight deviations between your mo...

Страница 5: ...in with the right wing so that your assembly matches the photos 1 Use your servo as a guide for the servo placement Place the servo so the servo arm is centered in the opening in the cover Use epoxy t...

Страница 6: ...ervos 5 Position the servos against the underside of the aileron servo hatch covers between the mounting blocks Drill 1 16 1 6mm holes through the mounting tabs on the servo cases into the blocks Thre...

Страница 7: ...e it is to be soldered 2 Apply a few drops of soldering flux to the end of the pushrod and then use a soldering iron or a torch to heat it Tin the heated area with silver solder by applying the solder...

Страница 8: ...n any excess epoxy with denatured alcohol and a paper towel before the glue hardens Set the wing aside to allow the glue to harden 15 Repeat steps 1 14 for the left wing panel BUILD THE FUSELAGE Assem...

Страница 9: ...for the elevator servos The installation described uses one extension and a Y connector Some might prefer a separate line for each servo Either method is acceptable 1 Install a 36 914mm servo extensi...

Страница 10: ...to harden 6 Secure the horn to the elevator with four 4 x 5 8 sheet metal screws 7 Locate two 4 40 x 5 3 4 146mm threaded pushrod wires 4 40 nuts 4 40 threaded clevises 4 40 solder clevises and silico...

Страница 11: ...ng gear legs to the fuselage using four 8 32 x 1 25mm SHCS four 8 flat washers four 8 lock washers and thread locking compound When installed properly the landing gear sweeps back 2 Cut the axles to a...

Страница 12: ...le of drops of thin CA into the holes to harden the threads Set the fuselage aside until the glue hardens 8 Assemble the tail wheel wire as shown with the tail wheel steering arm and a 3mm wheel colla...

Страница 13: ...ock washers and 4 flat washers 12 Locate the two tail wheel wire springs With the rudder centered with the vertical fin attach the springs to each side of the tail wheel assembly inserting and twistin...

Страница 14: ...the rudder servo and the rudder You may find it helpful to tape the rudder in place for this step Install the clevises into the outer holes of the servo arm Using the same technique used on the opposi...

Страница 15: ...offs can be permanently mounted to the firewall Be sure to use thread locker on the bolts The bolts that mount the engine to the stand offs should be snug but not tightened permanently as you will be...

Страница 16: ...nt line upward towards the top of the fuel tank 10 Slide the aluminum ring over the fuel lines before installing the stopper into the fuel tank Install the stopper into the tank Slide the aluminum rin...

Страница 17: ...threaded wire Slide the pushrod tube into the tube you installed in the firewall and snap the ball link onto the ball you installed on the throttle arm 15 Position the carb fully open and rotate the t...

Страница 18: ...oke servo into the tray using the hardware that came with the servo Install a short 5 8 16mm servo arm on the servo 19 Install the remaining outer pushrod tube through the hole in the firewall in line...

Страница 19: ...stall the clevis into the outer hole of a short 5 8 16mm servo arm 24 Locate the four 16 406mm nylon tie wraps Insert one into each of the slots in the plywood plate as shown After you have inserted o...

Страница 20: ...ce for the engine Place the cowl over the engine as far as you can You should be able to get it almost completely over the engine With a felt tip marker mark inside of the cowl the area where the engi...

Страница 21: ...age to maintain separation between the ignition and radio system 7 Following the instructions with the engine install the ignition module and battery We have provided room on the side of the fuselage...

Страница 22: ...line 11 Rotate the prop shaft until the engine is on compression the piston is at the top of the cylinder Slide your prop onto the engine shaft You may need to drill the center of the prop to fit the...

Страница 23: ...ance around the prop blade Once you are satisfied that all of the parts are properly aligned carefully remove the spinner cone without disturbing the prop and back plate Transfer the hole locations in...

Страница 24: ...poon of soap per gallon of water Submerse the decal in the soap and water and peel off the paper backing Note Even though the decals have a sticky back and are not the water transfer type submersing t...

Страница 25: ...to suit your taste that is fine However too much control throw could make the model too responsive and difficult to control so remember more is not always better 1 Use a box or something similar to p...

Страница 26: ...th the wing attached to the fuselage all parts of the model installed ready to fly and an empty fuel tank place the model upside down on a Great Planes CG Machine or lift it upside down at the balance...

Страница 27: ...e engine off and inspect the model closely making sure all fasteners pushrods and connections have remained tight and the hinges are secure Always ground check the operational range of your radio befo...

Страница 28: ...part of the model other than the landing gear intentionally touch the ground except while landing CHECK LIST During the last few moments of preparation your mind may be elsewhere anticipating the exci...

Страница 29: ...l fasteners and control linkages for peace of mind Remember to takeoff into the wind When you re ready point the model straight down the runway hold a bit of up elevator to keep the tail on the ground...

Страница 30: ...ertain conditions such as on high or low rates This is not necessarily to improve your skills though it is never a bad idea but more importantly so you do not surprise yourself by impulsively attempti...

Страница 31: ...31 This model belongs to Name Address City State Zip Phone Number AMA Number DLE 55 Mounting Pattern 67 mm 80 mm...

Страница 32: ...GPMA1425 Mnl...

Отзывы: