GREAT PLANES Electrifly Rifle Скачать руководство пользователя страница 11

11


❏ 

3.  Use medium-grit sandpaper to roughen the exposed 

paint between the tape. Hint: Wrap your sandpaper around 
a 3/32" [2.4mm] sheet of balsa or something similar.


❏ 

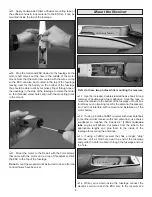
4.  Remove the tape and clean off any residual tape glue. 

Note that base of the two wing skids is slightly curved to 
match the airfoil shape of the wing while the fuselage skid 
is fl at. Glue the wing skids to the bottom of the wing as 
shown, starting with just a drop of thin CA. After the thin CA 
has hardened, follow with another drop or two of thin CA or 
medium CA. Allow to harden.


❏ 

5.  Prepare the bottom of the fuselage the same way 

and glue the fuselage skid to the bottom of the fuselage 5" 
[130mm] from the end, making certain it is centered.

Apply the Decals

The decals are applied “wet,” with window cleaner. This 

allows for precise positioning and after you squeegee out 
the window cleaner from under the decal there will be no air 
bubbles (as there usually are when you apply them dry).

1.  Use scissors or a sharp hobby knife to cut each decal 

from the sheet.

2.    Be certain the model is clean and free from oily fi ngerprints 
and dust. Peel the fi rst decal you wish to apply from its 
protective backing. Then, spray the back of the decal with 
window cleaner.

3.  Position the decal where desired and adjust for perfection. 
Use a piece of soft balsa or something similar to squeegee 
the window cleaner from under the decal. Apply the rest of 
the decals the same way.

GET THE MODEL READY TO FLY

Set the Control Throws

To ensure a successful fi rst fl ight, set up the Rifl e according 
to the control throws specifi ed. The throws have been 
determined through fl ight testing and record-keeping to 
give the pilot enough control to quickly change directions 
while at the same time not over controlling. If, after you 
have become accustomed to the way the Rifl e fl ies, you 
would like to change the throws to suit your taste, that 
is fi ne. However, too much control throw could make the 
model too responsive and diffi cult to control, so remember, 
“more is not always better.”

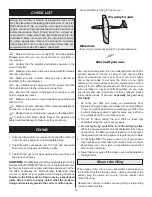
Measure the high rate elevator throw fi rst…

❏ 

1.  Turn on the transmitter, install and connect the motor 

battery, plug in the aileron servo, and mount the wing.


❏ 

2.  Holding a ruler vertically against the trailing edge of 

the middle of the elevator (the widest part), measure and 

Содержание Electrifly Rifle

Страница 1: ...final user assembled product By the act of using the user assembled product the user accepts all resulting liability If the buyer is not prepared to accept the liability associated with the use of th...

Страница 2: ...orrections to the Rifle visit the Great Planes web site at www greatplanes com Open the Airplanes link then select Rifle ARF If there is new technical information or changes to this model a tech notic...

Страница 3: ...equired to finish the Rifle that may require planning or decision making before starting assembly Order numbers are provided in parentheses Motor Battery and ESC The Rifle was designed for and tested...

Страница 4: ...his is the list of adhesives and building supplies that are required to finish the Rifle 1 2 oz 15g Thin Pro CA GPMR6001 CA applicator tips HCAR3780 2 oz 59mL spray CA activator GPMR6035 Threadlocker...

Страница 5: ...e at 217 398 8970 Order No Description NOTE REPLACEMENT PARTS LIST Wing Fuselage Horizontal Stabilizer Spinner Set Decal Sheet GPMA2720 GPMA2721 GPMA2722 GPMA2723 GPMA2724 Full size plans are not avai...

Страница 6: ...he elevator servo arm as shown 7 Guide the elevator pushrod down through the guide tube in the fuselage and mount the elevator servo by keying the tab in the back of the mount into the former and hold...

Страница 7: ...the rougher hook side of the included hook loop material to a length of 3 75mm Apply the strip inside the bottom of the fuselage just ahead of the front former Use the butt end of a small screwdriver...

Страница 8: ...ted to do so after the control throws have been set Mount the Receiver Refer to these two photos while mounting the receiver 1 Use the included double sided adhesive hook loop material or double sided...

Страница 9: ...e indicated by the arrows on the guide These tape strips aligned with the sharpened supports on the balance stand will keep the plane from slipping off the stand Hook Up the Ailerons Refer to this pho...

Страница 10: ...wire to the receiver Mount the wing to the fuselage with the included 3mm x 10mm counter sink flat head Allen screw Operate the ailerons to make sure the servo arm pushrods and torque rods are not in...

Страница 11: ...el is clean and free from oily fingerprints and dust Peel the first decal you wish to apply from its protective backing Then spray the back of the decal with window cleaner 3 Position the decal where...

Страница 12: ...At this stage your Rifle should be in ready to fly condition with all of the components in place including the complete radio system motor propeller and spinner Install the motor battery and mount the...

Страница 13: ...Y CODE EXCERPTS Read and abide by the following excerpts from the Academy of Model Aeronautics Safety Code For the complete Safety Code refer to Model Aviation magazine the AMA web site or the Code th...

Страница 14: ...possesses no self correcting tendencies what so ever it waits for your inputs before changing directions Therefore the Rifle must be flown only by experienced pilots who are able to keenly detect what...

Страница 15: ...power and sounds good Make sure your launch will be directly into any prevailing wind Inform your assistant of your intentions make certain he acknowledges and then apply full throttle Your assistant...

Страница 16: ...e all trimmed out for level flight and be executing perfect hand launches adrenaline pumping flights and smooth routine landings right at your feet One final note about flying your Rifle Have a goal o...

Отзывы: