❏ ❏
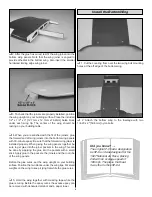
1. On the right top wing, install a 6" [152.4mm] servo
extension onto the servo lead. Secure the extension to the
lead with tape, a piece of heat-shrink tube or some other
method to keep them from coming unplugged.
❏ ❏
2. Tie the string to the servo extension. At the root of
the wing the other end of the string is taped. Pull the string
and the servo lead through the small hole you cut the
covering from. Untie the string and tape the lead to the wing
to prevent it from falling back into the wing.
❏ ❏
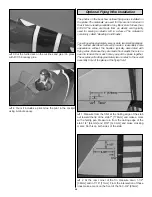
3. Install the servo into the servo opening. Drill
through the servo mounting holes with a 1/16" [1.6mm] drill
bit. Remove the servo from the servo opening. Install and
then remove a servo mounting screw into each of the holes
you have drilled. Apply a drop of thin CA into the holes to
harden the threads. Once the glue has cured, install the
servo into the servo opening using the hardware included
with your servo. Center the servo, then install a servo arm as
shown. The arm should be pointing towards the wing root.
❏ ❏
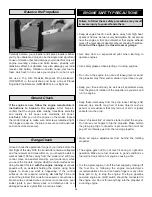
4. Install a 4-40 nut, metal clevis and silicon clevis
keeper on a .096 x 12" [305mm] pushrod. Attach the clevis
to a large control horn in the second hole from the bottom.
Position the control horn on the aileron so that the pushrod
is inline with the outer hole in the aileron servo arm. When
positioned properly the control horn will rest on a plywood
plate in the aileron. Mark the location of the mounting holes
onto the aileron. Drill a 1/16" [1.6mm] hole on the marks,
drilling through the plywood plate but not through the top of
the aileron. Insert and remove a #4 x 1/2" [12.7mm] sheet
metal screw into each of the holes. Apply a couple drops of
thin CA into the holes to harden the threads. Once the glue
has cured attach the horn to the aileron with four #4 x 1/2"
[12.7mm] sheet metal screws.
❏ ❏
5. Attach a metal solder clevis to the outside hole of
the aileron servo arm. Center the servo and the aileron. With
a fine-tip marker, mark the pushrod at the end of the clevis.
Use the same method to solder the aileron clevis to the
pushrod that was used to assemble the rudder pushrod.
❏ ❏
6. Trim the covering from the two aileron servo lead
exit holes in the side of the fuselage.
❏ ❏
7. Connect the Y-harness for the ailerons to the
receiver. Route the two connectors out of the holes.
❏
6. Repeat steps 1-5 for the left wing panel.
Install the Aileron Servos and Pushrods
21


