


GAC-‐300 Wifi Dial Up Router
The GAC-‐300 is a 802.11n WiFi Router with an advanced V.92 standard phone modem to enable Wireless access to the Internet through a phone line. The router makes a dialup
connection to the dial up Internet Service Provider (ISP) of your choice. It comes programmed with a free dial up ISP phone number so that you can test the router before programming
it with your ISP’s access number. The included V.92 standard 56K modem connects through the router’s USB port and provides the maximum data rate a phone line can support
(usually 40-‐50 kbps for a clear phone line, less for noisy lines). The GAC-‐300 is compatible with all WiFi devices (Windows and Mac Laptops, iPad, iPhone, Android Phones, etc.).
Specifications
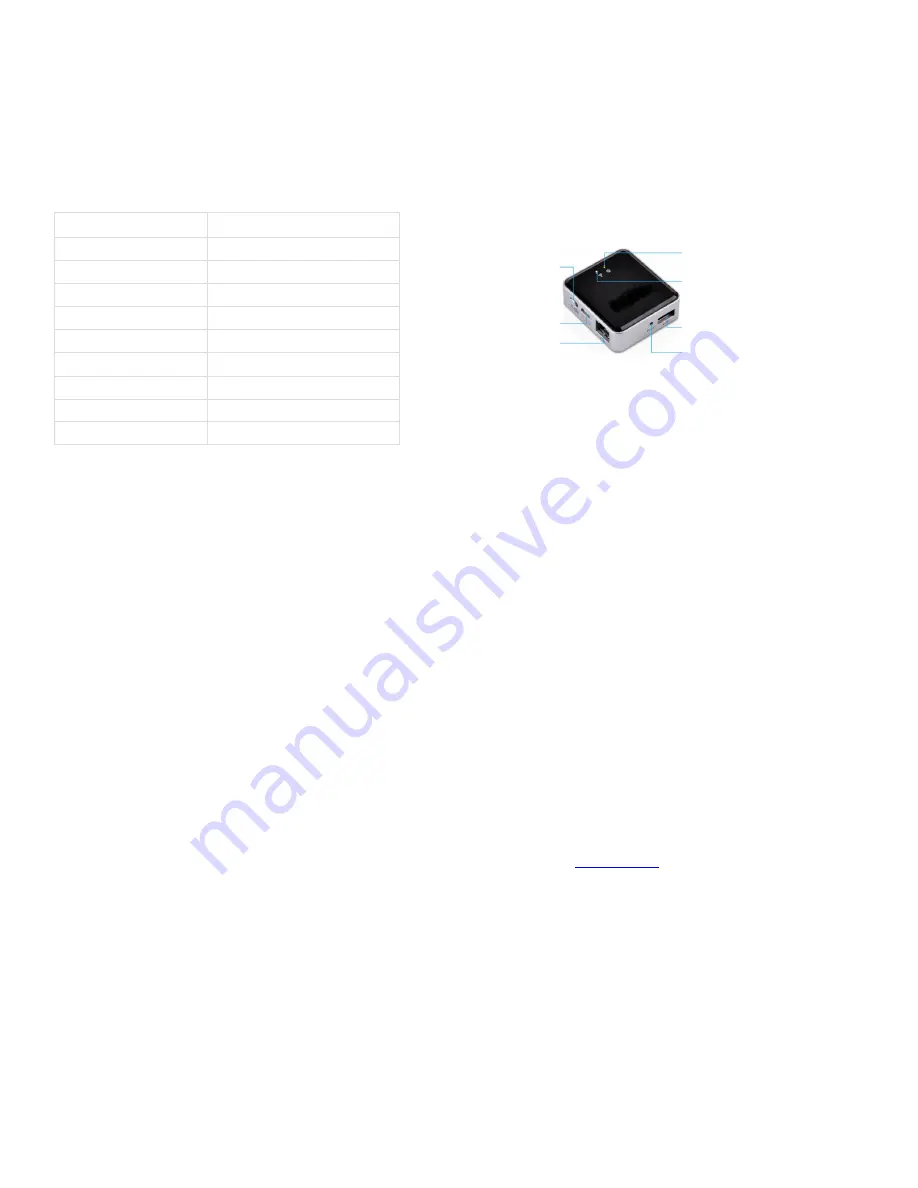
Figure 1
Top view of the GAC-‐300 showing the connections for the modem and power
Making the First Connection
Start by unpacking the router. The package consists of :
(a) Router, (b) USB Phone-‐Modem, (c) USB Cable which fits into any USB power adapter with minimum 1A output (USB DC adapter not included) (d) Phone cable, (e) Printed User
Guide
Attach the phone cable to the RJ-‐11 slot on the black phone modem and the other end of the phone cable to a telephone wall jack. Connect the phone modem to the USB port on
the router. Connect your USB charger to the power input of the router or use the included USB cable to connect to the USB jack on your power adapter. The router will power up
and the router will dial-‐out to the pre-‐configured free ISP Internet using the default long distance phone number configured in the router.
Per minute long distance charges from
your phone company may apply and to avoid those charges, configure a local access number and described in the Configuration section
.
The power up and dial out process takes anywhere from 2 to 3 minutes depending on the quality of your phone line and the ISP you are dialing. Once the connection is established,
the INTERNET LED with a “Globe” logo will start flashing about once per second. If the LED does not flash, power off the router, wait for 5 seconds and put the power back on. Consult
the Troubleshooting Section in this guide if the Internet LED still does not start flashing after 3 minutes.
Turn on your PC and scan for wireless networks. The router WiFi ID -‐
OpenWrt
will appear. Select
OpenWrt
and click Connect. If
OpenWrt
does not appear then wait for 10
seconds, and re-‐scan. Open a web browser on the PC (Internet Explorer for example) and see if you can access websites on the Internet. If the INTERNET LED is blinking but you
cannot connect to the Internet then your PC may not be connected properly to the router. Refer to the Troubleshooting section for help. Once you are done with the Internet
session,turn off the power to disconnect the connection.
The default phone number configured in the router is a long distance number and you may incur long distance charges
for this first connection.
You should now go ahead and customize the router with the phone number and account information for your own ISP account and optionally configure
WiFi security. If you want to use the router in wired mode, connect the PC’s LAN port with a LAN cable (not supplied) to the LAN port on the router. Make sure that the PC is
configured to get an IP address automatically. Thisis usually the default for a PC.
Configure the Router
Connect via WiFi to the
OpenWrt
ID as described earlier. Open up your web browser and enter the address
http://192.168.1.1
in the address bar. This is the internal web
configuration page on the router and not a web site on the Internet. The login screen will appear. Login to the router with user name
root
and password
admin
. Click the
Network
tab to open up the
Interfaces
page where the
DIALUP
interface shows the status of the dial up connection (Figure 3). Next click the
DIALUP
tab under
Interfaces
and the Dial
Up configuration page will appear as shown in Figure 4 below. Only a few entries on this page need to be changed. Set the Username and Password to that of your Dial Up ISP Account
and specify the ISP access phone number. Press
Save & Apply
. The router will store the new entries and bring the interfaces up. Wait ten seconds and power cycle the router. The
router will power up and automatically dial the configured number. Once the connection is established, the INTERNET LED in front will start flashing continuously once per second.
If the INTERNET LED does not flash, power off the router, wait for 5 seconds and put the power back. The INTERNET LED will begin to flash once per second after the connection is
made (after about 2 minutes) and you can start accessing the Internet. If the INTERNET LED does not flash continuously, click the Status Tab on the top most row of the web page
and then click the Dialup option on the extreme right of the Status Page. The first line of the log will provide the current status of the dial up connection. Consult the Troubleshooting
section at the end of this guide to diagnose the issue.
Start/Stop Connection Remotely
The dial up connection can be started and stopped remotely by accessing the web interface of the router. Refer to Figure 3 and identify the 2 green arrows icon at the far right of the
dialup interface line. Click the icon to start the dial up connection. To close the connection-‐ click the red icon right next to the 2 green arrows icon. If the connection does not close
you may need to click that red icon again. Do not click the red-‐X icon at the far right since that will completely delete dial up interface. If you click that by mistake, then you will have
to restore the router to factory defaults to recover the dial up functionality. Note that there is known bug that sometimes the Internet LED continues to blink even after the connection
is closed using this method.
Internet&
Connected
WiFi
USB&to&Phone&Modem
Reset
Switch
(Unused)
Power&Input
5V/1A
LAN
Wireless Standards
IEEE 802.11n, IEEE 802.11g, IEEE 802.11b
Wireless Signal Rates
11n: Up to 150 Mbps
Frequency Range
2.4-‐2.4835GHz
Wireless Transmit Power (MAX) 20dBm(Max. EIRP)
Interface
1 10/100M LAN Port,1 USB 2.0 Port
Phone Modem
V.92 Standard.
DC Supply
5v/1A from USB charger (not included)
Operating/Storage temperature 5
o
C~40
o
C/0
o
C~60
o
C
Relative/Storage humidity
5% ~ 90%, Non-‐Condensing
Certifications
FCC, CE, RoHS


