background image

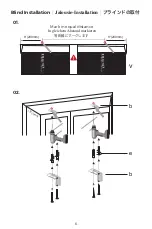
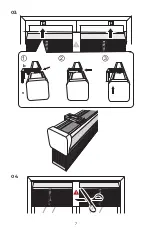
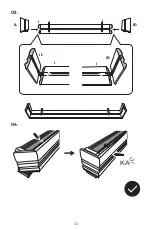
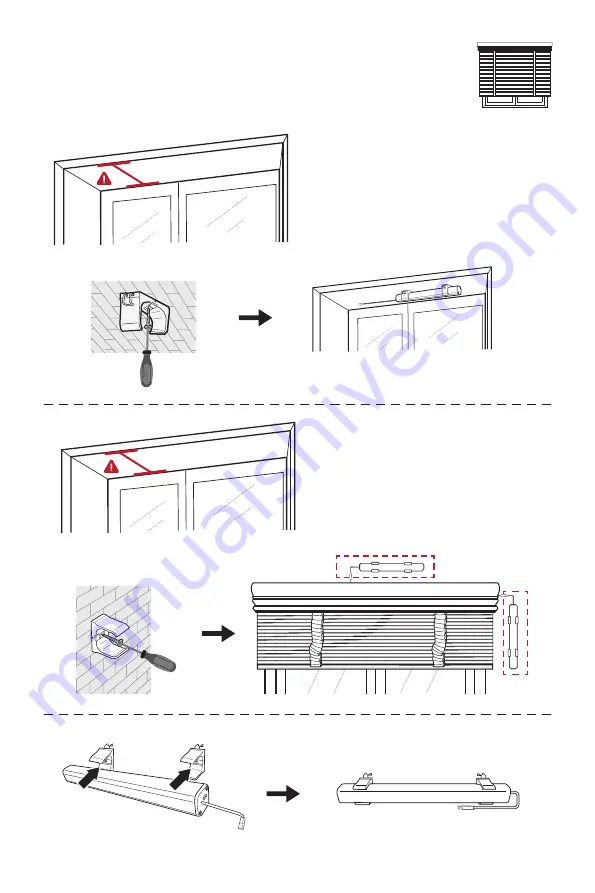
OUTSIDE MOUNT

正面付け

AUßENMONTAGE

1

2

4

5

6

7

8

10

11

12

13

14

15

16

17

18

19

20

21

22

23

24

25

26

27

28

3

9

j


>

1.5

(35mm)


<

1.5

(35mm)

d

d

j

d

d

Please install the blinds first and 

then install the battery 


Bitte installieren Sie die Jalousien und 

installieren Sie dann die Batterie.   


先にブラインドを取り付けてから、バッ

テリーを取り付けてください。 

Please install the battery before 

installing the blinds

.


Bitte installieren Sie die Batterie, bevor 

Sie die Jalousien installieren. 


ブラインドを取り付ける前にバッテリ

ーを取り付けてください。 

Содержание 68926

Страница 1: ...WOODEN BLINDS MANUAL HANDBUCH FÜR HOLZJALOUSIEN ウッドブラインド説明書 Version 1 0 Date 7 Jul 2022 68926 ...

Страница 2: ...te Parameters 16 Alexa Google home 17 23 Motor Programming 27 28 FAQ Motor Reset and Re pair 24 26 1 Vorbereitung 2 Zubehör 5 8 Innenmontage KATALOG 9 13 Außenmontage Batterie Version 3 Stecker Version 4 14 15 Fernbedienung Parameters 16 Alexa Google home 17 23 Motor Programmierung 27 28 FAQ Motor Reset und Re pair 24 26 ...

Страница 3: ...1 事前準備 2 出荷一覧 5 8 天井付け 目次 9 13 正面付け バッテリタイプ 3 コード式タイプ 4 14 15 リモコンパラメーター 16 Alexa Googlehome 17 23 モータープログラミング 27 28 よくある質問 モーターのリセットとペアリング 24 26 ...

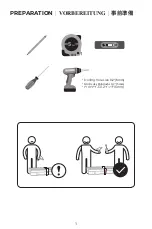
Страница 4: ...PREPARATION VORBEREITUNG 事前準備 5m Drilling hole size 0 2 6mm Größe des Bohrlochs 0 2 6mm 穴のサイズ0 2インチ 6mm 1 ...

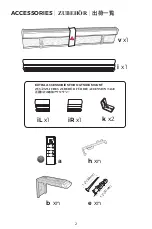
Страница 5: ...IES ZUBEHÖR 出荷一覧 v x1 e xn b xn i x1 I I 1 2 30m m I I 1 2 3 0 m m a Lithuim Cell CR2450 3V sc iL x1 iR x1 k x2 h xn 2 EXTRA ACCESSORIES FOR OUTSIDE MOUNT ZUSÄTZLICHES ZUBEHÖR FÜR DIE AUßENMONTAGE 正面付けの追加アクセサリー ...

Страница 6: ...r Panel Optional Solarpanel optional ソーラーパネル オプション 5V2A 1 Please fully charge the motor for more than 10 hours before your first use 2 After fully charged shade can be used for 2 3 months depending on the frequency of usage 1 Bitte laden Sie den Motor vor dem ersten Gebrauch mehr als 10 Stunden lang voll auf 2 Nach vollständiger Aufladung kann der Jalousien je nach Nutzungshäufigkeit 2 3 Monate la...

Страница 7: ...al Receiver Signal Empfänger 信号レシーバー Charging Connector Ladestecker 充電コネクタ 4 z g v Hardwired Version Stecker Version 電源コードタイプ 70 8 1 8m g x1 z x1 y x1 78 7 2m Optional オプション Reset Button Reset Knopf リセットボタン ...

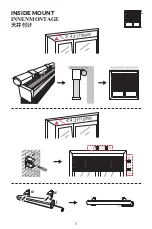
Страница 8: ...INSIDE MOUNT INNENMONTAGE 天井付け I I j d d 5 4 3 110mm 4 3 110mm d ...

Страница 9: ... v b e b 02 01 Mark in equal distance Blind Installation Jalousie Installation ブラインドの取付 In gleichem Abstand markieren 等距離にマークします 3 70mm 6 8 200mm 8 200mm ...

Страница 10: ...03 04 1 2 3 b v 7 ...

Страница 11: ...Wooden Valance Installation Holzvolant Installation 飾りボードの取付 01 02 i h 1 2 90 8 Back Rückseite バック xn i KA ...

Страница 12: ... and then install the battery Bitte installieren Sie die Jalousien und installieren Sie dann die Batterie 先にブラインドを取り付けてから バッ テリーを取り付けてください Please install the battery before installing the blinds Bitte installieren Sie die Batterie bevor Sie die Jalousien installieren ブラインドを取り付ける前にバッテリ ーを取り付けてください ...

Страница 13: ...b b 01 02 e b 10 Blind Installation Jalousie Installation ブラインドの取付 v Mark in equal distance In gleichem Abstand markieren 等距離にマークします 8 200mm 8 200mm ...

Страница 14: ...03 1 2 3 b v 04 11 ...

Страница 15: ...01 Back Rückseite バック Back Rückseite バック 02 iL K K 12 iL iR K K iR Wooden Valance Installation Holzvolant Installation 飾りボードの取付 i h xn 1 2 90 Back Rückseite バック i ...

Страница 16: ...04 03 13 iR iL i i iL iR i KA ...

Страница 17: ... BATTERY 3V Now you can control the blind via remote Jetzt können Sie die Rollos per Fernbedienung steuern リモコンでブラインドを制御することができました Megnetic Holder Megnetic Halter 磁気ホルダー CR2450 3V Lithuim Cell CR2450 3V sc INSTALL BATTERY DIE BATTERIE INSTALLIEREN リモコン電池を取付ます CR2450 LITHIUM BATTERY 3V 14 s x2 ...

Страница 18: ...す Channel 0 Group Control Kanal 0 Gruppe Kontrolle チャンネル0 グループコントロール Setting Button Einstellung Button 設定ボタン BACK RÜCKSEITE バック FRONT VORDERSEITE フロント Rolling Rollen ローリング 114ft 35m 656ft 200m CONTROL RANGE KONTROLLBEREICH 制御範囲 P2 P2 M CR2450 LITHIUM BATTERY 3V 15 Up Oben アップ Stop Stoppen ストップ Down Unten ダウン Channel Kanal チャンネル Channel Kanal チャンネル ...

Страница 19: ...HUB Anleitung 詳しくはハブの説明書を参照してください Alexa Google home 16 Hardwired Version Stecker Version コード式タイプ Battery Version Batterie Version バッテリタイプ APP control directly or Alexa Google home control please download the APP on the envelope Please make sure your phone is connected to Wi Fi before the APP is pairing with motor and controlling the blinds APP Steuerung direkt oder Alexa Google Heimsteuerung bitte...

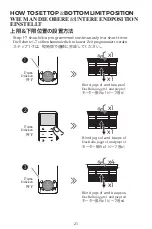
Страница 20: ...o in die obere untere Endstellung ブラインドを調整したい限度位置に移動ください until until EINSTELLUNG DER OBEREN UNTEREN ENDSTELLUNG HOW TO ADJUST TOP BOTTOM LIMIT POSITION 上限 下限位置の調整方法 x1 x4 x1 x5 Beeps x4 Blind jogs x1 Beeps x1 Beeps x4 Das Rollo joggt x1 und piept x1 ビープ音x4 モーター振れx1 ビープ音x1 17 When programming please do not adjust the top limit position too much It will be better for the blind if the top limit is no...

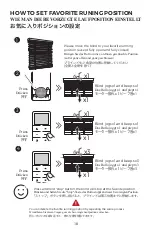
Страница 21: ... ブラインドをご希望の位置に移動してください 全開と全閉を除く Blind jogs x1 and beeps x1 Das Rollo joggt x1 und piept x1 モーター振れx1ビープ音x1 x1 x1 Blind jogs x1 and beeps x1 Das Rollo joggt x1 und piept x1 モーター振れx1ビープ音x1 x1 x3 Blind jogs x1 and beeps x3 Das Rollo joggt x1 und piept x3 モーター振れx1ビープ音x3 Press Drücken 押す Press Drücken 押す Press Drücken 押す HOW TO SET FAVORITE RUNING POSITION WIE MAN DIE BEVORZUGTE LAUFPOSITION EINSTELLT お...

Страница 22: ...ENUNGEN B EIN 新しいリモコン B の追加方法 Press Drücken 押す Press Drücken 押す Press Drücken 押す P2 P2 M CR2450 LITHIUM BATTERY 3V P2 P2 M CR2450 LITHIUM BATTERY 3V P2 P2 M CR2450 LITHIUM BATTERY 3V x1 x1 Blind jogs x1 and beeps x1 Das Rollo joggt x1 und piept x1 モーター振れx1ビープ音x1 x1 x1 Blind jogs x1 and beeps x1 Das Rollo joggt x1 und piept x1 モーター振れx1ビープ音x1 x1 x7 Blind jogs x1 and beeps x7 Das Rollo joggt x1 und p...

Страница 23: ...ITION WIE MAN DIE ENDSTELLUNG LÖSCHT 限度位置の削除 Press Drücken 押す Press Drücken 押す Press Drücken 押す Blind jogs x1 and beeps x1 Das Rollo joggt x1 und piept x1 モーター振れx1ビープ音x1 Blind jogs x1 and beeps x1 Das Rollo joggt x1 und piept x1 モーター振れx1ビープ音x1 Blind jogs x1 and beeps x4 Das Rollo joggt x1 und piept x4 モーター振れx1ビープ音x4 20 ...

Страница 24: ...grammed continuously in a short time Die Schritte 1 7 sollten kontinuierlich in kurzer Zeit programmiert werden ステップ1 7は 短時間で連続に完成してください Press Drücken 押す Press Drücken 押す Press Drücken 押す Blind jogs x1 and beeps x1 Das Rollo joggt x1 und piept x1 モーター振れx1ビープ音x1 Blind jogs x1 and beeps x1 Das Rollo joggt x1 und piept x1 モーター振れx1ビープ音x1 Blind jogs x1 and beeps x4 Das Rollo joggt x1 und piept x4 モーター振...

Страница 25: ...す 6 until beeps x4 Blind jogs x1 beeps x1 beeps x4 Das Rollo joggt x1 und piept x1 ビープ音x4 モーター振れx1 ビープ音x1 beeps x4 Blind jogs x1 beeps x1 beeps x4 Das Rollo joggt x1 und piept x1 ビープ音x4 モーター振れx1 ビープ音x1 When programming please do not adjust the top limit position too much It will be better for the blind if the top limit is not set too tightly Bei der Programmierung sollten Sie die obere Endposition...

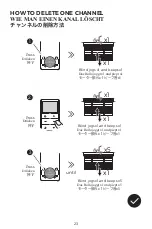
Страница 26: ...WIE MAN EINEN KANAL LÖSCHT チャンネルの削除方法 Press Drücken 押す Press Drücken 押す Press Drücken 押す Blind jogs x1 and beeps x1 Das Rollo joggt x1 und piept x1 モーター振れx1ビープ音x1 Blind jogs x1 and beeps x1 Das Rollo joggt x1 und piept x1 モーター振れx1ビープ音x1 Blind jogs x1 and beeps x5 Das Rollo joggt x1 und piept x5 モーター振れx1ビープ音x5 until 23 ...

Страница 27: ...x3 HOW TO RESET THE MOTOR WIE MAN DEN MOTOR ZURÜCKSTELLT モーターをリセットする Beeps x3 Piept x3 ビープ音x3 Press until blind jogs x3 Drücken bis das Rollo joggt x3 モーター振れ3回までにずっと押します x3 24 ...

Страница 28: ...Beeps x3 Piept x3 ビープ音x3 x3 Press until blind jogs x3 Drücken bis das Rollo joggt x3 モーター振れ3回までにずっと押します x3 1 HOW TO RE PAIR WITH MOTOR WIE MAN DEN MOTOR WIEDER REPARIERT モーターとペアリングするの方法 25 ...

Страница 29: ...o piept x1 ビープ音x1 Press until blind jogs x1 and beeps x1 Drücken bis das Rollo joggt x1 und piept x1 モーター振れx1ビープ音x1まで長押し Blind jogs x1 and beeps x1 Das Rollo joggt x1 und piept x1 モーター振れx1ビープ音x1 Blind jogs x1 and beeps x6 Das Rollo joggt x1 und piept x6 モーター振れx1ビープ音x6 Press Drücken 押す Press Drücken 押す Press Drücken 押す 26 ...

Страница 30: ...xa oder Google zu verbinden Er funktioniert mit den meisten gängigen Hubs auf dem Markt wie z B BOND Broadlink 1 WIE MAN DAS ROLLO MIT ALEXA ODER GOOGLE KOPPELT 1 Verwenden Sie einen 5V 2A Stecker um den Motor über 12 Stunden aufzuladen 2 Neue Fernbedienungsbatterie auswechseln 3 Motor zurücksetzen auf Seite 24 4 Fernbedienung wieder mit dem Motor koppeln auf Seite 25 26 2 WAS IST ZU TUN WENN DER ...

Страница 31: ...ジのようにモーターをリセットします 4 25 26ページのようにモーターとリモコンをペアリングします 2 モーターが作動しない場合はどうすればよいですか 1 17ページのように上限 下限位置を調整してください 2 調整に失敗した場合は 24 26ページのようにモーターをリセットし ペアリングしてください それから21 22ページの上限と下限の位置を設定します 3 新しい上限 下限位置が必要な場合の対処方法 1 窓枠の外側 内側をもう一度測定して サイズがご注文と同じであることを再確認してください 2 サイズがご注文と同じ場合は ブラインドサイズを測定し カスタマーサービスにご連絡く ださい サービスの電子メールは 各製品のWebページに記載されています 通常 24時間 以内に返信致します 4 ブラインドが窓枠に合わない場合はどうすればよいですか 28 ...

Отзывы: