background image

33601 VARIO Modul - Graupner HoTT 2.4

                                                                             02

3. 

STARTING UP

Connect the VARIO MODULE with the socket marked „T“ of the receiver. The connector system is polarised, 
look for the small camfer on the edges. Never use force - the plug should engage easily and fully. The so-
ckets are labeled accordingly: black wire (-), red wire (+) and orange wire (S).

Only for transmitters under 1 „exception“ with SMART-BOX:
Install the SMART-BOX at the mounting bracket of the transmitter as shown in the 

fi

 gure. Connect the box 

then the 3-pin lead to the transmitter. Put one end of the cable into the DATA jack on the transmitter and the 
other into the jack on the right side of the SMART-BOX. The connector system is polarised, look for the small 
camfer on the edges. Never use force - the plug should engage easily and fully. The sockets are labeled 
accordingly: black wire (-), red wire (+) and orange wire (S).

Note: 

You can connect the VARIO MODULE instead of the receiver directly to the jack on the right side of the 

SMART-BOX. By doing this, the settings will be sent directly to the VARIO MODULE (without using the radio 
control system) and the programming is much faster. A power supply for the SMART-BOX is neccessary 
(3.6 - 9 V), inserted on the left side. The connector system is reverse polarised, look for the small camfer on 
the edges. Do not use force, the plug should click into place easily. This sockets is labeled accordingly also. 
The black wire must be down (-), the red top (+).

4. 

OPERATION

The operation of the VARIO-MODULE is similar to the operation of the transmitter. You should also read 
the manual of your remote control system, especially the chapter „telemetry“. The operation is done in the 
transmitter menu „Telemetry“ under the display SETTING AND DATA VIEW. The sensor displays follow the 
receiver displays (RX), i.e. the „Vario Sensor“ display follows after the last display servo test (RX SERVO 
TEST). 

Please note

: the menus can only be selected when the receiver is switched on. When you switch 

the receiver on, it may take a few seconds before the receiver display becomes active and can be selected: 
> symbol appears at the top right corner of the transmitter display (TX).
There may be a slight delay in the screen’s response to inputs, since all the settings are transmitted directly 
to the receiver by wireless means.

Operation with the SMART-BOX:

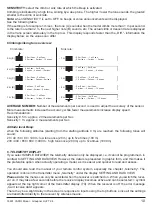
The SMART-BOX is operated by the four buttons on the top. Switch with the ESC and ENTER keys between 
the different displays. With the DEC and INC buttons you can select the parameters in the display (INC 
moves the cursor down, DEC up).

Switch on the transmitter. On the startup screen appears SETTING AND DATA VIEW / MODEL SELECT. 
Move the arrow cursor with the INC or DEC buttons on SETTING AND DATA VIEW and then press ENTER 
to display the parameters of the transmitter, receiver and telemetry sensors and / or program it, or select 
MODEL SELECT to display the telemetry data graphically (see point 6). In MODEL SELECT display no 
changes are possible.

After SETTING AND DATA VIEW have chosen, the VARIO SENSOR display is available. The sensor dis-
plays follow the transmitter (TX) and receiver (RX) displays, i.e. the Vario display follows after the last display  
servo test (RX SERVO TEST). 

Please note

: the menus can only be selected when the receiver is switched on. When you switch the recei-

ver on, it may take a few seconds before the receiver display becomes active and can be selected: > symbol 
appears at the top right corner of the transmitter display (TX).
There may be a slight delay in the screen’s response to inputs using the top buttons, since all the settings 
are transmitted directly to the receiver by wireless means.

Содержание HoTT 2.4 VARIO Module 33601

Страница 1: ...2 Minimum Altitude 06 4 3 Maximum Altitude 06 4 4 Sink rate sec Negative Difference 1 06 4 5 Sink rate 3 sec Negative Difference 2 07 4 6 Climb rate sec Positive Difference 1 07 4 7 Climb rate 3 sec Positive Difference 2 07 4 9 Display Overview 08 5 Setup Displays 09 5 1 Continous Vario Setup Sensivity 09 6 Telemetry Display SIMPLE DATAVIEW 10 7 Firmware Updates 12 8 Signal Tone Overview 13 9 Warr...

Страница 2: ... instructions Informations available Setup Current Altitude Min Altitude Max Altitude Climb Sinkrate s Climb Sinkrate 3s Climb Sinkrate Min Continous Vario accuracy 0 1m Note Any settings you make on the Transmitter or SMART BOX will be stored in the VARIO MODULE only Since the VARIO MODULE can be updated via the USB connection you always have the latest software and can utilize future functions o...

Страница 3: ... DATA VIEW The sensor displays follow the receiver displays RX i e the Vario Sensor display follows after the last display servo test RX SERVO TEST Please note the menus can only be selected when the receiver is switched on When you switch the receiver on it may take a few seconds before the receiver display becomes active and can be selected symbol appears at the top right corner of the transmitt...

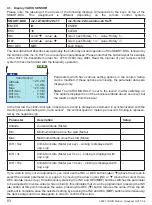
Страница 4: ...f the SMART BOX followed by the buttons of the mx 16 HoTT as an example in parentheses Please note that the button layout for example of the HoTT mc transmitters order No 4758 4759 may differ Read the manual of your remote control system to become familiar with the telemetry operation Parameter Description Setup Altitude Current Altitude Meter Min Minimum Altitude since the start Meter Max Maximum...

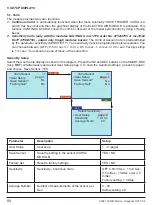
Страница 5: ...00 to 3000 m Max ALT Page 3 Maximum Altitude 500 to 3000 m Negative Difference 1 Sek Page 4 Sink rate Sec 50 0 to 0 m Negative Difference 2 3 Sek Page 5 Sink rate 3 Sec 50 0 to 0 m Positive Difference 1 Sek Page 6 Climb rate Sec 0 to 50 0 m Positive Difference 2 3 Sek Page 7 Climb rate 3 Sec 0 to 50 0 m Warning Time Page 2 page 7 Warning Time OFF 5 10 15 20 25 30 sec Repeat Time Page 2 page 7 Repe...

Страница 6: ...warning at any time by pressing one of the buttons on the top of the SMART BOX If you wish to carry out an adjustment point 4 2 to 4 7 you must use the INC or DEC buttons above the screen to select page 1 Save Sensor Simultaneously pressing the INC and DEC buttons SET switches the parameter to be adjusted to inverse video white on black this indicates that it can be programmed pressing the INC but...

Страница 7: ... Tone page 2 20m Off Always O 4 3 Maximum Altitude Page 3 Maximum Altitude Maximum altitude of the model during operation warning threshold set between 500 and 3000 m based on the star ting altitude 0 m Factory setting 500 m Signal Tone Z DEC Max Altitude Set Warning Max ALT Warning Time Repeat Time Signal Tone page 3 500m Off Always Z INC 4 4 Sink rate per second Page 4 Sink rate s Negative Diffe...

Страница 8: ...starting altitude 0 m Factory setting 10 m Sec Signal Tone N 4 7 Climb rate per 3 seconds Page 7 Climb rate 3 s Positive Difference 2 Climb rate of the model per 3 sec in Meter warning threshold set between 0 and 50 m based on the starting altitude 0 m Factory setting 1 m 3 Sec Signal Tone M DEC Negative Difference 2 Set Warning Diff 3 Sec Warning Time Repeat Time Signal Tone page 5 1 m Off Always...

Страница 9: ...Warning Max height Warning Time Repeat Time Signal Tone page 3 500m Off Always B INC DEC Negative Difference 1 Set Warning Diff Sec Warning Time Repeat Time Signal Tone page 4 10 m Off Always C INC DEC Negative Difference 2 Set Warning Diff 3 Sec Warning Time Repeat Time Signal Tone page 5 1 m Off Always B INC DEC Positive Difference 1 Set Warning Diff Sec Warning Time Repeat Time Signal Tone page...

Страница 10: ...m sec 1 m sec or 3 m sec Factory setting is 1 m sec You should use one of these at the same time Sensivity Setup Select the User Setup display as shown in the diagram Press the INC and DEC buttons on the SMART BOX resp SET simultaneously and select User Setup page 2 To save the selected settings go back to page 1 and choose Save Sensor YES Parameter Description Setup User Setup User seup 1 2 page ...

Страница 11: ...lect SIMPLE DATAVIEW the telemetry data can only be displayed i e it cannot be programmed in contrast to SETTING AND DATAVIEW However the data is represented in graphic form and this makes it the preferable option when actually operating a model as it is easier and quicker to read and assess You should also read the manual of your remote control system especially the chapter telemetry The operatio...

Страница 12: ...ursor to AIRPLANE model aircraft or CAR model car then press ENTER SET to move to the corresponding telemetry display In the aircraft display AIRPLANE you can use the INC or DEC button to select one of the following graphic displays RECEIVER shows the same data as RX DATAVIEW RECEIVE VARIO MODUL receive performance actual altitude min and max altitude temperature climb rate sink rate sec climb rat...

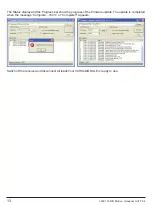
Страница 13: ...as shown in the illustrations and are connected Start the Graupner Firmware Update Utility Under COM Port Setup select the cor rect COM port i e the one to which the USB lead is connected If you are not sure of this press the button Search and select in the pop up window Silicon Labs CP210x USB to UART Bridge and press OK Select Baud Rate 19200 Under Interface Type click on Signal 2 Vcc 3 Gnd Now ...

Страница 14: ...4 The Status display and the Progress bar show the progress of the firmware update The update is completed when the message Complete 100 or Complete appears Switch off the receiver and disconnect all leads Your VARIO MODULE is ready to use ...

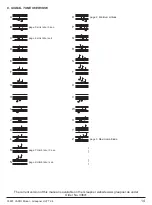
Страница 15: ...um altitude O P page 5 sink rate 3 sec page 4 sink rate sek Q R S T U page 7 climb rate 3 sec page 6 climb rate sec V W X Y Z page 3 Maximum altitude 8 SIGNAL TONE OVERVIEW The current version of this manual is available on the Graupner website www graupner de under Order No 33601 ...

Страница 16: ...e of it in the or dinary domestic waste The correct method of disposal is to take it to your local collection point for recycling electrical and electronic equipment The symbol shown here which may be found on the product itself in the operating instructions or on the packaging indicates that this is the case Individual markings indicate which materials can be recycled and re used You can make an ...

Страница 17: ...a société Graupner GmbH Co KG Henriettenstraße 94 96 73230 Kirchheim Teck Allemagne accorde sur ce produit une garantie de 24 mois à partir de la date d achat La garantie prend effet uniquement sur les vices de fonc tion nement et de matériel du produit acheté Les dom mages dûs à de l usure à de la surcharge à de mauvais accessoires ou à d une application inadaptée sont ex clus de la garantie Cett...

Страница 18: ..._____________________________________________________________________________ _____________________________________________________________________________________ _____________________________________________________________________________________ _____________________________________________________________________________________ ________________________________________________________________...

Страница 19: ..._____________________________________________________________________________ _____________________________________________________________________________________ _____________________________________________________________________________________ _____________________________________________________________________________________ ________________________________________________________________...

Страница 20: ...supplier We accept no liability for printing errors Sous réserve de modifications et de possibilité de livraison Livraison uniquement au travers de magasins spécialisés en modélisme Nous pourrons vous communiquer l adresse de votre revendeur le plus proche Nous ne sommes pas responsables d éventuelles erreurs d impression Con riserva di variazione delle specifiche e disponibilità del prodotto Forn...

Отзывы: