GRASS VALLEY Infinity DMR 1000 Скачать руководство пользователя страница 35


35

The thumbnail view also shows playlists. There are two types of playlist:

• Tape View — contains a list of all compatible clips on the current media, in 

chronological order. 

• Story — contains a list of all clips in the particular story, in chronological order.

NOTE: When a story is selected in the Setup | Metadata | Storyfile menu, all subsequent 
recorded clips are stored under that story’s playlist.

Playlists are displayed after the clips. The Tape View playlist is always shown first.
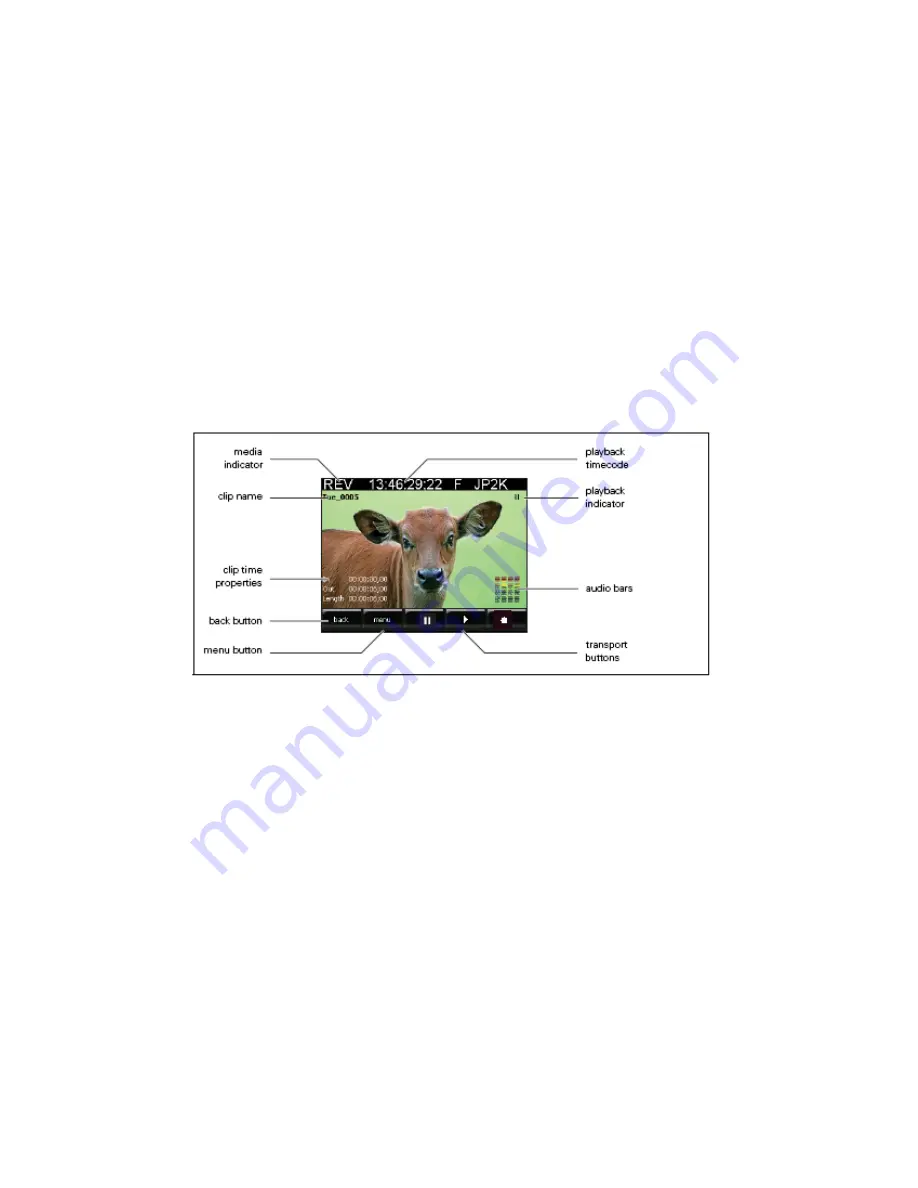
Playing a clip

• To select a clip, tap its thumbnail.

• To load a clip, double tap its thumbnail.

You can use the transport buttons on the front panel or the touch screen. 

To return to the thumbnail overview, press the Back button on the touch screen.

To look up detailed information about a selected clip, or to delete the clip, press the 
menu button and make the appropriate selection. 

Содержание Infinity DMR 1000

Страница 1: ...Infinity DMR 1000 Quick Start Guide Digital Media Recorder SOFTWARE VERSION 12 1 071 8659 00 April 2009...

Страница 2: ...ountries Grass Valley Inc products are covered by U S and foreign patents issued and pending Additional information regarding Grass Valley Inc trademarks and other proprietary rights may be found at w...

Страница 3: ...mpactFlash cards 31 Inserting a CompactFlash card 31 Ejecting a CompactFlash card 32 Recording a clip 32 About the recording buffer 32 Loading a clip 33 Using the Clips menu 34 Playing a clip 35 Findi...

Страница 4: ...4...

Страница 5: ...se World Wide Web http www thomsongrassvalley com support Technical Support E mail Address gvgtechsupport thomson net Telephone Support Use the following information to contact Product Support by phon...

Страница 6: ...3440 North America North America Mexico Caribbean 1 800 547 8949 1 530 478 4148 Europe UK Ireland Israel 44 118 923 0499 Benelux Netherlands 31 0 35 62 38 421 Benelux Belgium 32 0 2 334 90 30 France...

Страница 7: ...lowing safety precautions to avoid injury and prevent damage to this product or any products connected to it CAUTION This product contains no user serviceable parts Do not open the DMR Only qualified...

Страница 8: ...ate this product in wet or damp conditions Do Not Operate in an Explosive Atmosphere To avoid injury or fire hazard do not operate this product in an explosive atmosphere Avoid Exposed Circuitry To av...

Страница 9: ...bols Terms in This Manual These terms may appear in this manual WARNING Warning statements identify conditions or practices that can result in personal injury or loss of life CAUTION Caution statement...

Страница 10: ...ervice personnel only To avoid personal injury do not perform any servicing unless you are qualified to do so Refer to all safety summaries before performing service Do Not Service Alone Do not perfor...

Страница 11: ...could void the user s authority to operate this equipment Canadian EMC Notice of Compliance This digital apparatus does not exceed the Class A limits for radio noise emissions from digital apparatus s...

Страница 12: ...tromschlaggefahr zu verringern f hren Sie keine Wartungsarbeiten au er den in den Bedienungsanleitungen genannten Arbeiten aus es sei denn Sie besitzen die entsprechende Qualifikationen f r diese Arbe...

Страница 13: ...Wenn Sie diesen Begriff lesen besteht ein unmittelbares Verletzungsrisiko WARNUNG Wenn Sie diesen Begriff lesen besteht ein mittelbares Verletzungsrisiko VORSICHT Es besteht ein Risiko f r Objekte in...

Страница 14: ...erwenden Sie antistatische Prozeduren Ausr stung und Oberfl chen w hrend der Wartung Warnungen Die folgenden Warnungen weisen auf Bedingungen oder Vorgehensweisen hin die Verletzungs oder Lebensgefahr...

Страница 15: ...keine Explosionsgefahr besteht Verwenden Sie dieses Produkt nur in Umgebungen in denen keinerlei Explosionsgefahr besteht Hohe Kriechstr me Das Ger t muss vor dem Einschalten unbedingt geerdet werden...

Страница 16: ...erten Servicetechniker untersuchen Kabel richtig verlegen Verlegen Sie Netzkabel und andere Kabel so dass Sie nicht besch digt werden St tzen Sie schwere Kabelb ndel ordnungsgem ab damit die Anschl ss...

Страница 17: ...intenance Afin de diminuer les risques de d charges lectriques ne proc dez aucune intervention d entretien autre que celles contenues dans le manuel de l utilisateur moins que vous ne soyez habilit po...

Страница 18: ...que Signale que l utilisateur l op rateur ou le technicien de maintenance doit faire r f rence au x manuel s pour prendre connaissance des instructions d utilisation de maintenance ou d entretien Il s...

Страница 19: ...e sur ce produit si une personne n est pas pr sente pour fournir les premiers soins en cas d accident Retirez tous vos bijoux Avant de proc der une intervention d entretien retirez tous vos bijoux not...

Страница 20: ...occasionner des endommagements l quipement et aux installations N ouvrez pas l appareil Toute ouverture prohib e de l appareil aura pour effet d annuler la garantie Utilisez la source d alimentation...

Страница 21: ...de cet quipement s ils sont fournis satisfont aux exigences de toutes les r glementations r gionales L utilisation de cet quipement des tensions d passant les 130 V en c a requiert des cordons d alim...

Страница 22: ...22...

Страница 23: ...23 Unpack and check contents Before you begin unpack and identify the following items 1 Power Cord Quick Start Guide Documentation CD ROM Infinity DMR...

Страница 24: ...an AC power cord You can also use an external 15 V DC power source with standard XLR style 4 pin connector not included Front panel of the DMR 1000 This is an example of the front panel of one model...

Страница 25: ...rnal 15 V DC power source with standard XLR style 4 pin con nector If AC power is enabled DC power is ignored LTC input is readable forward and reverse via BNC Connectors Use this USB port or the USB...

Страница 26: ...e these to configure the DMR load a clip edit a playlist etc To go back a step use either the soft Back button on the touchscreen or the hard Back button on the front panel The hard buttons below the...

Страница 27: ...ng the touch screen When you power on the DMR 1000 you see the main settings screen displayed on the LCD screen The screen can be displayed in three different formats default day and night as shown be...

Страница 28: ...with a new sub set of function buttons A button with a title and a value under it These buttons are used to change the value of the parameter Tapping this button opens a pop up box such as the follow...

Страница 29: ...set all 4 channels Video standarda a Make sure to eject any loaded clip before setting the video standard If the DMR is playing recording or has a clip loaded the video standard setting is unavailabl...

Страница 30: ...Select one of the following 720p50 1080i50 720p59 1080i59 Video source Setup formats video source SDI Video compression Setup formats video compression HD Select one of the following JP2K50 JP2K75 JP...

Страница 31: ...urn off the power 2 Insert a long metal pin such as a paperclip into the disk eject hole on the REV drive 3 Push firmly until the REV disk is extruded 4 Pick up the disk and gently pull it out of its...

Страница 32: ...s the Record button About the recording buffer The built in recording buffer enables the DMR to continue recording even when the media is temporarily inaccessible for example due to heavy shocks When...

Страница 33: ...dia recorder IN OUT BACK CF1 CF2 Tap once Tap twice 1 2 3 You can also use the jog shuttle knob to select a clip Press the knob to load the clip The selected clip is loaded into the playback monitor a...

Страница 34: ...p has an orange background while the unselected clips have a white background If a clip has a video standard or compression format that differs from the current settings the thumbnail has an orange ti...

Страница 35: ...ubsequent recorded clips are stored under that story s playlist Playlists are displayed after the clips The Tape View playlist is always shown first Playing a clip To select a clip tap its thumbnail T...

Страница 36: ...selected clip into the playback monitor delete delete the selected clip format medium formats the current media To close the menu click the Back button on the touchscreen If you select properties a p...

Страница 37: ...ype that you are using Creating a new playlist 1 Select the Home button 2 From the touch screen menu select Clips 3 From the available clips in the specified recording medium tap a clip that you want...

Страница 38: ...ity DMR does not display a confirmatory message before deleting a clip from the playlist Deleting a clip from the playlist merely deletes the reference to the clip 1 Select the Home button 2 From the...

Страница 39: ...channels channel 1 4 ch recording level If level control is set to Knob 1 or 2 the recording level setting is grayed out Analog only Audio source Audio channels source ch 1 4 If AES 1 4 or Mute is sel...

Страница 40: ...are grayed out Configuring the Path Notes Audio output to AES source Make the following selections 1 Audio outputs AES audio AES Mode source 2 Audio outputs AES audio AES 1 2 3 4 AES source AES 5 8 a...

Страница 41: ...ts video compression SD Video compression HD Setup formats video compression HD Media selection Setup formats media selection Selects the media format Chunk size Setup formats chunksize By default the...

Страница 42: ...4 Userbits 2 Setup timecode userbits userbits 2 UB 5 8 Ancillary timecode SD Setup timecode setup ATC SD Ancillary timecode HD Setup timecode setup ATC HD Timecode setup input type Setup timecode set...

Страница 43: ...ime HH MM SS Date MM DD YY Time Zone 0 30 hrs steps UTC 12 00 Backlight System frontpanel backlight Calibration System frontpanel calibration Used to reset the touch screen location accuracy Title bar...

Страница 44: ...Fast Forward Hold down FF for a moment then release the button to cause the clip to fast forward at 32x speed Stop and Fast Forward Press STOP and FF to cue to the end of the clip Frame advance Momen...

Отзывы: