background image

CHAPTER 3. CRAFT ROBO CONTROLLER 

3-17

PREFACE

CH 3. CRAFT ROBO CONTROLLER

CH 1. PRIOR TO USE

APPENDIX A

CH 2. CONNECTION AND PREPARATION 

INDEX

CONTENTS

CH 4. CUTTING DATA SAVED ON SD CARD

PREFACE

CONTENTS

CH 1. PRIOR TO USE

CH 2. CONNECTION AND PREPARATION 

INDEX

APPENDIX A

CH 4. CUTTING DATA SAVED ON SD CARD

CH 3. CRAFT ROBO CONTROLLER

If the position of the intersection point recognized by the Craft ROBO is not 

aligned with that of the printed cross, correct it as specified below. 


Use the vertical (y) or horizontal (x) scroll bar to specify a correction value. 


The correction value must be in the range of −40 to 40. One step represents 

0.05 mm. For example, if 20 is specified as the correction value, the line drawn 

by the pen (ballpoint pen) moves 1 mm.  

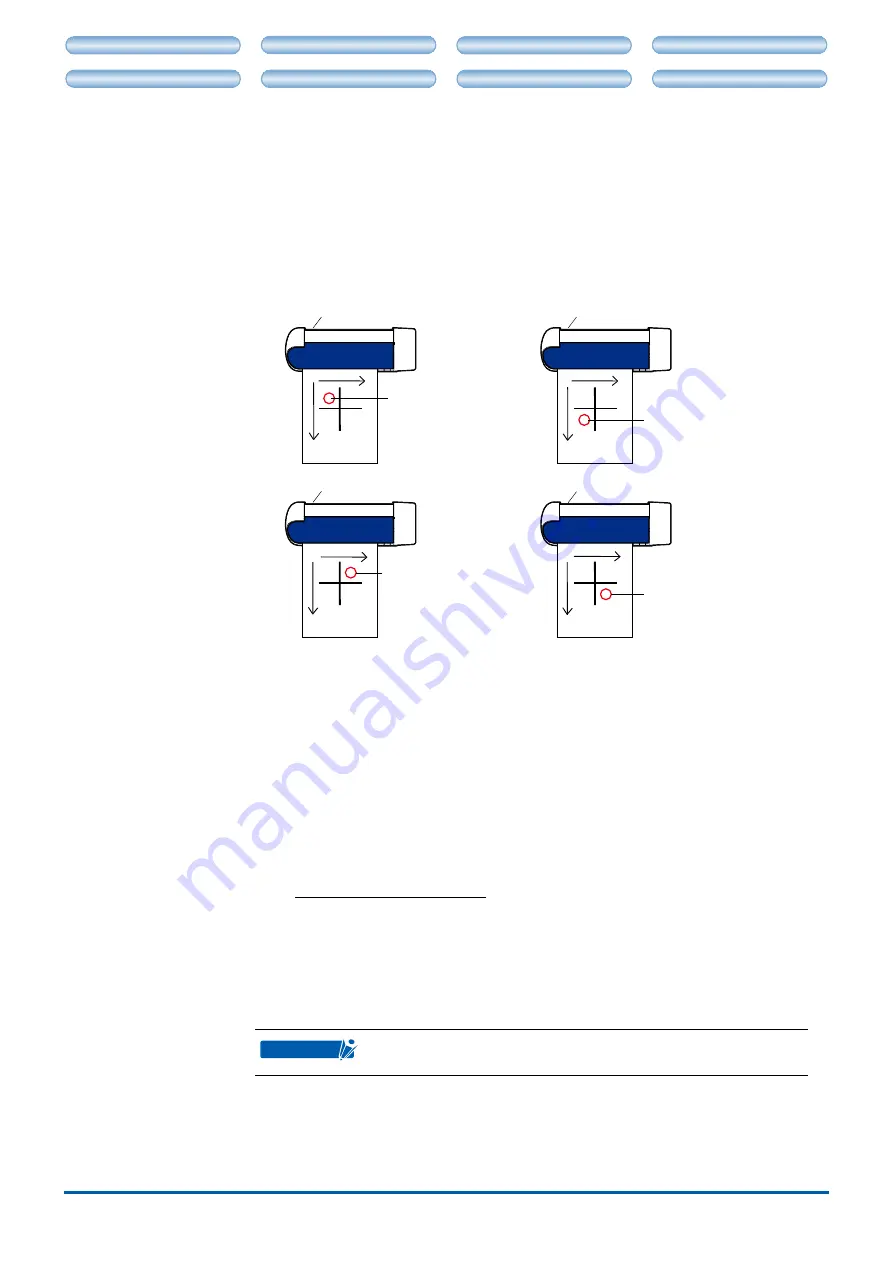
If the position of the intersection point recognized by the Craft ROBO is not 

aligned with that of the printed cross, set a correction value in accordance with 

the figures shown below. The red circle in each diagram denotes the position 

of the intersection point recognized by the Craft ROBO.

Vertical (y)

Craft ROBO

If  the  cross  is  located 

at this position, move it 

toward the positive side 

in both the horizontal (x) 

and vertical (y) directions.

Craft ROBO

Craft ROBO

Craft ROBO

If  the  cross  is  located 

at  this  position,  move 

it  toward  the  positive 

side in the horizontal (x) 

directions  and  toward 

the negative side in the 

vertical (y) directions.

If the cross is located at this 

position, move it toward the 

negative side in the horizontal 

(x) directions and toward the 

positive side in the vertical (y) 

directions.

If  the  cross  is  located 

at  this  position,  move  it 

toward the negative side 

in both the horizontal (x) 

and vertical (y) directions.

Horizontal (x)

Vertical (y)

Horizontal (x)

Vertical (y)

Horizontal (x)

Vertical (y)

Horizontal (x)

Blade Position
(Displayed only for the CC330-20.)

Clicking the [Use Keyboard] button allows the arrow keys on the computer 

keyboard to be used in the same way as the [Blade Position] buttons.

Distance Correction

When the Craft ROBO moves the media, the distance by which the media is fed 

may not always be exactly as expected, depending on the media thickness and 

cutting speed. Distance Correction is used to account for such an error. In the  

range of −2% to +2%, enter a negative value if the fed distance is greater than the 

expected distance, or a positive value if the fed distance is less than the expected 

distance. The correction value may be calculated from the equation below. 

Actually moved distance

Distance to be moved

1 –

(

)

× 100 = correction value

Concrete example

If the media needs to be moved 20 cm and the distance actually moved by the 

Craft ROBO is 19.8 cm, then

(1 – 19.8 ÷ 20) × 100 = 1

Therefore, enter the value 1 for correction.

CHECKPOINT

It is not normally necessary to perform correction. When registration 

marks are used, correction is performed automatically.

Содержание CC300-20 Craft ROBO

Страница 1: ...NNECTIONAND PREPARATION INDEX CONTENTS CH 4 CUTTING DATASAVED ON SD CARD CONTENTS CH 1 PRIOR TO USE CH 2 CONNECTIONAND PREPARATION INDEX APPENDIX A CH 4 CUTTING DATASAVED ON SD CARD CH 3 CRAFT ROBO CO...

Страница 2: ...y and if not installed and used in accordance with the instructions may cause harmful interference to radio communications However there is no guarantee that interference will not occur in a particula...

Страница 3: ...er sheet 2 7 2 4 Loading Media without Using the Carrier Sheet CC330 20 Only 2 8 Media loading method 2 8 How to unload the media 2 9 Allowable cutting area 2 9 2 5 Adjusting and Mounting the Blade Pl...

Страница 4: ...NG DATASAVED ON SD CARD CH 3 CRAFT ROBO CONTROLLER 3 5 Craft ROBO Controller Settings 3 10 3 6 Error Messages 3 18 CHAPTER 4 CUTTING DATA SAVED ON SD CARD 4 1 Introduction 4 1 4 2 Operations 4 1 Cutti...

Страница 5: ...LLER CHAPTER 1 PRIOR TO USE 1 1 Check All the Items Referring to the list below check to confirm that all the components are included with your product If any item is missing please contact your place...

Страница 6: ...n this cover when setting the tool or media Be sure to close it during cutting Tool carriage Drives the tool holder to the left or right Push rollers Holds the media in place against the media rollers...

Страница 7: ...r sets the value during menu operation ENTER Enters the selected menu or defines the setting In the Test Cut screen which is displayed only when the SD card is set in the SD card slot press ENTER whil...

Страница 8: ...cable provided with the Craft ROBO to connect the AC adapter jack on the Craft ROBO to an AC outlet of the rated voltage and then turn on the power CHECKPOINT Always connect the AC adapter to the AC a...

Страница 9: ...to connect the Craft ROBO to a computer CHECKPOINT Install the software for the Craft ROBO before connecting the Craft ROBO to a computer See Chapter 3 2 Installing the Craft ROBO Controller Do not co...

Страница 10: ...o replace it with a new carrier sheet after cutting 10 sheets Pulling the carrier sheet out of the Craft ROBO may shorten its lifetime or cause misaligned cutting Be sure to select Unload Media menu o...

Страница 11: ...of the media to the white triangle mark at the upper right corner of the carrier sheet Using the carrier sheet for media from 191 to 270 mm in width equivalent to A4 size CHECKPOINT You can set media...

Страница 12: ...305 mm Loading the carrier sheet with media attached When using media smaller than 210 mm x 305 mm always affix the media within the allowable cutting area CHECKPOINT Do not use media smaller than pos...

Страница 13: ...heet against both push rollers To ensure that the loaded sheet is straight align the left edge of the sheet with the left guideline on the front guide Left guideline on the front guide 3 Make sure tha...

Страница 14: ...ble cutting area of the carrier sheet Make sure that your design fits within the allowable cutting area indicated below Set the arrow faced toward Craft ROBO main unit 190mm Allowable cutting area 10m...

Страница 15: ...making sure that the media is straight CHECKPOINT If a media wider than 220 mm is loaded the guideline will be covered by the media However if the media is loaded so that its top edge touches and is p...

Страница 16: ...Unload Media is displayed on the screen In this case just press ENTER to unload media Allowable cutting area Make sure that your design fits within the allowable cutting area indicated below If the me...

Страница 17: ...is 190 mm Expanded mode The width of the allowable cutting area is 200 mm If registration marks are used the allowable width is 190 mm CHECKPOINT Follow the procedure below to change the mode from Sta...

Страница 18: ...Expanded or viceversa The default setting is Standard mode 1 In the Control Panel open Printers Printers and Faxes for Windows XP 2 Open Properties for Graphtec CC300 or CC330 3 Click Printing Prefere...

Страница 19: ...The length of the blade protruding from the cap can be adjusted by selecting one of the three available blade adjustment caps Select the blade adjustment cap best suited for the media you plan to use...

Страница 20: ...1 Turn the cap in the counterclockwise direction to remove it 2 Replace it with the correct blade adjustment cap 3 Turn the cap in the clockwise direction to tighten it Tighten Blade adjustment cap H...

Страница 21: ...ade length adjusted by selecting the most suitable blade adjustment cap in the Craft ROBO Caution When handling the cutter blade take care not to cut your hands CHECKPOINT Be sure to grip the tool hol...

Страница 22: ...Mounting a ballpoint pen CHECKPOINT To mount a ballpoint pen it is necessary to attach a ballpoint pen plunger not supplied Acceptable ballpoint pens The ballpoint pen plunger accepts the following pe...

Страница 23: ...gn it with the notched part of the tool holder 1 Loosen the thumbscrew on the ballpoint pen plunger by turning it counterclockwise 2 Insert the ballpoint pen into the plunger 3 Confirm that the tip of...

Страница 24: ...on the ROBO Master If you use Cutting Master 2 for Craft ROBO for cutting the data created with Adobe Illustrator or Corel DRAW you can set how many times cut at Passes on Advanced Tab The blade no lo...

Страница 25: ...CKPOINT When installing the software be sure to log on using an account with Administrator rights 3 2 Installing the Craft ROBO Controller This section describes how to install the software Do not con...

Страница 26: ...ON SD CARD APPENDIX A INDEX When auto play of software is not set For Windows Vista 1 Select Run MultiSetup exe from Autoplay Selection menu of Windows When Autoplay Selection menu does not appear 1...

Страница 27: ...nt Cut starts up When the installation of ROBO Master is finished or cancelled the installer of the Craft ROBO Controller start up Installing the Craft ROBO Controller 1 When the installer starts up t...

Страница 28: ...select one from the list of Existing Folders A new folder named Craft ROBO is prepared by default If there is no need to change the default folder click Next File copying starts 4 When the system has...

Страница 29: ...ur computer 3 3 Starting up the Craft ROBO Controller The Craft ROBO Controller can be started up from the Start menu on the Windows desktop or from the Craft ROBO compatible software such as ROBO Mas...

Страница 30: ...OBO in the File menu of ROBO Master 2 The Output to Craft ROBO window will open Click OK to start up the Craft ROBO Controller When the Craft ROBO Controller is started up from the ROBO Master the Cut...

Страница 31: ...ent cap on the blade plunger with a cap in the color that is displayed in the Blade Adjustment Cap indicator See Blade Adjustment Cap in Section 3 5 Craft ROBO Controller Settings 5 Adjust the tool co...

Страница 32: ...edia Using the Carrier Sheet and Section 2 4 Loading Media without Using the Carrier Sheet CC330 20 Only 8 Check that the Registration Marks check box has been selected See Registration Marks in Secti...

Страница 33: ...Design Orientation in Section 3 5 6 Load media in the Craft ROBO See Section 2 3 Loading Media Using the Carrier Sheet and Section 2 4 Loading Media without Using the Carrier Sheet CC330 20 Only 7 If...

Страница 34: ...rrent settings for each parameter Follow the step by step instructions for easy Craft ROBO setup and operation About Click to display the version information of the Craft ROBO Controller currently in...

Страница 35: ...g to the color of the cap The color selection is mostly determined by the thickness of the media to be cut Adjust Settings If the results of the test cutting indicate that the conditions need to be ad...

Страница 36: ...he backing material liner or carrier sheet If cutting has not been performed correctly such as when the backing material itself is cut or uncut areas of film remain change the blade adjustment cap to...

Страница 37: ...n Marks check box to enable the reading of registration marks CHECKPOINT If the Craft ROBO compatible software such as ROBO Master was used to start up the Craft ROBO Controller this parameter is auto...

Страница 38: ...tration marks Origin point Vertical distance between registration marks CHECKPOINT When registration marks are used avoid placing them on or in the vicinity of the printed image wherever possible When...

Страница 39: ...r Position Correction Displayed only for the CC330 20 This function is used to adjust the cut position when the printed image and the cut position are misaligned This operation enables the positions r...

Страница 40: ...rk may not be read correctly Wherever possible use a sheet of the actual media paper vinyl film that you plan to use 3 From the Media Type drop down box of the Craft ROBO Controller select the paramet...

Страница 41: ...tal x directions and toward the negative side in the vertical y directions If the cross is located at this position move it toward the negative side in the horizontal x directions and toward the posit...

Страница 42: ...ns could not be found and so the Craft ROBO Controller could not be started Please reboot your computer or re install the Craft ROBO Controller Follow the instructions in the message To install the so...

Страница 43: ...the problem is still not resolved consult the manufacturer of the application software that you are using The distances between the registration marks have not been specified correctly Please check th...

Страница 44: ...e Craft ROBO can recognize up to 2 GB of data area Only FAT 12 and FAT 16 formats are supported For a long file name the first 16 characters are scroll displayed on the screen of the control panel 2 b...

Страница 45: ...with the tool conditions set in the previous cutting Follow the procedure below to cut the data saved on an SD card using the tool conditions set for the previous cutting operation from the control p...

Страница 46: ...press or to select No and press ENTER PRESS ENTER The cutting area is within the media size Press ENTER to display Cut To start cutting press or to select Yes and press ENTER To cancel cutting press o...

Страница 47: ...NTER Start Point Start Point 9 Press or SHIFT to set the start point and press ENTER Start Point Scale 100 Use the following keys on the control panel to move the tool to the point you want to set as...

Страница 48: ...irming the cutting area Confirming the cutting area If you select Area the Craft ROBO moves the tool to the last coordinate of the cutting data and checks if the cutting area is within the media size...

Страница 49: ...ation 1 2 3 4 5 6 7 8 9 10 When the design orientation is portrait Start point origin Y direction X direction 5 4 3 2 1 10 9 8 7 6 Media orientation CHECKPOINT When cutting is complete the number of c...

Страница 50: ...age English ENTER 3 Press or to select the language and press ENTER English Load w Carrier Load Media ENTER or 4 3 Error Messages If any of the following error messages is displayed follow the instruc...

Страница 51: ...ze 0 05 mm Repetition accuracy 0 2 mm 300 mm Loadable number of blades pens 1 Tools Blade with dedicated blade holder General purpose ballpoint pen used only with the ballpoint pen holder not supplied...

Страница 52: ...2 Copyright i Craft ROBO Controller Installing 3 1 Operations 3 7 Settings 3 10 Starting 3 5 System Requirements 3 1 Craft ROBO Software CD ROM 1 1 Creating a Media Type setting 3 9 Cut 3 10 Cutting...

Страница 53: ...NECTIONAND PREPARATION CH 3 CRAFT ROBO CONTROLLER CH 4 CUTTING DATASAVED ON SD CARD APPENDIX A INDEX Setup Instruction Sheet 1 1 Standard Specifications A 1 Standby switch 1 3 Starting up the installe...

Страница 54: ...H 4 CUTTING DATASAVED ON SD CARD PREFACE CONTENTS CH 1 PRIOR TO USE CH 2 CONNECTIONAND PREPARATION INDEX APPENDIX A CH 4 CUTTING DATASAVED ON SD CARD CH 3 CRAFT ROBO CONTROLLER The specifications etc...

Страница 55: ...ASAVED ON SD CARD PREFACE CONTENTS CH 1 PRIOR TO USE CH 2 CONNECTIONAND PREPARATION CH 3 CRAFT ROBO CONTROLLER CH 4 CUTTING DATASAVED ON SD CARD APPENDIX A INDEX 503 10 Shinano cho Totsuka ku Yokohama...

Отзывы: