background image

12

ORIGINAL MANUAL (INSTRUCTION)

CERAMIC TILE SAW 

59G880

CAUTION: BEFORE USING THE DEVICE READ THIS MANUAL CAREFULLY AND KEEP IT FOR FUTURE 
REFERENCE.

DETAILED SAFETY REGULATIONS

Detailed safety conditions regarding use of saws for ceramic tile cutting

Power supply voltage must match value marked on the rating plate of the ceramic tile saw.


Connect the tile saw only to electrical system equipped with residual current circuit breaker that will cut the power off 


when earth leakage current exceeds 30 mA in less than 30 ms.
When working outdoors use only extension cords designed for outdoor use.


During operation of the tile saw strictly follow applicable regulations regarding occupational health and safety.


Make sure direction of cutting blade rotation matches indicated direction of the saw motor. 


Cutting blade of the saw should be free to rotate after installation.


Always use anti-splinter goggles, hearing protection and anti-dust mask.


Always wear proper clothing for your work! Loose items of clothing or jewellery might get caught by rotating cutting 


blade.
Before any adjustment, measurement, cleaning or removing jammed ceramic pieces always disconnect power supply 


from the tool with the switch and remove the plug from mains socket!
After repair or maintenance is carried out, install all shields and protective parts before switching on the tile saw.


Do not start working with the tile saw when tired or under influence of medicines.


It is vital that all persons who operate the tile saw are properly trained for operation, using and adjustments of the 


tile saw. 
Replace damaged protection parts immediately.


Never overload the tile saw, causing rotational speed to drop down considerably. 


Keep the workplace clean. Before working remove waste material and unnecessary objects. 


Keep bystanders away from the tile saw workplace.


Keep the workplace well illuminated.


Do not distract person who is working with the tile saw.


After the motor is switched off with the switch, never attempt to stop the cutting blade by applying side pressure.


Immediately replace damaged cutting blade.


Never use cutting blades with parameters different from specified in this manual.


Never attempt to remove or disconnect protection parts of the tile saw.


When a break in work is required, finish current cutting and switch off the tile saw.


When a break in work and leaving the workplace is required, switch off the tile saw with the switch and disconnect it 


from power supply by removing the plug from mains socket.
Check technical condition of the tile saw before starting to operate: 


all protection parts must be in good working order and operate as supposed to, 


screws and other mount parts must not be loosened, 


all adjustment keys must be removed from the tool.


Always ensure the processed material adheres to the work table of the saw with its whole surface.


Never cut several pieces of material at a time.


Do not unplug the tile saw from mains socket by pulling the cord. Protect the power cord against excessive heat, oil 


and sharp edges.
When operating the tile saw keep your body in firm, standing position.


All parts of the tile saw must be properly fixed.


Repairs of the tile saw should only be carried out by qualified person in authorized service workshop and with use of 


original spare parts. 
Do not make profile cuts with the tile saw.


When carrying the tile saw, hold only by transport handles, do not hold by saw shields.


Содержание 59G880

Страница 1: ...KA DO GLAZURY TILE CUTTER FLIESENS GE CSEMPEV G G P FERASTRAU P T GLAZURA PILA NA DLA BU REZA KA DLA D C REZALNIK ZA KERAMIKO PLYTELI PJAUSTYMO STAKL S FL U Z IS PLAADIL IKUR PILA ZA PLO ICE TESTERA Z...

Страница 2: ...A 31 HU HASZN LATI UTAS T S 38 RO INSTRUCTIUNI DE DESERVIRE 44 CZ INSTRUKCE K OBSLUZE 50 SK N VOD NA OBSLUHU 56 SI NAVODILA ZA UPORABO 62 LT APTARNAVIMO INSTRUKCIJA 68 LV LIETO ANAS INSTRUKCIJA 74 EE...

Страница 3: ...3 1 1 7 10 14 5 9 8 11 12 13 2 3 17 20 22 23 6 24 4 19 6 5 A 23 20 22 B 20 21 C...

Страница 4: ...4 1 D 15 E 16 F 18 G 9 8 10 7 H I K L 4 11 17 M 14 25 N 27 28 29 O...

Страница 5: ...em dzia ania lek w Jest rzecz niezb dn aby wszystkie osoby obs uguj ce pilark zosta y odpowiednio przeszkolone w zakresie obs ugi u ytkowania i regulacji Uszkodzone elementy zabezpieczaj ce nale y bez...

Страница 6: ...B yszcz ca blacha stalowa lub inne materia y z powierzchni odbijaj c wiat o nie pozwala na stosowanie wiat a laserowego gdy mog oby w wczas doj do niebezpiecznego odbicia wiat a w kierunku operatora o...

Страница 7: ...CZNYCH UWAGA OSTRZE ENIE MONTA USTAWIENIA INFORMACJA WYPOSA ENIE I AKCESORIA Podstawa 1 szt 1 Noga 4 szt 2 K tomierz nastawny 1 szt 3 Element blokady d ugo ci ci cia pokr t o 2 kpl 4 Element do przytr...

Страница 8: ...za wieci si kontrolka zasilania 27 rys O Wcisn przycisk Test 29 kontrolka zasilania 27 ga nie Wcisn przycisk Reset 28 kontrolka zasilania 27 ponownie za wieci si W przypadku nieprawid owego dzia ania...

Страница 9: ...WACJA Przed przyst pieniem do jakichkolwiek czynno ci zwi zanych z instalowaniem regulacj napraw lub obs ug nale y wyj wtyczk przewodu zasilaj cego z gniazdka sieciowego CZYSZCZENIE I PRZECHOWYWANIE P...

Страница 10: ...a 710 mm Stopie ochrony IP54 Klasa ochronno ci I Klasa lasera 2 Moc lasera 1mW D ugo fali wietlnej lasera 650nm Typ ogniwa zasilaj cego laser Bateria typu AAA 2 sztuki Masa 27 3 kg Rok produkcji 2011...

Страница 11: ...2006 95 EC 2006 95 EK Kisfesz lts g berendez sek Dyrektywa Maszynowa 2006 42 WE Machinery Directive 2006 42 EC 2006 42 EK G pek Dyrektywa o Kompatybilno ci Elektromagnetycznej 2004 108 WE EMC Directi...

Страница 12: ...arts immediately Never overload the tile saw causing rotational speed to drop down considerably Keep the workplace clean Before working remove waste material and unnecessary objects Keep bystanders aw...

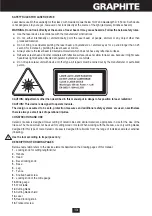
Страница 13: ...with device of other type All repairs must be carried out by the manufacturer or authorized person CAUTION Adjustments other than described in this manual put in danger of exposition to laser radiatio...

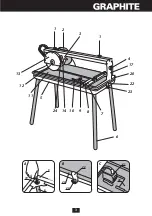
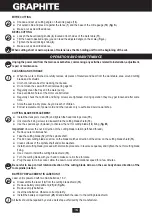
Страница 14: ...ckage and assemble in the below described order CERAMIC TILE SAW ASSEMBLY Use the screws included to attach the legs 6 to the base 5 g A Put the screws into holes at both sides of the base 5 Put the t...

Страница 15: ...ting blade must rotate with maximum rotational speed before the cut is started Wait until cooling water stream reaches the cutting blade Base of the mitre gauge 10 is also the longitudinal fence Set 0...

Страница 16: ...d service workshop CUTTING BLADE REPLACEMENT Install the transport screw 16 and tighten the head locking screw 15 Unscrew the xing screws to disassemble the cutting blade shield 13 Use the special key...

Страница 17: ...N Do not dispose of electrically powered products with household wastes they should be utilized in proper plants Obtain information on wastes utilization from your seller or local authorities Used up...

Страница 18: ...nicht gebraucht werden wenn der Bediener m de ist oder unter dem Ein uss von Medikamenten steht Es ist unabdingbar dass alle Personen die die S gemaschine bedienen entsprechend im Bereich der Bedienun...

Страница 19: ...s auf Menschen Tiere oder Objekt das kein zu bearbeitetes Objekt ist Lassen Sie nicht dass das B ndel des Laserlichtes zuf lligerweise in die Augen von beistehenden Personen oder Tieren f r l nger als...

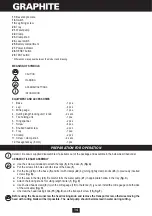
Страница 20: ...scheibe 13 Laser 14 Regler zur Arretierung des Kopfes 15 Transportschraube 16 Winkelteilung der Schr gstellung 17 Hauptschalter 18 Schraube zur Befestigung des Fu es 19 Schale 20 Wasserpumpe 21 Klemme...

Страница 21: ...pr zisen und ef zienten Betrieb der Schr gs ge zu gew hrleisten f hren Sie alle Regulierungsprozeduren komplett durch Nach der Ausf hrung aller Regulierungs und Einstellungsarbeiten stellen Sie siche...

Страница 22: ...24 dr cken Der Lasergenerator wir eine rote Linie ausstrahlen die auf dem Material sichtbar wird Den Schnittpunkt des Werkst cks entsprechend der ausgestrahlten Linie einstellen und den Schnitt ausf...

Страница 23: ...ngestellte Verzahnung mit der Richtung des Pfeils auf der Abdeckung der Schneidescheibe 13 vollkommen bereinstimmt Die Ober che der Spindelwelle und die Flanschunterlagen reinigen Eine neue Schneidesc...

Страница 24: ...ieelektrischbetriebeneProduktenichtindenHausm ll sonderneinerumweltgerechtenWiederverwertung zuf hren Fragen Sie den Vertreiber oder lokale Verwaltung nach Informationen ber die Entsorgung Elektro und...

Страница 25: ...25 59G880 30 30...

Страница 26: ...26 2 1 650 0 25 1 2 3 4 5 6 7 8...

Страница 27: ...27 9 10 11 12 13 14 15 16 17 18 19 20 21 22 23 24 25 27 RESET 28 TEST 29 1 1 4 2 1 3 2 4 1 5 2 6 4 7 2 8 1 9 2 10 2 11 8 1 12 6 5 m A 5 20 5 22 23 B...

Страница 28: ...28 20 21 C 1 D 10 7 8 H 15 E 16 F 27 O Test 29 27 Reset 28 27 I 18 G 18 10 10 00 9 10 7 8 H 7 7 10 I I 18 12 3 2 O 18...

Страница 29: ...29 24 10 7 10 K 4 11 L 4 16 15 13 12 M 12 13 13...

Страница 30: ...0 0 45 200 25 4 2 4 380 570 555 520 90 30 45 30 710 IP54 I 2 1 650 AA 2 27 3 2011 LpA 79 A K 3 A LwA 92 A K 3 A ah 0 962 2 K 1 5 2 TOPEX Sp ka z ograniczon odpowiedzialno ci Sp ka komandytowa ul Pogra...

Страница 31: ...31 59G880 30 30...

Страница 32: ...32 2 1 650 0 25...

Страница 33: ...33 1 2 3 4 5 6 7 8 9 10 11 12 13 14 15 16 17 18 19 20 21 22 23 24 25 27 RESET 28 TEST 29 1 1 4 2 1 3 2 4 1 5 2 6 4 7 2 8 1 9 2 10 2 11 8 1 12...

Страница 34: ...34 6 5 A 5 20 5 22 23 B 20 21 C 1 D 10 7 8 H 15 E 16 F 27 O Test 29 27 Reset 28 27 I 18 G O 18...

Страница 35: ...35 10 10 0 9 8 10 7 H 7 7 10 I I 18 12 3 2 O 18 24 10 7 10 K 4 11 L 4...

Страница 36: ...36 16 15 13 12 M 12 13 13 1 5 AAA 14 13 25 N 25...

Страница 37: ...4 380 570 555 520 90 30 45 30 710 IP54 I 2 1 650 2 AA 27 3 2011 LpA 79 A K 3 A LwA 92 A K 3 A ah 0 962 2 K 1 5 2 TOPEX Sp ka z ograniczon odpowiedzialno ci Sp ka komandytowa ul Pograniczna 2 4 TOPEX...

Страница 38: ...gi felszerel sek s r lt elemeit azonnal ki kell cser lni Tilos a csempev g t annyira t lterhelni hogy az a v g t rcsa fordulatsz m nak jelent s cs kken s t okozza A munkav gz s hely t tartsa rendben...

Страница 39: ...relt l zereszk zt m s t pus ra cser lni B rmif le jav t st csak a gy rt vagy ltala meghatalmazott szem ly v gezhet FIGYELEM A fentiekben megadottakt l elt r rendszab lyok alkalmaz sa a l zersug r okoz...

Страница 40: ...zett marokcsavar 2 db 8 T lca 1 db 9 T lcar gz t kamp 2 db 10 T lcar gz t kamp csavarja s marokcsavarany ja 2 k szlet 11 Hatsz gkulcs 8 mm 1 db 12 FELK SZ L S AZ ZEMBEHELYEZ SRE A csempev g sz tszere...

Страница 41: ...a a m rkaszervizbe A BE S KIKAPCSOL S A h l zati fesz lts g egyezzen meg a csempev g gy ri adatt bl j n felt ntetett fesz lts ggel A csempev g t csak akkor szabad beind tani ha a v g t rcsa nem rintke...

Страница 42: ...y ecsettel a legel ny sebb tiszt tani A csempev g tiszt t s hoz tilos vizet vagy vegyszert haszn lni Rendszeresen tiszt tsa az a t lc t s a v zszivatty t A motorh z szell z ny l sait tartsa a leveg sz...

Страница 43: ...dB A Hangteljes tm ny szint LwA 92 dB A K 3 dB A Rezg sgyorsul s ah 0 962 m s2 K 1 5 m s2 K RNYEZETV DELEM Az elektromos zem term keket ne dobja ki a h zi szem ttel hanem azt adja le hullad kkezel sr...

Страница 44: ...ozitivele de protec ie defectate trebuie neap rat f r nt rziere nlocuite Nu este permis supra ns rcinarea circularului care se manifest prin ncetinirea rota iei discului t ietor Standul de lucru trebu...

Страница 45: ...ca lumina laserului s se poate re ecta spre ochii operatorului persoanelor ter e sau spre animale Nu este permis de aschimba sistemul de laser cu sistem de alt tip Orice repara ie trebuie s e executa...

Страница 46: ...e blocarea lungimii de t iere buton 2 kpl 4 Element de inut pl cile 1 buc 5 Cheie inelar 2 buc 6 Surub 4 buc 7 Surub cu cap zim at 2 buc 8 Cuv 1 buc 9 Clem 2 buc 10 Surub butonul clemei 2 kpl 11 Cheie...

Страница 47: ...eventual ac ionarea protec iei diferin iale de curent va ac iona necorect n alt mod dec t cel descris mai sus absolut tec rul trebuie scos din priza de alimentare cu tensiune iar utilajul trebuie dat...

Страница 48: ...SI PASTRAREA Dup terminarea lucrului trebuie eliminate toate buc ile de material de pe masa de lucru inclusiv n jurul discului t ietor Circularul poate cur at cu c rp sau cu penson La cur at nu este...

Страница 49: ...terea laserului 1mW Lungimea undei de lumin a laserului 650nm Tipul pilei de alimentarea laserului Baterii de tip AAA 2 buc Greutatea 27 3 kg Anul fabrica iei 2011 DATE REFERITOR LA ZGOMOT SI VIBRATII...

Страница 50: ...n pily Po kozen bezpe nostn sou sti je t eba neprodlen vym nit Nikdy pilu nep et ujte a nesni ujte tak zna n m zp sobem ot ky pilov ho kotou e Pracovi t udr ujte v istot P ed zah jen m pr ce odkli te...

Страница 51: ...typu Ve ker opravy mus prov d t v robce nebo autorizovan osoba POZOR P i nastaven kter se li od nastaven uveden ho v tomto n vodu hroz nebezpe zp soben laserov m z en m POZOR Za zen slou k pr ci v uza...

Страница 52: ...a obklady je dod v na v rozmontovan m stavu Je t eba vyjmout sou sti z balen a prov st mont podle n e uveden ho popisu MONT PILY NA OBKLADY Spojte nohy 6 s podstavcem 5 pomoc roub jsou sou st dod vky...

Страница 53: ...N Vodn erpadlo nap jec kabel a hadice pro p vod vody se nesm dostat do oblasti kde prob h ez n P ed zah jen m ez n mus pilov kotou dos hnout maxim ln ch ot ek Vy kejte a se proud chladic vody dostane...

Страница 54: ...jte zda jsou v echny upev ovac rouby a vruty uta en B hem pr ce m e asem doj t k jejich povolen Uchov vejte pilu v dy na such m m st mimo dosah d t V m nu nap jec ho kabelu i jin opravy sm prov d t v...

Страница 55: ...ku LpA 79dB A K 3 dB A Hladina akustick ho v konu LwA 92 dB A K 3 dB A Hodnota zrychlen vibrac ah 0 962 m s2 K 1 5 m s2 OCHRANA IVOTN HO PROST ED Elektricky nap jen v robky nevyhazujte spolu s dom c m...

Страница 56: ...V iadnom pr pade nie je dovolen p lu pre a ova preto e toto m e vies k zna n mu spomaleniu ot ania p lov ho kot a Pracovn miesto udr iavajte v istote Sk r ako prist pite k pr ci odpracte odpad alebo n...

Страница 57: ...erov zariadenie za zariadenie in ho typu V etky opravy musia by vykon van v robcom alebo opr vnenou osobou POZOR In manipul cia ako t ktor je uveden v tomto n vode m e sp sobi riziko vystavenia sa las...

Страница 58: ...ny k 8 mm 1 ks 12 PRED UVEDEN M DO PREV DZKY P la na obklada ky je dod van v rozmontovanom stave Vyberte s iastky z balenia a vykonajte jej mont pod a nasleduj ceho postupu MONT P LY NA OBKLADA KY Pom...

Страница 59: ...e je materi l ktor pl nujete obr ba odsunut od p lov ho kot a Zap nanie stla te tla idlo I sp na a 18 obr G Vyp nanie stla te tla idlo O sp na a 18 REZANIE Vodn pumpa nap jac k bel a hadi ka na pr vod...

Страница 60: ...P lu je najlep ie isti handri kou alebo tetcom Na istenie p ly nepou vajte chemick istiace prostriedky Pravidelne istite od ne ist t kyvetu a vodn pumpu Vetracie otvory motora udr iavajte priechodn P...

Страница 61: ...ok v roby 2011 DAJE T KAJ CE SA HLU NOSTI A VIBR CI Hladina akustick ho tlaku LpA 79 dB A K 3 dB A Hladina akustick ho v konu LwA 92 dB A K 3 dB A Hodnota zr chlen vibr ci ah 0 962 m s2 K 1 5 m s2 OCH...

Страница 62: ...dovoljeno preobremenjevati age kar bi privedlo do znatne upo asnitve obra anja rezilne plo e Skrbeti je treba za istost delovnega mesta Pred pri etkom dela je treba odstraniti odpadke ali nepotrebne p...

Страница 63: ...napravo drugega tipa Vsa popravila mora opraviti proizvajalec ali poobla ena oseba POZOR Druge regulacije kot te omenjene v teh navodilih lahko povzro ijo izpostavljenost na lasersko ar enje in so za...

Страница 64: ...bala e in sestaviti v skladu s spodaj opisanim vrstnim redom MONTA A AGE ZA KERAMIKO Pove ite noge 6 s podstavkom 5 s pomo jo vijakov prilo enih slika A Vijake umestite v odprtine na obeh straneh pods...

Отзывы: