background image

3

4

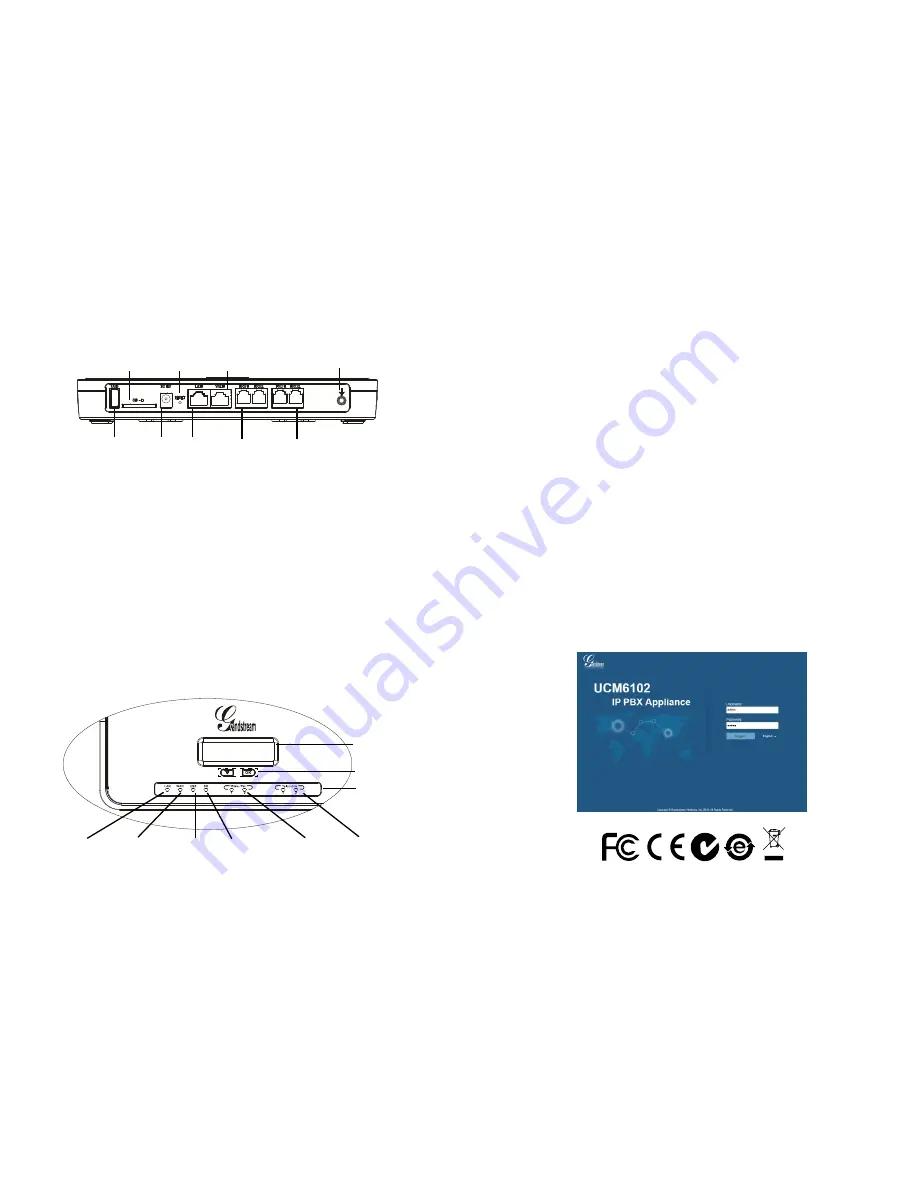
CONNECTING THE UCM6102:

2 x FXS Port

LAN Port

DC 12V

2 x FXO Port

SD Card Slot

USB Port

1. Connect one end of an RJ-45 Ethernet cable into the WAN port of the UCM6102.
2. Connect the other end of the Ethernet cable into the uplink port of an Ethernet 

    switch/hub.
3. Connect the 12V DC power adapter into the 12V DC power jack on the back of

    the UCM6102. Insert the main plug of the power adapter into a surge-protected 

    power outlet.
4. Wait for the UCM6102 to boot up. The LCD in the front will show its hardware 

    information when the boot process is done.
5. Once the UCM6102 is successfully connected to network, the LED indicator for

    WAN in the front will be in solid green and the LCD shows up the IP address.
6. (Optional) Connect PSTN lines from the wall jack to the FXO ports; connect 

    analog lines (phone and fax) to the FXS ports.

Reset

Ground

USING THE UCM6102 KEYPAD MENU:

CONFIGURING THE UCM6102 VIA WEB GUI:

1. Connect the computer to the same network as the UCM6102.
2. Ensure the UCM6102 is properly powered up and shows its IP address in the 

    LCD.
3. Open a web browser on the computer and enter the web GUI URL in the format:

    http(s)://IP-Address:Port
    

The default protocol is HTTPS and the default port number is 8089.

4. The web GUI login page will show (see Figure below). The default username 

    and password for administrator are “admin”.
5. For the detailed information to configure SIP Extensions, PSTN lines, SIP trunks  

    and all the other system settings via web GUI, please download the UCM6102 

    user manual here:


 http://www.grandstream.com/support

1. Press “Down” or “OK” key to start browsing menu options.
2. Press “Down” to browser different menu options. Press “OK” to select an entry.
3. In the menu option, select “Back” to go back to previous menu.
4. The LCD will return to default display after being idle in menu for more than 20

    seconds.

LCD

Navigation 

Keys

USB LED

FXS LED

WAN LED

SD Card LED

FXO LED

LED 

Indicators

WAN Port

LAN LED

Содержание UCM6102

Страница 1: ... 1297 Beacon Street 2nd Floor Brookline MA 02446 USA Tel 1 617 566 9300 Fax 1 617 249 1987 www grandstream com For Warranty and RMA information please visit www grandstream com UCM6102 IP PBX Appliance Quick Installation Guide ...

Страница 2: ...Content English 1 简体中文 5 Español 9 Français 13 Deutsch 17 Italiano 21 Русскй 25 ...

Страница 3: ...E ADDITIONAL ARRANGEMENTS TO ACCESS EMERGENCY SERVICES IN ACCOR DANCE WITH THE IMMEDIATELY PRECEDING PARAGRAPH PACKAGE CONTENTS EN PRECAUTIONS Do not attempt to open disassemble or modify the device Do not use a third party power adapter Do not expose this device to temperatures outside the range of 0 C to 40 C for operating or 10 C to 60 C for storage Do not expose this device to environment outs...

Страница 4: ...02 KEYPAD MENU CONFIGURING THE UCM6102 VIA WEB GUI 1 Connect the computer to the same network as the UCM6102 2 Ensure the UCM6102 is properly powered up and shows its IP address in the LCD 3 Open a web browser on the computer and enter the web GUI URL in the format http s IP Address Port The default protocol is HTTPS and the default port number is 8089 4 The web GUI login page will show see Figure...

Страница 5: ...者损害都不负有任何法 律追究责任 在此 您将无权对任何以及所有 由于无法通过UCM6102拨打紧急电话以及没 有遵照前段文字描述而造成紧急通话失败的事 件提出诉讼 设备包装清单 ZH 注意事项 1 请不要拆卸或修改该设备 2 请不要使用第三方的电源适配器 3 请不要在超出0至40摄氏度的环境下使用该设备 请不要在超出 10至60摄氏度 的环境下存储该设备 4 请不要将设备暴露在超出相对湿度10 90 范围外的环境下 5 请不要在设备启动未完成的时候或设备的软件升级过程中断开电源 如上所述 的操作会导致话机本身的程序损坏 进而造成设备无法启动 UCM6102 1台 网线 1根 电源适配器 1个 快速安装手册 1本 产品概览 UCM6102是一款功能丰富 兼具创新的IP PBX设备 它采用先进的硬件平台 运 用强健的系统资源 为用户提供了集语音 视频 数据 传真和监控设备需求的 统一解决方案 ...

Страница 6: ...3 用12V电源适配器连接UCM6102电源接口和交流电源插座 4 等待设备启动 启动完成后 UCM6102的LCD上将会显示设备硬件信息 5 等待设备网络连接完成 连接成功后 UCM6102的WAN端口LED指示灯将会显 示绿色 LCD将会显示设备IP地址 6 可选 连接PSTN电话线至UCM6102的FXO端口 连接模拟电话或者传真线 至UCM6102的FXS端口 菜单按键 1 将电脑与UCM6102连接至同一网络 2 UCM6102正常启动并成功连接网络后 在LCD上确认UCM6102的IP地址 3 将UCM6102的IP地址以下列格式输入在电脑的网络浏览器上 http s IP地址 端口 默认协议为HTTPS 默认端口为8089 4 UCM6102网络登录界面如下图所示 默认用户名和密码均为 admin 5 登录后 用户可以在网络界面下配置SIP账号 PSTN连接 SIP中继 系统...

Страница 7: ...OS DE EMERGENCIA ASI COMO A SU NEGLIGENCIA DE REALIZAR LAS COORDINACIONES NECESARIAS PARA ACCEDER A TODOS LOS SERVICIOS DE EMER GENCIA MENCIONADOS EL PARRAFO PRECEDENTE ES 12V No abrir desarmar o intentar modificar este equipo No use adaptadores de corriente distintos al suministrado No exponga este dispositivo a temperaturas fuera del rango de 0 C a 40 C en funcionamiento y 10 C a 60 C en almacen...

Страница 8: ... indicador LED SD Card con indicador LED FXO con indicador LED LAN con indicador LED WAN con indicador LED 1 Pulse el botón Bajar o OK para comenzar a navegar por las opciones del menú 2 Pulse el botón Bajar para navegar por las diferentes opciones del menú Pulse el botón OK para seleccionar una entrada 3 En la opción del menú seleccione Volver para regresar al menú anterior 4 La pantalla LCD volv...

Страница 9: ...ENCE EN CONFORMITE AVEC LE PARA GRAPHE PRECEDENT FR 12V PRECAUTIONS Ne pas tenter d ouvrir de désassembler ou demodifier le dispositif Ne pas utiliser un adaptateur d alimentation tiers Ne pas exposer cet appareil à des températures hors de la plage de 0 C à 40 C en opération ou 10 C à 60 C en stockage Ne pas exposer cet appareil à un environnement avec humidité hors de la plage de 10 90 RH sans c...

Страница 10: ...teurs LED LED USB LED FXS LED LAN LED Carte SD LED FXO 1 Appuyez sur Bas ou OK pour commencer à parcourir les options du menu 2 Appuyez sur Down pour parcourir les différentes options du menu Appuyez sur OK pour sélectionner une entrée 3 Dans le menu sélectionnez Retour pour revenir au menu précédent 4 L écran LCD revient à l affichage par défaut après avoir été inactif dans le menu pendant plus d...

Страница 11: ...ZUGANG ZU NOTRUFEN VORZUNEHMEN VER URSACHT WERDEN KÖNNEN DE 12V Versuchen Sie nicht das Gerät zu öffnen zu zerlegen oder zu modifizieren Verwenden Sie keine Netzteile von anderen Herstellern Das Gerät darf nicht bei Temperaturen jenseits von 0 C bis 40 C betrieben oder gelagert werden von 10 C bis 60 C Die Luftfeuchtigkeit muss innerhalb des folgenden Bereichs liegen 10 90 rel Luftfeuchtigkeit nic...

Страница 12: ...nschlüsse an VERWENDUNG DES UCM6102 TASTENFELDMENÜS Navigation stasten LED Anzeigen 1 Drücken Sie die Abwärtstaste oder OK um durch die Menüoptionen zu navi gieren 2 Drücken Sie die Abwärtstaste um zu anderen Menüoptionen zu wechseln Drücken Sie OK um einen Eintrag auszuwählen 3 Wählen Sie in der Menüoption Zurück um zum vorherigen Menü zu wechseln 4 Bei mehr als 20 Sekunden ohne Aktivität wird au...

Страница 13: ...I DI EMERGENZA IN CONFOR MITÀ AL PARAGRAFO PRECEDENTE IT 12V CONTENUTO DELLA CONFEZIONE Non tentare di aprire smontare o modificare il dispositivo Non utilizzare un adattatore di alimentazione di terzi Non esporre il dispositivo a temperature non incluse nell intervallo da 0 C a 40 C per l operatività o da 10 C a 60 C per l immagazzinaggio Non esporre il dispositivo ad ambienti non inclusi nel seg...

Страница 14: ...DEL MENU DEL TASTIERINO DI UCM6102 LED scheda SD Tasti di navigazione Indicatori LED 1 Premere il tasto Giù o OK per iniziare a scorrere le opzioni del menu 2 Premere Giù per scorrere le diverse opzioni del menu Premere OK per selezionare una voce 3 Nell opzione di menu selezionare Indietro per tornare al menu precedente 4 Il display LCD tornerà alla visualizzazione predefinita dopo un periodo di ...

Страница 15: ... ДОСТУП К АВАРИЙНЫМ СЛУЖБАМ В СООТВЕТСТВИИ С ПРЕДЫДУЩИМ ПАРАГРАФОМ RU 12V КОМПЛЕКТ ПОСТАВКИ Не пытайтесь открывать разбирать или изменять устройство Не используйте адаптер питания другого производителя Не допускается использование устройства при температурах вне диапазона от 0 C до 40 C при эксплуатации и от 10 C до 60 C при хранении Не допускается выставлять устройство наружу при относительной вл...

Страница 16: ...ОЛЬЗОВАНИЕ МЕНЮ КЛАВИАТУРЫ UCM6102 Индикатор LAN Индикатор WAN Индикатор USB Индикатор SD карты Индикатор FXS Индикатор FXO ЖК дисплей Клавиши навигации Световые индикаторы 1 Подключите компьютер к той же сети в которой находится UCM6102 2 Убедитесь что UCM6102 правильно включен а на ЖК дисплее отображается его IP адрес 3 Откройте веб браузер на компьютере и введите URL адрес веб интерфейса в форм...

Отзывы: