Gram TCamel S Series Скачать руководство пользователя страница 18

18

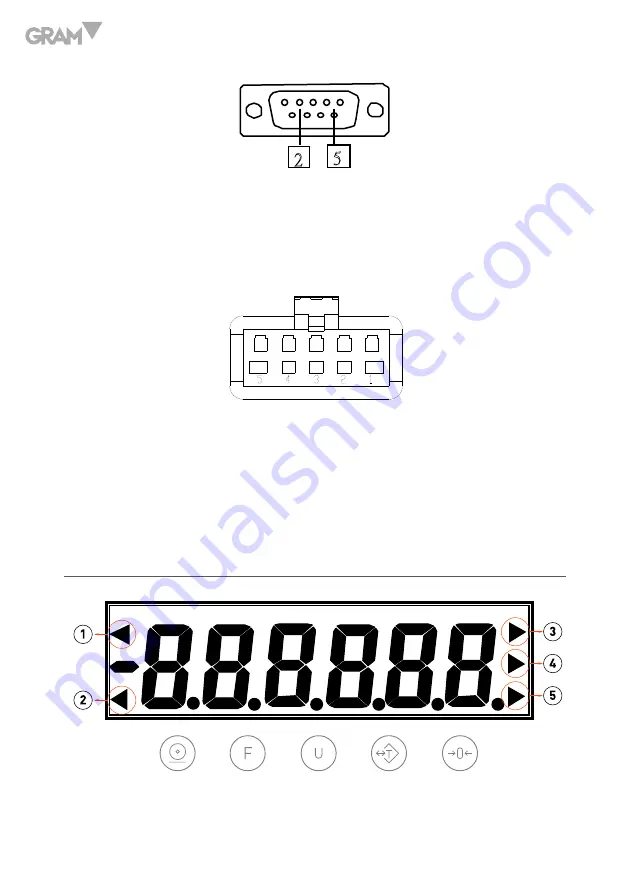
2.  RS-232 connection:


2- pin.  Data output (TXD)         


5- pin.  Ground (GND)

3.  Printer connection:    
          

Printer pin 1. Connects with +5V
Printer pin 2. Connects with GND
Printer pin 4. Connects with TXD
Printer pin 5. Connects with GND

DISPLAy DESCRIPTION


2


5


Содержание TCamel S Series

Страница 1: ...SERIES SERIE S RIE TCamel S OPERATION MANUAL MANUAL DE UTILIZACION MANUEL D UTILISATION...

Страница 2: ...3 Troubleshooting 13 Instruction for use 15 Preparing to use the scale 16 Features and specification of indicator 16 Features 16 Specifications 17 Display description 18 Keypad description 19 Operatin...

Страница 3: ...3 Division setup 23 Time Date setting 23 Calibration 24 Division Setting 25 Decimal point setting 25 Maximum capacity setting 25 Zero point calibration 25 Second point calibration 26 Guarantee 27...

Страница 4: ...de problemas 34 Instrucciones de utilizaci n 35 Preparaci n del transpalet para su utilizaci n 36 Especificaciones del indicador 37 Conectores 37 Descripci n del display 38 Descripci n de las teclas...

Страница 5: ...aci n de la fecha y hora 43 Calibraci n manual T cnico 44 Configuraci n de la divisi n 45 Configuraci n del punto decimal 45 Configuraci n de la capacidad m xima 45 Calibraci n del punto de cero 45 Ga...

Страница 6: ...solution de probl mes 54 Instructions d utilisation 55 Preparation du transpalette pour utilisation 56 Sp cificit s de l indicateur 56 Connexions 57 Description de l cran 58 Description des touches 59...

Страница 7: ...et de l heure 63 Calibration 65 Configuration de la r solution 65 Configuration de l emplacement de la virgule 65 Configuration de la capacit maximale 66 Calibration du point z ro 66 Calibration du De...

Страница 8: ...8 ENGLISH Handle assembly...

Страница 9: ...ard clockwise until the fork does not ascend when you press the handle If you push the handle down in the middle position the fork declines please turn the screw round on the unloading board anti cloc...

Страница 10: ...ance and overhaul Routine maintenance is essential You should focus on wheels and mandrel and timely remove the foreign body enwinding and pricking into the wheels When the removal has been completed...

Страница 11: ...It s better for the operator to dress protective gloves and shoes 9 In the process of lifting and transporting cargo all the workers concerned should keep away from the fork at least 600 mm 10 Pay att...

Страница 12: ...rk adjust D of Group D clockwise for small and counterclockwise for large If the value is wrong when put on the back of the fork adjust C of Group C clockwise for small and counterclockwise for large...

Страница 13: ...ing No Malfunction Cause Approach 1 Fork can t ascend to the maximum height Inadequate hydraulic oil Refueling 2 Fork cannot be raised No hydraulic oil Impure oil Keep bolts too close or screws too ti...

Страница 14: ...screw 4 Oil spill Aging or damaged seals Some broken parts Update Update 5 Fork declines release valve does not work The impure hydraulic oil leads that the release valve cannot close tightly Some pa...

Страница 15: ...brate after replacement of the sensor Instruction for use 1 Please keep the scale in a cool dry place Do not store it at high temperature 2 Do not allow any liquids to come into contact with the scale...

Страница 16: ...ld be placed in the centre of the weigh pan for accurate weighing The overall dimensions of the goods being weighed should not exceed the dimension of the weigh pan 5 Once the scale has been powered o...

Страница 17: ...s Maximum 1000 ohm Up to 4 load cells of 350 ohm Readability Selectable 0 0 Tare Function Full Units of measure Kg lb Power supply Rechargeable battery or Charger DC 7 2V 1A Connector 4 pin d socket 1...

Страница 18: ...ction 2 pin Data output TXD 5 pin Ground GND 3 Printer connection Printer pin 1 Connects with 5V Printer pin 2 Connects with GND Printer pin 4 Connects with TXD Printer pin 5 Connects with GND Display...

Страница 19: ...play is not showing zero press the ZERO key to zero the scale The weight can be zero is only at the 2 of Max capacity TARE key in the menu use as RIGHT key The tare function will not operate during th...

Страница 20: ...shows total weight then back to simple counting mode 5 After display shows unit weight and total weight the scale back to simple counting mode user can continue use this mode or press key to return t...

Страница 21: ...en put other object to continue accumulate data Press key to overview the total accumulated numbers and total accumulated weight LCD will shows total accumulated numbers then shows the total accumulat...

Страница 22: ...ncreasing the charge level Continue to charge overnight for a complete re charge Advanced functions Checking battery voltage When scale is on and at zero and stable long press key around 3 5 seconds b...

Страница 23: ...ge related data press key to save the time and then back to checking mode 2 Checking mode If the data not saved the time will not change after back to checking mode Data show as follows 1 Clk 24 12 cl...

Страница 24: ...cimal digit adds by 1 Press key once the other digit adds by 1 7 Min 00 minute Input number for the accordingly minute 30 for 30 minutes The largest number is 59 Press key once the decimal digit adds...

Страница 25: ...enter the maximum capacity setting Maximum capacity setting LCD shows FULL around 2 3 seconds then LCD shows 000 000 The decimal point was set as 3 decimal points then press key to move the flashing...

Страница 26: ...en use key to move the flashing digits to the right in circle to select the digits that will increase the number Press key to increase the number until the number appears then repeat the above moves u...

Страница 27: ...ct of the material During this period GRAM PRECISION SL covers the manpower and the spare parts costs necessary for the reparation of the scale This guarantee does not cover the failures caused by an...

Страница 28: ...el eje colocar el pasador de 05mm dentro del agujero Cadena Una vez instalado el eje y la cadena se puede utilizar despu s de presionar la barra hac a abajo y tirando hacia afuera del mbolo de empuje...

Страница 29: ...ac a abajo en posici n reposo las horquillas descender n girareltornillodedescargaenelsentidocontrariodelasagujas del reloj hasta que las horquillas no desciendan al presionar la palanca Conlapalancad...

Страница 30: ...bajar varias veces Rutina de mantenimiento y revision La rutina de mantenimiento es esencial Usted debe centrarse en las ruedas y en el mandril retirar los cuerpos extra os que se ubiquen en las rued...

Страница 31: ...palancasyhorquillas 6 No utilizar la transpaleta sobre superficies oblicuas 7 No transportar a una persona sobre la horquilla 8 Se recomienda que el operador lleve guantes y calzado de seguridad 9 En...

Страница 32: ...to cuando la carga se coloca en la parte frontal de la horquilla ajustar D del grupo D en sentido a las agujas del reloj para variaciones peque as y en sentido contrario para variaciones m s grandes S...

Страница 33: ...33 Especificaciones del transpalet Capacidad m xima 2000kg Longitud de la horquilla 1150mm Ancho de la horquilla 550mm 685mm Altura de la horquilla 80mm Peso 95 105kg...

Страница 34: ...eite Cambiar el aceite Ajustar los pernos o los tornillos Extraer el aire 3 La horquilla no puede descender La colocaci n de la mercanc a en un solo lado la sobrecarga provoca que los pistons o el cue...

Страница 35: ...ecta Cambiar el aceite Revisar y reemplazar las piezas gastadas Extraer el aire Actualizar Ajustar el perno o tornillo Instrucciones de utilizaci n 1 Mantener el transpalet en un lugar frio y seco No...

Страница 36: ...e de que no hay ning n objeto sobre la horquilla 4 No dejar ning n objeto sobre la horquilla durante un largo periodo de tiempo esto puede da ar las c lulas de carga 5 Todos los productos a pesar debe...

Страница 37: ...Unidades de pesada Kilogram kg y libras lb Funciones cuentapiezas hold y acumulaci n de pesadas Indicador de bater a baja Autodesconexi n Opciones Impresora Conectores 1 Conector c lula de carga Pin 1...

Страница 38: ...38 2 Conector RS 232 2 pin Salida de datos TXD 5 pin Ground GND 3 Conector impresora Pin 1 conecta con 5V Pin 2 conecta con GND Pin 3 conecta con TXD Pin 4 conecta con GND Descripci n del display 2 5...

Страница 39: ...desplazarse hacia la derecha La funci n de Tara no est disponible en las siguientes condiciones Cuando el transpalet se conecta y el valor del display es negativo Cuando se ha sustraido el peso de un...

Страница 40: ...r la tecla el display mostrar el peso unitario y el peso total 5 Pulsar la tecla para salir del modo cuentapiezas y volver al modo normal de pesaje Funci n Hold 1 Pulsar la tecla tres veces el display...

Страница 41: ...rarelobjetoyesperaraquelalecturadeldisplay quede a cero colocar otro objeto para continuar con la acumulaci n de pesadas Pulsar la tecla para visualizar el n mero de acumulaciones efectuadas y el peso...

Страница 42: ...recarga completa Funciones avanzadas Comprobaci n del voltaje de la bater a Con el display a cero pulsar la tecla durante 3 5 segundos soltar la tecla en el momento que el indicador emita una se al ac...

Страница 43: ...eder a los modos de comprobaci n y modificaci n 1 Modo modificaci n Cuando la hora empieza a parpadear cambiar los datos y pulsar la tecla para guardar los cambios y pasar al modo de comprobaci n Los...

Страница 44: ...al se a ade por 1 Pulsar la tecla el otro d gitos se a ade por 1 7 Min 00 minuto Introducir el minuto 30 para 30 minutos El n mero mayor es 59 Pulsar la tecla el d gito decimal se a ade por 1 Pulsar l...

Страница 45: ...dad m xima Configuraci n de la capacidad m xima El display muestra FULL durante 2 3 segundos seguidamente muestra 000 000 punto decimal configurado a 3 puntos pulsar la tecla para mover los d gitos pa...

Страница 46: ...r la s pesa s de calibraci n sobre la horquilla pulsar la tecla para desplazarse de un d gito a otro y pulsar la tecla para incrementar el valor de cada d gito El valor introducido debe corresponder c...

Страница 47: ...riodo de 1 a o a partir de la fecha de entrega Durante este periodo GRAM PRECISION SL se har cargo de la reparaci n de la balanza Esta garant a no incluye los da os ocasionados por uso indebido o sobr...

Страница 48: ...Une fois l axe perc placer la broche de 5mm dans le trou Cha ne Une fois l axe et la cha ne install s il peut tre utilis apr s avoir tir sur la barre jusqu en bas et en tirant en dehors le v rin Une f...

Страница 49: ...ers le bas en position repos les fourches descendent faites tourner la vis de d charge dans le sens contraire des aiguilles d une montre jusqu ce que les fourches ne descendent plus en appuyant sur le...

Страница 50: ...ez le levier de la position El vation la position descente plusieurs fois Fr quence de maintenance et r vision Une maintenance fr quente est essentielle Vous devez vous concentrer principalement sur l...

Страница 51: ...tre utilis par des personnes ayant une formation professionnelle 5 Avant d utiliser le transpalette v rifier les roues le levier et les fourches 6 Ne pas utiliser le transpalette sur des superficies o...

Страница 52: ...s v rifier que la valeur du poids est la m me si ce n est pas le cas ajuster l g rement les groupes C y D de la bo te de jonction Si la valeur est incorrecte quand la charge est plac e sur la partie a...

Страница 53: ...roupes C et D de carte ou les groupes A et B du potentiom tre dans le cas contraire le transpalette ne pourra pas tre ajust correctement Specificit s du transpalette Capacit maximale 2000kg Longueur d...

Страница 54: ...Changer l huile Ajuster les boulons ou les vis Extraire l air 3 Les fourches ne peuvent pas descendre Le placement de la marchandise d un seul c t ou la surcharge provoque l endommagement des pistons...

Страница 55: ...r les pi ces us es Extraire l air Mettre jour R gler le boulon ou la vis Instructions d utilisation 1 Maintenir le transpalette dans un lieu froid et sec Ne pas le stocker dans des milieux de hautes t...

Страница 56: ...iode cela pourrait endommager les capteurs de pes es 5 Tous les produits peser doivent tre plac s au centre des fourches pour obtenir des r sultats plus pr cis 6 Les dimensions totales des produits ne...

Страница 57: ...exion automatique Options Imprimante Connexions 1 Connexion capteurs de pes es Pin 1 connect avec EXC Pin 2 connect avec EXC Pin 3 connect avec SIG Pin 4 connect avec SIG 2 Connexion RS 232 2 pin Sort...

Страница 58: ...nnect avec 5V Pin 2 connect avec GND Pin 3 connect avec TXD Pin 4 connect avec GND Description de l cran 1 Indicateur du z ro 2 Indicateur de tare 3 Indicateur de compte pi ces 4 Indicateur de livres...

Страница 59: ...isponible dans les conditions suivantes Quand le transpalette se connecte et que la valeur l cran est n gative Quand le poids d un r cipient a t soustrait et que l cran affiche z ro Quand la valeur de...

Страница 60: ...touche l cran affichera le poids unitaire et le poids total 5 Appuyer sur la touche pour sortir du mode compte pi ces y retourner au mode de pes e normal Fonction Hold 1 Appuyer sur la touche trois f...

Страница 61: ...rer l objet et attendre que l cran affiche z ro placer un nouvel objet pour continuer l accumulation des pes es Appuyer sur la touche pour visualiser le num ro d accumulations effectu es et le poids t...

Страница 62: ...a attendre jusqu ce que la recharge de la batterie soit compl te Fonctions avancees V rification du voltage de la batterie Avec l cran Z ro appuyer sur la touche pendant 3 5 secondes l cher la touche...

Страница 63: ...acc der aux diff rents modes de v rification et de modification 1 Mode modification quand l heure commence clignoter changer les donn es et appuyer la touche pour garder les modifications et passer au...

Страница 64: ...al est 12 Dans le mode 24 heures le num ro est 23 Appuyer sur la touche le chiffre d cimal s ajoutera en utilisant la touche 1 Appuyer sur la touche un autre chiffre s ajoutera en utilisant 1 7 Min 00...

Страница 65: ...Appuyer sur la touche pour confirmer et passer au mode suivant Configuration de l emplacement de la virgule Configuration de l emplacement de la virgule Choisir l emplacement de la virgule pour choisi...

Страница 66: ...touche pour passer au mode de Calibration Calibration du point z ro L cran affichera CaL 0 ne placer aucun objet sur les fourches quand l cran affiche ce message De suite la balance passera au mode s...

Страница 67: ...ON SL se chargera de la r paration de la balance Cette garantie n inclut pas les dommages caus s par une utilisation impropre surcharge ou par faute de ne pas avoir suivi les recommandations crites da...

Страница 68: ...Gram Precision S L Traves a Industrial 11 08907 Hospitalet de Llobregat Barcelona Spain Tel 34 902 206 000 34 93 300 33 32 Fax 34 93 300 66 98 comercial gram es www gram es 001 08072016...

Отзывы: