background image

9

Switching on

Follow the instructions on this page on how to switch on your TV set and the remote 

control before going on to following pages describing how to use the channel set-up 

procedure.

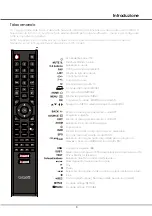
1. Insert two batteries in the remote control.

    Precautions on using batteries:

    - Only use the battery types specified.

    - Make sure you use the correct polarity.

    - Do not mix new and used batteries.

    - Do not use rechargeable batteries.

    - Do not expose batteries to excessive heat such as sunshine, fire or the like, 

      throw them in a fire, recharge them or try to open them, as this could cause 

      them to leak or explode.

    - Remove the batteries from the remote control if you are not using it for a long 

      period of time.

3. Connect an outside aerial to the ANTENNA IN socket at the back of the TV set.

4. When powered on, the TV will be turned on directly or be in standby.

    Note: For some models, switch the TV on by pressing the power button. 


   If the power indicator lights up, the TV set is in standby mode. Press the     

    button on the remote control or on the TV set to turn on the TV.    

2. Connect the power cable FIRST to the television, THEN  to a mains socket.

    (Note: If the power cable is connected to the television, please only connect the 

    power cable to the mains socket.)

     If your TV is connected to an AC supply

     Your TV set should only be connected to an AC supply. It must not be connected

     to a DC supply. If the plug is detached from the cable, do not, under any 

     circumstances, connect it to a mains socket, as there is a risk of electric shock.

     If your TV is connected to a DC supply

     Your TV set should only be connected to a DC supply. It must not be connected

     to a AC supply. If the plug is detached from the cable, do not, under any

     circumstances, connect it to a mains socket, as there is a risk of electric shock.


Switching off

To put the TV set into standby mode, press the     button on the remote control

or on the TV, the TV set remains powered up, but with low energy consumption.
To switch off the TV set, unplug the mains socket from the mains outlet.

Note: For some models, press the power button to switch off the TV set.

Chapter 2

General Operation

Содержание GR32D8650

Страница 1: ...Please read this manual carefully before using and keep it for future reference INSTRUCTION MANUAL GR32D8650 HD SMART TV ...

Страница 2: ...remove cover or back as there are no user serviceable parts inside Refer servicing to qualified personnel IMPORTANT SAFETY INSTRUCTIONS 2 The exclamation point within an equilateral triangle is intended to alert the user to the presence of important operating and maintenance instructions in the literature accompanying the appliance ATTENTION RISQUE DE CHOC ELECTRIQUE NE PAS OUVRIR 8 Never place a ...

Страница 3: ...h To prevent the spread of fire keep candles or other open flames away from this product at all times The European Directive on Waste Electrical and Electronic Equipment WEEE required that old household electrical appliances must not be disposed of in the normal unsorted municipal waste stream Old appliances must be collected separately in order to optimize the recovery and recycling of the materi...

Страница 4: ...ecautions Product Power and Plug Power Cord and Signal Cable Use Environment Cleaning Hanging the TV Set on the Wall Buttons on the TV Sockets Remote Control Functions Switching on Swi tching off Netwo rk con nection Menu Fun ction USB Fu nction Features of product Attention and Frequently Asked Questions Troubleshooting Base Installation Table of Contents ...

Страница 5: ...n damage If this happens unplug the set and refer to the service personnel If the set is subject to impact or has been dropped to have the cabinet damaged Power and Plug Do not allow anything to rest on or roll over the power cord and the signal cable Protect the power cord and the signal cable from being trampled Do not overload the power cord or the power outlet Do not expose the power cord and ...

Страница 6: ...n Turns the TV on or standby Note for some models the button turns the TV on or off 3 MENU button Brings up the main menu or press to return to the previous menu 4 SOURCE button Press to select signal source Type 2 Type 3 1 PROGRAM CHANNEL UP DOWN button Scans up down through the channel list In the menu system they act like the up down direction buttons on the remote and adjust menu controls 2 VO...

Страница 7: ...the TV Note Excessive sound pressure from earphone s can cause hearing loss CI SCART SCART adapter Connects to an external device such as a VCR set top box or a DVD player using the included SCART adapter cable DIGITAL AUDIO OUTPUT COAXIAL SPDIF DIGITAL AUDIO OUTPUT COAXIAL SPDIF Use a digital cable to connect your TV to a compa tible audio receiver SATELLITE SATELLITE socket input This socket can...

Страница 8: ...satellite receivers DVD players or games consoles Note Component IN and AV IN share the same L R Audio input jacks Audio AC IN AC In socket input This socket can be used to connect a AC supply SD CARD The socket can be used to connect an SD card S VIDEO S VIDIO socket input Allows you to connect an S VIDEO cable from another component DC IN DC In socket input This socket can be used to connect a D...

Страница 9: ...Enter AD menu under DTV source up down left and right direction buttons Highlights different items in the menu system and adjusts the menu controls Accesses the TV mode TV INFO Goes to the NETFLIX homepage Goes to the YouTube homepage USB To enter the USB mode Recording button Not available for some models To to back to the previous menu or interface to exit a running app To select the picture for...

Страница 10: ...is in standby mode Press the button on the remote control or on the TV set to turn on the TV 2 Connect the power cable FIRST to the television THEN to a mains socket Note If the power cable is connected to the television please only connect the power cable to the mains socket If your TV is connected to an AC supply Your TV set should only be connected to an AC supply It must not be connected to a ...

Страница 11: ... your ethernet cable to the router and to the Ethernet port on the back of the TV 3 Use the Network Settings to configure the TV Connecting to a wireless network To connect to a wireless network 1 Ensure you have A router broadcasting a high speed wireless signal A high speed internet connection A wireless USB Adapter not need for a built in wireless connection 2 The TV set with Wi Fi Module Note ...

Страница 12: ...ows you to set the OSD language Audio language etc The SCREEN PC menu allows you to adjust the picture s position phase clock etc Note Only available in VGA PC mode Connect a USB device to a USB socket and display the main menu You can play movie photo music or text on TV USB Function Note Some options may unavailable in some models In USB state if no USB device connected the USB interface will be...

Страница 13: ... avoid damaging the system or the device 3 Pay attention to the power supply of the device when you are using a mobile hard disk or a digital camera If the power supply is not sufficient or not stable you may encounter problems during operating or can not operate at all In this case please restart the device or unplug the device and plug it again and ensure that its power supply is normal 4 The sy...

Страница 14: ... a television signal where the signal is weak the picture may be marred by dots When the signal is extremely weak it may be necessary to install a special antenna to improve the reception 1 Adjust the position and orientation of the indoor outdoor antenna 2 Check the connection of antenna 3 Fine tune the channel 4 Try another channel Broadcasting failure may Ignition Black spots or horizontal stre...

Страница 15: ...GR32D8650 HD SMART TV Si prega di leggere attentamente e di conservare per riferimento futuro MANUALE UTENTE ...

Страница 16: ...ssario 6 L apparecchiatura non dovrebbe essere esposta a sgocciolamenti o a spruzzi d acqua e nessun contenitore pieno di liquido vasi bottiglie bicchieri deve essere collocato sul dispositivo Per ridurre il rischio di incendio o di shock elettrico non esponete l apparecchiatura a pioggia o a umidità 7 Non esporre le batterie a temperature elevate non gettare nel fuoco caricare o lasciare all aper...

Страница 17: ...sa a terra Per evitare il rischio di incendi tenere questo prodotto lontano da candele o altre fiamme libere Questo dispositivo è realizzato con componenti riciclabili in conformità con la direttiva WEEE Questo simbolo sul prodotto o sulla confezione indica che il prodotto non va gestito come un normale rifiuto domestico Dovrebbe invece essere consegnato presso i punti di raccolta adeguati per il ...

Страница 18: ...i utilizzo 4 Pulizia 4 Montaggio a parete 4 Pulsanti 5 Prese 6 Telecomando 8 Capitolo 2 Generale Accensione 9 Spegnimento 9 Connessione rete 10 Funzione Menu 11 Funzioni USB 11 Caratteristiche del prodotto 11 Capitolo 3 Funzioni Avanzate FAQ 12 Capitolo 4 Altre Informazioni Individuazione e risoluzione dei problemi 13 Montaggio 14 ...

Страница 19: ...set vicino a zone umide e fredde Proteggere da surriscaldamento ã Tenere il set lontano dalla luce diretta del sole ã L apparecchio non deve essere esposto a sgocciolamenti o spruzzi e nessun oggetto riempito di liquidi come i vasi deve essere collocato sull apparecchio ã Non utilizzare il set vicino alla polvere Pulizia ã Spolverare il set pulendo lo schermo e l armadietto con un panno morbido e ...

Страница 20: ...iare le scorciatoie spostando il Controller in direzione su giù e premere il Controller per entrare quindi operare secondo la visualizzazione sullo schermo Le scorciatoie includono Source Menu Home Home Back e Standby E le scorciatoie possono variare a seconda dei modelli Per uscire dal menu NAV premere il controller in direzione su giù fino a quando non viene evidenziato quindi premere nuovamente...

Страница 21: ...mero di porte HDMI può variare La funzione ARC Audio Return Channel è supportata solo su alcune porte HDMI ARC per alcuni modelli Nota solo le prese HDMI con l identificazione MHL supportano la funzione MHL MHL sta per Mobile High definition Link e permette di collegare un dispositivo mobile con capacità MHL al televisore CI Porta CI Questa porta CI Common Interface può essere utilizzata per inser...

Страница 22: ... a cui si sta collegando è compatibile con Y Pb Pr Le prese dei componenti forniscono un eccellente qualità dell immagine perché il video è separato in tre parti separate Prese video AV RCA audio ingresso Le prese AV IN possono essere utilizzate per collegare una serie di apparecchiature tra cui videoregistratori videocamere decoder ricevitori satellitari lettori DVD o console di gioco Nota Compon...

Страница 23: ...programm televisivo Accede al MENU AD in modalità DTV Accede a sorgente USB Seleziona una lingua sottotitoli disponibile per un programma TV Attiva Disattiva il televideo Seleziona obiettivi o funzioni del Televideo Play Pausa Seleziona l immagine il video o il brano precedente successivo Stop Tasto di registrazione Non disponibile per alcuni modelli Accede all App NETFLIX Accede all App YOUTUBE R...

Страница 24: ... essere collegato ad un alimentazione a corrente continua DC Se la spina è staccata dal cavo non collegarla in nessun caso ad una presa di corrente poiché c è il rischio di scosse elettriche ã Se il televisore è collegato ad un alimentazione a corrente continua DC Il televisore deve essere collegato solo ad un alimentazione in corrente continua Non deve essere collegato ad un alimentazione CA Se l...

Страница 25: ...ere ã Un cavo ethernet abbastanza lungo da raggiungere la TV ã Un router o modem con una porta Ethernet disponibile ã Una connessione Internet ad alta velocità ã Una porta Ethernet LAN sul retro della TV 2 Collegare il cavo Ethernet al router e alla porta Ethernet sul retro del televisore 3 Utilizzare le impostazioni di rete per configurare il televisore Connessione ad una rete wireless Per connet...

Страница 26: ...i sta guardando e all illuminazione dell ambiente Suono Il menu SUONO consente di personalizzare l audio del televisore in base alle proprie preferenze Tempo Il menu TEMPO permette di regolare l orario l orario di accensione l orario di spegnimento ecc Blocco Il menu BLOCCO consente di selezionare una password di impedire la visione di alcuni canali tramite password ecc Setup Opzioni Il menu SETUP...

Страница 27: ...l dispositivo 3 Fate attenzione al cavo di alimentazione del dispositivo quando si utilizza un disco rigido mobile o una fotocamera digitale Se il cavo di alimentazione non è sufficiente o non è stabile è possibile che si verifichino problemi durante il funzionamento o che non si possa operare affatto In questo caso si prega di riavviare il dispositivo o di scollegare il dispositivo e ricollegarlo...

Страница 28: ...rato Premere il pulsante MUTE ã Provare un altro canale Il problema potrebbe essere dovuto alla trasmissione ã I cavi audio sono installati correttamente Barre orizzontali verticali o immagini con tremolio ã Di solito sono causate da interferenze locali come automobili lampade a luce diurna e asciugacapelli ã Regolare l antenna per ridurre al minimo le interferenze Nessuna immagine in modalità VGA...

Страница 29: ...pporto su piano assicurarsi che i bulloni siano ben serrati In caso contrario il prodotto può cadere in avanti terminata l installazione Se si serra il bullone con forza eccessiva il bullone può deviare dall abrasione della zona di serraggio dello stesso 2 1 Screw x 4 Base x 2 Altre Informazioni 14 ...

Страница 30: ...FF Output 350mA Max 22KHz Memorizzazione dei Canali 4000 DiSEqC 1 0 1 1 compatibile SISTEMA VIDEO APPLICAZIONI SMART Pre Installate In Evidenza INTERNET WI FI Interno IEEE 802 11b g n Ethernet 10 100 Mbps Dual Core A9 1 0GHz CPU PROCESSORE MEMORIA GPU RAM ROM Dual Core Mali400 OpenGL ES2 0 1 GB DDR 4 GB YouTube Netflix Prime Video App locali MPEG 1 MPEG 2 MP ML MPEG 4 SP HL3 0 MPEG 4 ASP HL4 0 H 2...

Отзывы: