background image

Owner’s Manual

SS-WM15-TAB

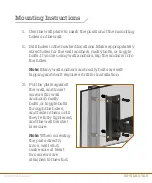
1.  Use the wall plate to mark the position of the mounting 

holes on the wall. 

2.  Drill holes in the marked locations. Make appropriately 

sized holes for the wall anchors, molly bolts, or toggle 

bolts. If you’re using wall anchors, tap the anchors into 

the holes. 


Note:

 Many wall anchors and molly bolts are self-

tapping and don’t require a drill for installation. 

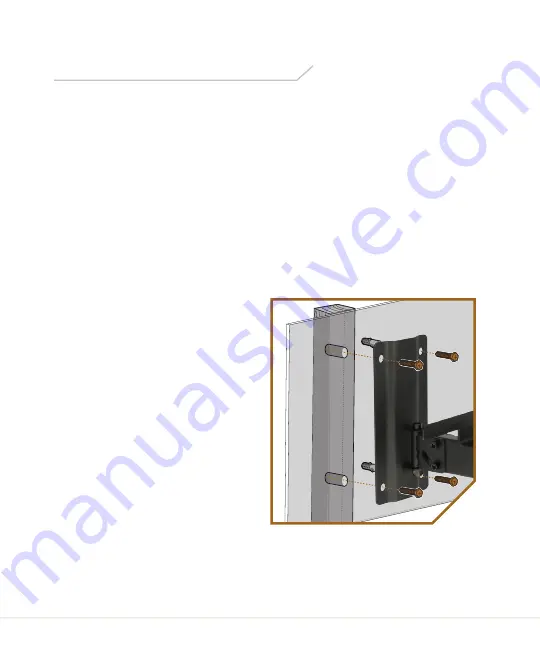
3.  Put the plate against 

the wall, and insert 

screws (for wall 

anchors), molly 

bolts, or toggle bolts 

through the holes, 

and fasten them until 

they’re fully tightened, 

and the wall bracket 

is secure. 


Note:

 When screwing 

the plate directly 

into a wall stud, 

make sure at least 

two screws are 

attached to the stud.

Mounting Instructions

Содержание Auray SS-WM15-TAB

Страница 1: ...Wall Mount Speaker Bracket SS WM15 TAB Owner s Manual with Tilt and Angle Adjustment and Adjustable Back Plate Pair ...

Страница 2: ...ment A back platform and bracket adjusts to the depth of your speaker cabinet and offers excellent steadiness and security for your wall mounted speaker Please read and follow these instructions and keep this manual in a safe place Handle the unit with care Clean the unit with only a soft dry cloth Make sure everything is secure before proceeding Do not exceed the maximum load capacity All images ...

Страница 3: ...tap the anchors into the holes Note Many wall anchors and molly bolts are self tapping and don t require a drill for installation 3 Put the plate against the wall and insert screws for wall anchors molly bolts or toggle bolts through the holes and fasten them until they re fully tightened and the wall bracket is secure Note When screwing the plate directly into a wall stud make sure at least two s...

Страница 4: ...tant When adjusting the angle with a mounted speaker make sure the speaker is supported from beneath the bracket Adjust the tilt to aim your speakers at the optimum angle Tighten or loosen the four side hex screws with the included hex wrench to adjust the speaker angle and ensure the bracket maintains its position once it s set Swivel Adjustment Tilt Adjustment ...

Страница 5: ...platform under the speaker until the back is flush against the back edge of the speaker and retighten the locking nut Adjusting the Back Platform and Bracket Specifications Weight Capacity 80 lb 36 3 kg Mount 1 375 in 35 mm Material Steel Swivel 180 Tilt 30 Arm Length 15 5 in 39 4 cm Plate Dimensions H W D 9 25 4 75 0 5 in 23 5 12 1 1 3 cm Weight 4 6 lb 2 1 kg ...

Страница 6: ...by misuse neglect accident alteration abuse improper installation or maintenance EXCEPT AS PROVIDED HEREIN THE WARRANTY PROVIDER MAKES NEITHER ANY EXPRESS WARRANTIES NOR ANY IMPLIED WARRANTIES INCLUDING BUT NOT LIMITED TO ANY IMPLIED WARRANTY OF MERCHANTABILITY OR FITNESS FOR A PARTICULAR PURPOSE This warranty provides you with specific legal rights and you may also have additional rights that var...

Отзывы: