Gradient Lens LUXXOR Скачать руководство пользователя страница 7

Luxxor

®

 Portable Video Camera User Guide

Phone:  

800.536.0790

   fax 585.235.6645   gradientlens.com   [email protected]

Luxxor

®

 Portable Video Camera User Guide

Phone:  

800.536.0790

   fax 585.235.6645   gradientlens.com   [email protected]

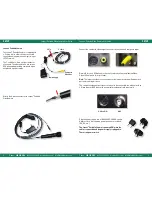
The PVM displays live video and captured still or video images on its built in LCD display. 

It can output live video to an external monitor via a composite signal connector and the 

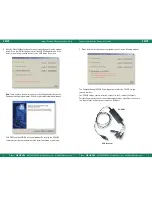
included cable. Stored images can be downloaded to a computer via the USB port and 

included cable, or through the removable SD memory card. (Details are on next page.)
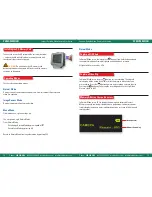
PVM Operation

Turn the PVM’s power on by pressing and holding the power button for 2-5 seconds. 

The Gradient Lens logo will appear. Then the word CAMERA and the battery and 

memory status indicators will appear for a few seconds.

When these indicators disappear the unit is in Normal Mode, displaying a live image 

from the camera.  

To turn the unit off, push and hold the power button for 1-2 seconds until it turns off.

Power On / OFF

10

Main Controls

OK      esC

Power

PVM OPeraTiOn

PVM OPeraTiOn

12 

13

12-Pin

6-Pin

6

LPC

12

PVM

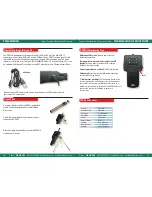
Portable Video Monitor Option

If the Portable Video (PVM-DV) viewing option is  

chosen, the included cable will have a circular  

connector at each end, one 6-pin and one 12-pin. 

Connect the 6-pin end to the Luxxor

®


Portable Camera and the 12-pin end 

to the PVM. The camera is powered 

from the PVM’s battery for completely 

portable use.

Charging the PVM

To charge the PVM, connect the 

charger lead to the jack labeled DCIN 

on the PVM. Then plug the charger 

into a 100-240 V, 50/60 Hz outlet. Full 

charge takes about 2 hours. The PVM 

will not operate with the charger 

plugged in when the battery is nearly 

fully charged. 

note:

 There is no charging indicator 

light. The battery status indicator  

will appear in the display when 

booting up.

Содержание LUXXOR

Страница 1: ...LE CAMERA LUXXOR PORTABLE video CAMERA UserGuide Phone 800 536 0790 fax 585 235 6645 gradientlens com info gradientlens com 207 Tremont Street Rochester New York 14608 800 536 0790 Fax 585 235 6645 RE...

Страница 2: ...ion images can then be viewed live and captured documented and e mailed PORTABLE CAMERA Table of Contents Warnings Page 3 Set Up Page 4 PVM Operation Page 12 Troubleshooting Page 21 Specifications Pag...

Страница 3: ...o a monitor with an S Video Input or BNC Input with an appropriate adapter sold separately Plug the power supply into a 100 240 VAC 50 60 Hz outlet Adapters for a few common power outlets are included...

Страница 4: ...er 5 The installer will now move to the Install Video ToolBox step Click Install to install the Video ToolBox software setup SETUP Computer Ready Option Install the Software WARNING The included softw...

Страница 5: ...xor Portable Camera and converts the analog composite video signal from the camera to a digital signal for input to your computer s USB port 6 After the Video ToolBox software has been installed you w...

Страница 6: ...cted and the power supply plugged in There is no power switch After the software has been properly installed connect the composite output from the Y cable to the composite input yellow of the VC USB2...

Страница 7: ...these indicators disappear the unit is in Normal Mode displaying a live image from the camera To turn the unit off push and hold the power button for 1 2 seconds until it turns off Power ON OFF 10 Ma...

Страница 8: ...ft of the image to indicate that you are recording Press the button again to stop recording and save the clip Pressing the button will also stop the recording and save the clip Video files are saved a...

Страница 9: ...images will always include a time date stamp Confirm changes by pressing OK ERASE ALL YES NO MENU DELETE ALL VIDEO OUTPUT DATE TIME SETUP LANGUAGE VIDEO FORMAT MENU DELETE ALL VIDEO OUTPUT DATE TIME...

Страница 10: ...Auto Power Off Connecting to an Auxiliary Display Menu Mode MENU VIDEO OUTPUT DATE TIME SETUP LANGUAGE VIDEO FORMAT AUTO POWER OFF AUTO OFF DISABLE 5 MIN 10 MIN 15 MIN 30 MIN Video Out AV Cable PVM op...

Страница 11: ...ng SPECIFICATIONS Sensor 1 4 CCD Effective Pixels 768 x 494 Scanning 2 1 Interlace Resolution 520 TV Lines Output Composite Output Format NTSC Length 6 25 159 mm Max Diameter 1 74 44 2 mm Weight 6 3 o...

Страница 12: ...ce components found to be defective or at variance from the manufacturer s specifications within this time at no cost to the customer It shall be the purchaser s responsibility to return the instrumen...

Отзывы: