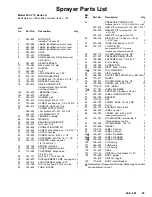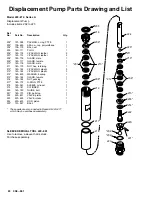
Displacement Pump
Pump Reassembly
1.
Clean the piston valve threads. One at a time,
stack the backup washer (203*), seal (215*) (with
lips facing down), and female gland (214*) on the
piston. Alternately stack the polyethylene (212*)
and leather (206*) packings (lips facing up) on the
piston. Then install the male gland (210*). See Fig.
23.
2.
Place the flats of the piston valve in a vise. Tighten
the packing retaining nut against the piston valve
to 4 in-lb (0.35 N.m). See Fig. 24.
Note the alignment of the piston to the packing retainer
nut. Maintain this alignment through Steps 4 and 5.
3.
Apply one drop of Locktite to the threads. Place
the ball (225*) on the piston valve. See Fig. 25.
4.
While maintaining the alignment, thread the piston
valve assembly into the piston rod just until the
piston valve nut contacts the rod. See Fig. 26.
5.
Place the flats of the rod in a vise. Carefully tighten
the piston valve nut (211) against the piston rod to
19 ft-lb (27 N.m). Use two wrenches to maintain
the alignment. See Fig. 27.
6.
Place the male gland (208*) in the cylinder. Alter-
nately stack the polyethylene (213*) and leather
packings (207*) (lips facing down). Then place the
female gland (209*) in the top of the cylinder. Seat
the packings. See Fig. 28.
Fig. 23
02566
203*
206*
215*
*212
*210
*214
Fig. 24
02567
Torque to 4 in-lb
(0.35 N.m)
Fig. 25
02568
*225
Fig. 26
02569
Fig. 27
02570
Torque to 19 ft-lb
(27 N.m)
Fig. 28
02571
*207
209*
213*
208*
Содержание ULTRA PLUS+ 1500
Страница 26: ... Notes ...


