Maintenance
3A1183D
11
Replacement of Belt/Belt
Adjustment
NOTE:
The Cog Belt System does not require align-
ment. When upper sheave is placed on motor shaft it is
pushed on until a positive stop is reached. The set
screws are then loctited. The lower pulley is placed on
gearbox and held in place with keyway and snap ring.
The flange on upper sheave holds the belt in alignment
and the belt self aligns on lower pulley eliminating hav-
ing to align.
1. Remove cover from unit.
2. Remove tensioner Assembly. Loosen screws. Move
gearbox forward to allow removal and replacement
of belt.
3. Retighten screws into gearbox until they bottom out.
This will align gearbox correctly.
4. Replace tensioner with bolts and leave loose to
allow adjusting belt tension.
5. Tighten belt. When properly tightened the deflection
play should be 1/4 inch when pushing hard with
thumb. (20 ft/lbs)
NOTE:
When placing belt on pulleys and inserting the
tensioner against belt, ensure cogs on belt are engaged
into cogs on pulleys before tightening belts. Rotating
upper pulley while holding the tensioner against the belt
will allow proper engagement of cogs prior to tightening.
Servicing the Fluid Pump
NOTE:
Before disassembling the sprayer refer to Trou-
bleshooting to try and resolve the problem.
Fluid Pump Disconnect
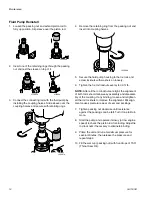
1. Flush out the material you are spraying, if possible.
2.
Relieve Pressure
, page 13. Stop the pump in the
middle of down stroke.
3. Remove the suction tube and fluid hose (if so
equipped) from the fluid pump.
4. Remove the connecting rod shield from the pump.
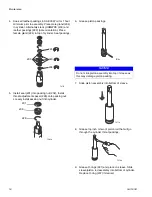
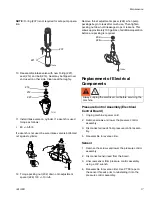
5. Remove two retaining rings (6), slip the sleeve of
the coupling down, and remove both coupling
halves. This will disconnect fluid pump from the con-
necting rod.
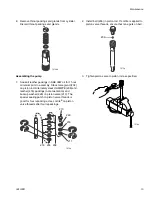
6. Using a 7/8” box wrench, disconnect the high pres-
sure fluid line from the pump.
7. Using a 9/16” wrench, unscrew the two tie rod lock-
nuts.
8. Pull the pump off the tie rods.
ti16032a
6
ti16033a


