background image

22

309136

Service

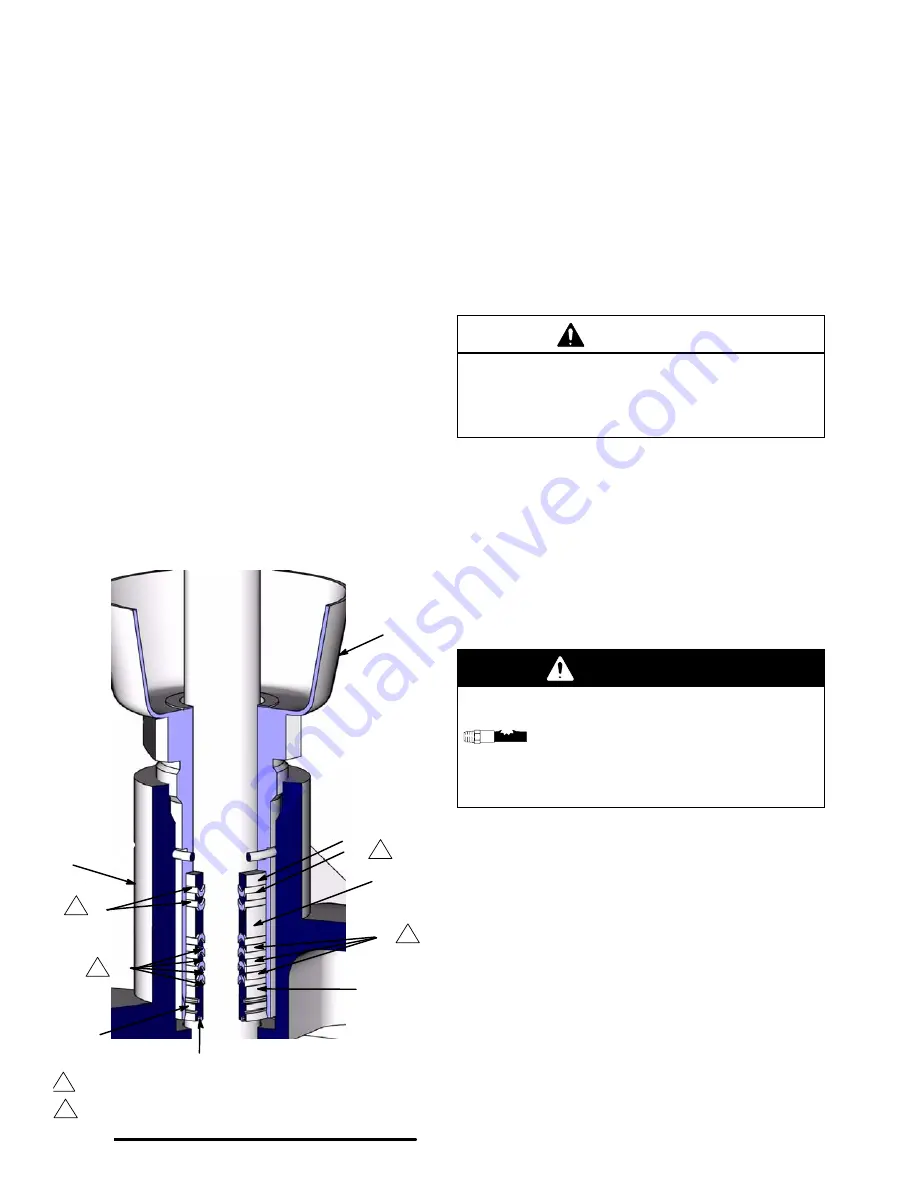
NOTE: Refer to Fig. 14 for Steps 21 and 22.

21. Lubricate three new throat packings (two – 31

{

)

and (one – 35†) and the male gland (30

{

) with

light grease. Holding the packing nut (12), drop the
gland (30

{

) into the packing nut so that the lips

face up. Alternately set the three v-packings with
the lips facing up into the packing nut one at a
time, starting with 31

{

,  followed by  35†, and

ending with  31

{

.

22. Lubricate the female gland (42

{

) well and place it

in the packing nut.    Lubricate seven new throat
packings (four – 31

{

) and (three – 35†)  with light

grease.  Alternately set the seven v-packings with
the lips facing down into the packing nut one at a
time, starting with (31

{

),  followed by  (35†), and

ending with  (31

{

).  Lightly grease gland assembly

(32) and press fit into wet cup (12) until you feel
the o–ring (A) snap into its groove. Place lubri-
cated o–ring (34) into the groove on the face of the
gland assembly.

Fig. 14

1

Lips of v–packings face up.

2

Lips of v–packings face down.

42

12

30†

35

5

35

31

31

34

32

1

1

2

2

A

NOTE: Refer to Fig. 16 for Steps 23–35 unless other-
wise indicated.

23. Loosely screw the packing nut (12) into the outlet

valve housing (5).

24. Lubricate and install the new o-rings (16*) around

each of the four ball seats (17 and 22).

CAUTION

The orientation of the ball valves in the inlet and
outlet valve housings is critical. Install the parts of
the ball valve exactly as instructed and refer to Fig.
16. If installed incorrectly, the pump will not operate.

25. Place the inlet valve housing (6) on a flat surface

with the ball valve openings facing up. Lubricate
the seals (15*) and set them into each side of the
inlet valve housing.

26. Place the ball guides (14) and balls (13) in the inlet

valve housing.

WARNING

COMPONENT RUPTURE HAZARD
The relief valve seat (22) must be in-
stalled at the fluid inlet, to reduce the
risk of pump overpressurization. It can-
not relieve pressure if installed in anoth-
er location.

27. Press the seat (22) with the pressure relief valve

into the fluid inlet side of the inlet manifold (1).
This seat is not reversible. Orient as shown in the
detail in Fig. 16. Press the other seat (17), with the
unworn side facing out, into the other side of the
inlet manifold.

NOTE: The pressure relief seat kit (22) includes two
seals (15) and two o-rings (16). When installing a new
pressure relief seat, also install the seals and o-rings
on both sides of the fluid inlet manifold (1).

Содержание HIGH-FLO 243737

Страница 1: ...shing materials Do not use for flushing or purging lines with caustics acids abrasive line strippers or other similar fluids 309136N 01405 Stainless Steel Model Shown Mounted on Accessory Stand 218742 Important Safety Instructions Read all warnings and instructions in this manual Save these instructions See page 2 for table of contents and page 4 for pump part nos ratios and working pressures ...

Страница 2: ...pment D Use the equipment only for its intended purpose If you are uncertain about usage call your Graco distributor D Do not alter or modify this equipment Use only genuine Graco parts and accessories D Check equipment daily Repair or replace worn or damaged parts immediately D Do not exceed the maximum working pressure stated on the equipment or in the Technical Data section for your equipment D...

Страница 3: ... in the spray dispense area D Do not smoke in the spray dispense area D Do not turn on or off any light switch in the spray dispense area while operating or if fumes are present D Do not operate a gasoline engine in the spray dispense area TOXIC FLUID HAZARD Hazardous fluid or toxic fumes can cause serious injury or death if splashed in the eyes or on the skin inhaled or swallowed D Know the speci...

Страница 4: ...43742 B Viscount II 300 27 243733 Series D 27 10 3 103 1500 2 1 21 300 SEVERE DUTY ELECTROPOLISHED STAINLESS STEEL MODELS WITH NPT THREADS Maximum Air or Hydraulic Working Pressure Maximum Fluid Working Pressure Pump Part No Series Ratio and Type parts list page Displacement Pump Series parts list page MPa bar psi MPa bar psi 243743 B 3 1 Bulldog 27 243771 Series D 27 0 7 7 0 100 2 1 21 300 243745...

Страница 5: ... 243756 B 300 Viscount II 27 243736 Series D 27 10 103 1500 2 1 21 300 SEVERE DUTY CHROME STAINLESS STEEL MODELS WITH NPT THREADS Displacement Maximum Air or Hydraulic Working Pressure Maximum Fluid Working Pressure Pump Part No Series Ratio and Type parts list page Displacement Pump Series parts list page MPa bar psi MPa bar psi 248343 A 400 Viscount II 27 248333 Series B 27 10 103 1500 2 8 28 40...

Страница 6: ...e other end of the wire to a true earth ground Order Part No 237569 Ground Wire and Clamp Fig 1 TI1052 Y Z Fig 2 W X Y Z 0864 2 Air and fluid hoses use only electrically conductive hoses 3 Air compressor or hydraulic power supply follow manufacturer s recommendations 4 Surge tank use a ground wire and clamp See Fig 2 5 Spray gun ground through connection to a prop erly grounded fluid hose and pump...

Страница 7: ... stainless steel plumbing to maintain a corrosion resistant system Tri Clamp Adapters Tri clamp adapters are available which allow sanitary pipe to be connected to a pump with bspp inlet and outlet Refer to Fig 3 Install a 2 in tri clamp gasket GG in the groove of the tri clamp adapter HH Mate the tri clamp adapter with the sanitary pipe and secure with two clamps JJ bolts KK and nuts MM Install t...

Страница 8: ...ng Systems In non circulating systems with a fluid outlet that can be closed off causing the pump to stall install a fluid pressure relief valve AA and a return line BB See Fig 4 WARNING COMPONENT RUPTURE HAZARD The pressure relief valve reduces the risk of the pump overpressurizing if the piston seal is worn and leaking and the fluid outlet is closed off Install the valve so the ar row on its bod...

Страница 9: ...Provide a bracket on which to mount the accessories In an air powered system install the air line accesso ries in the order shown in Fig 5 Working upstream from the pump air inlet install an air line lubricator H for automatic air motor lubrication Next install a bleed type master air valve L to relieve air trapped between the valve and the pump and an air regulator and gauge J to control pump spe...

Страница 10: ...uid Shutoff Valve E Fluid Supply Line F Mix Tank G Pump Runaway Control Valve H Air Line Lubricator J Air Regulator and Gauge K Air Line Filter L Bleed type Master Air Valve W Air Line Drain Valve Y Ground Wire F E D A E D B Y D F K J L H G Y C Fig 5 1 Do not hang the air accessories directly on the pump s air inlet Provide a bracket on which to mount the accessories L 1 1 W ...

Страница 11: ...cturer s recommendations on reservoir and filter cleaning and periodic changes of hydraulic fluid The motor has a 3 4 npt hydraulic oil inlet and a 1 in npt hydraulic oil outlet Use a minimum 1 2 in ID hydraulic supply line and a minimum 5 8 in ID return line On the hydraulic oil supply line P install a shutoff valve G to isolate the system for servicing a fluid pressure gauge H to monitor hydraul...

Страница 12: ...Non Restrictive Fluid Shutoff Valve E Fluid Supply Line F Mix Tank G Hydraulic Supply Line Shutoff Valve H Hydraulic Pressure Gauge J Flow Control Valve K Pressure Reducing Valve L Drain Line M Hydraulic Return Line Shutoff Valve N Accumulator P Hydraulic Supply Line Q Hydraulic Return Line Y Ground Wire Fig 6 01408 F E D A E D B Y D F K J L H M Y C N G P Q ...

Страница 13: ...d type master air valve L 3 In a hydraulic powered system close the hy draulic supply line shutoff valve G first then the return line shutoff valve M 4 Close the fluid shutoff valves from the supply tanks 5 Open the dispensing valve if used or slowly and carefully loosen a fluid fitting near the pump to relieve pressure Flush the Pump Flush the pump before using it the first time to remove the lig...

Страница 14: ... way h Adjust the pressure reducing valve until you get the desired fluid pressure Run the pump until all air is purged from the fluid lines i Count the cycle rate of the pump j Close the flow control valve until the cycle rate and fluid pressure start to drop k Open the flow control valve slightly until the cycle rate and fluid pressure return to the desired level This method of setting the hy dr...

Страница 15: ...the pump at the bottom of its stroke to prevent the fluid from drying on the piston rod and damaging the throat packings Read all other instruction manuals supplied with your pump and with all accessories you add to the system Monitor the fluid supply carefully If air is sucked into the pump due to an empty supply container the pump will accelerate quickly and can damage the pump packings If your ...

Страница 16: ...k valves Check and correct see page 22 start ing at step 24 Pump operates erratically Exhausted fluid supply Refill and reprime pump In an air pow ered system use pump runaway valve Held open or worn check valves Check and repair Worn piston packings Replace Excessive hydraulic fluid supply pres sure to Viscount motor See hydraulic motor manual 308048 Pump does not operate Restricted air or hydrau...

Страница 17: ...pe to the bottom threads of the rods before reattaching the air motor The bottom threads are farthest from the tie rod flats 1 Position the air motor on the pump On stainless steel pumps lubricate and tape the tie rod threads see the CAUTION above Screw the tie rod locknuts 104 onto the tie rods 103 2 Place the two couplers 105 in the coupling nut 106 Screw the nut up onto the motor shaft Torque t...

Страница 18: ...ubricant 222955 on the threads of the piston shaft 29 and piston 23 Displacement Pump Repair 1 Use a 13 mm socket wrench to loosen and remove the twelve capscrews 2 and lockwashers 3 on the outlet manifold 1 See Fig 16 2 Lift the manifold 1 off the outlet valve housing 5 and remove the ball guides 14 balls 13 seats 17 and seals 15 Remove the o ring 16 from the seats 17 NOTE Seat Puller Kit 220384 ...

Страница 19: ...s with a plastic mallet and use a slight rocking motion to help loosen and remove the cylinder and tubes 5 Screw out packing nut 12 Using a small flat blade screwdriver pry out male gland assembly 32 using the groove on outer surface Remove remaining packings 31 35 and glands 30 42 from the nut See Fig 10 6 Unscrew and remove the three pump stand bolts D See Fig 8 Lift the inlet valve assembly off...

Страница 20: ...Remove the balls 13 ball guides 14 and seals 15 from the inlet valve housing 6 11 Push the piston assembly through the cylinder just enough to expose the piston 23 flats Secure the piston flats in a vise Use a plastic mallet to tap the cylinder 27 up and off the piston assembly NOTE Refer to Fig 11 for Steps 12 16 12 Loosen the piston nut 26 Use Tool Kit 220385 to remove the piston shaft 29 and pi...

Страница 21: ...t down on its side CAUTION Do not lay the piston assembly with the new seal installed on its side Doing so may damage the seal NOTE Refer to Fig 13 for Step19 19 Carefully and evenly guide the seal and the piston into the cylinder The piston seal and piston may need to be tipped at an angle and the exposed leading lip of the seal tapped into the cylinder with a plastic mallet After the seal lip ha...

Страница 22: ...e packing nut 12 into the outlet valve housing 5 24 Lubricate and install the new o rings 16 around each of the four ball seats 17 and 22 CAUTION The orientation of the ball valves in the inlet and outlet valve housings is critical Install the parts of the ball valve exactly as instructed and refer to Fig 16 If installed incorrectly the pump will not operate 25 Place the inlet valve housing 6 on a...

Страница 23: ...rews op positely and evenly to 81 88 NSm 60 65 ft lb See Fig 15 33 Lubricate the seals 15 and press one into each side of the outlet valve housing 5 Press the seats 17 with the unworn sides facing the balls into the outlet valve housing Then install the balls 13 and ball guides 14 34 Place the outlet manifold 1 on the outlet valve housing 5 and install the twelve capscrews 2 and lockwashers 3 loos...

Страница 24: ...16 1 3 2 Apply medium strength sealant and torque to 24 27 NSm 18 20 ft lb Torque oppositely and evenly to 81 88 NSm 60 65 ft lb Torque to 67 NSm 50 ft lb Back off and re torque to 27 34 NSm 20 25 ft lb 4 Apply medium strength throat sealant and torque to 270 284 NSm 200 210 ft lb 5 See Fig 14 for proper assembly of v pack ings 6 3 5 5 7 7 7 8 Stainless Steel Model Shown 19 18 6 43 4 7 These parts...

Страница 25: ...PT 243747 4 1 220106 243735 180487 102216 184129 186925 196321 193424 BSPP 243748 4 1 235525 243735 180487 102216 184129 186925 N A N A NPT 243749 3 1 220106 243736 180487 102216 184129 186925 196321 193424 BSPP 243750 3 1 235525 243736 180487 102216 184129 186925 N A N A MODEL VISCOUNT II PUMPS NUMBER RATIO Hydraulic Motor Manual See 308048 Carbon Steel Pumps NPT 243740 600 223646 243731 180487 1...

Страница 26: ...ump King Pump Bulldog Pump Lower Pump 101 101 101 107 108 102 103 105 106 104 1 2 2 3 TI0222 107 108 1 2 Fig 17 1 3 2 Adapter for NPT models only Torque to 195 210 NSm 145 155 ft lb Apply PTFE tape or anti seize lubricant to the bottom threads ...

Страница 27: ...AT valve relief 1 237744 23 PISTON pump 1 196261 196263 196265 196261 196263 196265 196261 196263 196265 24 SEAL piston UHMWPE 1 196232 196233 196234 196232 196233 196234 196232 196233 196234 25 PLATE retaining 1 196262 196264 196266 196262 196264 196266 196262 196264 196266 26 NUT jam 1 196243 27 CYLINDER pump 1 180499 180498 180497 180499 180498 180497 180499 180498 180497 28 SEAL UHMWPE 1 18075...

Страница 28: ...180760 22 SEAT valve relief 1 237744 23 PISTON pump 1 196261 196263 196265 196261 196263 196265 24 SEAL piston UHMWPE 1 196232 196233 196234 196232 196233 196234 25 PLATE retaining 1 196262 196264 196266 196262 196264 196266 26 NUT jam 1 196243 27 CYLINDER pump 1 180499 180498 180497 180499 180498 180497 28 SEAL UHMWPE 1 180759 180758 180757 180759 180758 180757 29 SHAFT piston 1 185197 30 GLAND p...

Страница 29: ...e included in Pump Seal Repair Kit 243727 243728 and 243729 which may be purchased separately See page 30 These parts are included in Coupling Jaw Kit 243948 or 15D950 See page 30 These parts are included in the Throat Packing Kits 243671 and 243672 which may be purchased separately Material varies according to kit See page 30 42 35 31 31 32 43 1 BSPP to NPT adapter used on NPT pumps only 40 41 TI...

Страница 30: ...upling 2 186925 NUT coupling 1 29 185197 SHAFT piston chrome 1 PTFE Leather Throat Packing Repair Kit 243672 For all pumps Ref No Part No Description Qty 30 198360 GLAND packing male 1 31 190298 V PACKING PTFE 6 32 243839 GLAND packing male 1 34 109213 O RING PTFE 1 35 15J057 V PACKING leather 4 42 196216 GLAND packing female 1 Triple Lipt Throat Conversion Kit 243673 For all pumps Part No Descrip...

Страница 31: ...et Pressure psi MPa bar at a specific fluid flow lpm gpm and operating air pressure psi MPa bar 1 Locate desired flow along bottom of chart 2 Follow vertical line up to intersection with selected fluid outlet pressure curve black Follow left to scale to read fluid outlet pressure To find Pump Air Consumption m min or scfm at a specific fluid flow lpm gpm and air pressure psi MPa bar 1 Locate desir...

Страница 32: ...d Outlet Pressure psi MPa bar at a specific fluid flow lpm gpm and operating air pressure psi MPa bar 1 Locate desired flow along bottom of chart 2 Follow vertical line up to intersection with selected fluid outlet pressure curve black Follow left to scale to read fluid outlet pressure To find Pump Air Consumption m min or scfm at a specific fluid flow lpm gpm and air pressure psi MPa bar 1 Locate...

Страница 33: ...Fluid Outlet Pressure psi MPa bar at a specific fluid flow lpm gpm and operating air pressure psi MPa bar 1 Locate desired flow along bottom of chart 2 Follow vertical line up to intersection with selected fluid outlet pressure curve black Follow left to scale to read fluid outlet pressure To find Pump Air Consumption m min or scfm at a specific fluid flow lpm gpm and air pressure psi MPa bar 1 Lo...

Страница 34: ...uid flow lpm gpm and operating air pressure psi MPa bar 1 Locate desired flow along bottom of chart 2 Follow vertical line up to intersection with selected fluid outlet pressure curve black Follow left to scale to read fluid outlet pressure To find Pump Air Consumption m min or scfm at a specific fluid flow lpm gpm and air pressure psi MPa bar 1 Locate desired flow along bottom of chart 2 Read ver...

Страница 35: ...31 46 77 62 psi MPa bar cycles per minute gpm liters minute 30 60 91 151 181 FLUID FLOW TEST FLUID NO 10 WEIGHT OIL FLUID PRESSURE 1 4 14 0 7 7 A B C 93 212 2 1 21 2 8 28 3 5 35 4 2 42 0 4 8 12 16 20 24 28 0 8 16 24 32 40 48 56 Hydraulic Oil Consumption gpm lpm cycles per minute gpm liters minute FLUID FLOW TEST FLUID NO 10 WEIGHT OIL HYDRAULIC OIL CONSUMPTION 30 15 45 60 76 91 108 121 15 31 46 77...

Страница 36: ...let Pressure 10 21 31 52 42 psi MPa bar cycles per minute gpm liters minute 30 60 91 151 181 FLUID FLOW TEST FLUID NO 10 WEIGHT OIL FLUID PRESSURE 1 4 14 0 7 7 A B C 62 212 2 1 21 2 8 28 0 4 8 12 16 20 24 28 0 8 16 24 32 40 48 56 Hydraulic Oil Consumption gpm lpm cycles per minute gpm liters minute FLUID FLOW TEST FLUID NO 10 WEIGHT OIL HYDRAULIC OIL CONSUMPTION 30 15 45 60 76 91 72 121 10 21 31 5...

Страница 37: ...th selected fluid outlet pressure curve black Follow left to scale to read fluid outlet pressure To find Motor Hydraulic Oil Consumption lpm or gpm at a specific fluid flow lpm or gpm 1 Locate desired flow along bottom of chart 2 Read vertical line up to intersection with hydraulic oil consumption curve dashes Follow left to scale to read hydraulic oil consump tion A 10 3 MPa 103 bar 1500 psi hydr...

Страница 38: ...55 248343 248345 include NPT adapter 2 2 3 3 TI0244 2 in bspp 2 in npt f 3 F E Mounting Stand Hole Layout 160 2 mm 6 41 in 160 2 mm 6 41 in 277 5 mm 11 1 in 60_ 30_ 30_ 185 0 mm 7 4 in radius Three 17 mm 0 68 in holes Pump Model A B C D E F Weight Bulldog 540 mm 21 25 in 732 mm 29 28 in 1003 mm 40 in 205 mm 8 2 in 551 mm 21 7 in 641 7 mm 25 2 in 75 kg 167 lb King 540 mm 21 25 in 732 mm 29 28 in 10...

Страница 39: ...309136 39 Notes ...

Страница 40: ...buyer agrees that no other remedy including but not limited to incidental or consequential damages for lost profits lost sales injury to person or property or any other incidental or consequential loss shall be available Any action for breach of warranty must be brought within two 2 years of the date of sale Graco makes no warranty and disclaims all implied warranties of merchantability and fitnes...

Отзывы: