background image

Motor Control Board Diagnostics 

28

333126A

Motor Control Board Diagnostics

Keep new transducer on hand for use for test.

Refer to Digital Display Messages, page 29.

1.

Relieve pressure

, page 11 and unplug sprayer.

2. Remove screws and cover.

3. Turn ON/OFF switch, ON.

4. Observe LED operation and reference following 

table:

NOTICE

Do not allow sprayer to develop fluid pressure without 
transducer installed. Leave prime valve open if test 
transducer is used.

LED Blinks

Sprayer Operation

Indicates

What To Do

Once

Sprayer runs

Normal operation

Do nothing

Two times repeatedly

Sprayer shuts down and 
LED continues to blink 
two times repeatedly

Run away pressure. Pressure greater than 
4500 psi (310 bar) or damaged pressure 
transducer

Replace motor control board or 
pressure transducer

Three times repeatedly Sprayer shuts down and 

LED continues to blink 
three times repeatedly

Pressure transducer is faulty or missing

Check transducer connection. 
Open drain valve. Substitute 
new transducer for transducer 
in sprayer. If sprayer runs, 
replace transducer

Four times repeatedly

Sprayer shuts down and 
LED continues to blink 
four times repeatedly

Line voltage is too high

Check for voltage supply 
problems

Five times repeatedly

Sprayer does not start or 
shuts down and LED 
continues to blink five 
times repeatedly

Motor fault

Check for locked rotor, shorted 
wiring or disconnected motor. 
Repair or replace failed parts.

Содержание FinishPro II 395

Страница 1: ...si 227 bar 22 7 MPa Maximum Air Working Pressure 35 psi 2 4 bar 0 24 MPa Models Related Manuals Important Safety Instructions Read all warnings and instructions in this manual and in the gun manual Save these instructions Region FinishPro II 395 FinishPro II 595 US 24U065 24U073 Europe CEE 7 7 24U067 24U075 Europe Multi Cord 24U069 24U077 UK 24U070 Asia Australia 24U071 24U071 333120 333182 309250...

Страница 2: ... FinishPro II 395 and 595 24 On Off Switch Replacement 25 Removing and Installing Air Filter 26 Compressor Replacement and Repair 27 Motor Control Board Diagnostics 28 Digital Display Messages FinishPro II 395 29 Digital Display Messages FinishPro II 595 30 Pressure Control Transducer 31 Pressure Adjust Potentiometer 31 Stored Data 32 Drain Valve Replacement 33 Drain Line Removal Replacement 34 Mo...

Страница 3: ...electric shock When repair or replacement of the cord or plug is required do not connect the grounding wire to either flat blade terminal The wire with insulation having an outer surface that is green with or without yellow stripes is the grounding wire Check with a qualified electrician or serviceman when the grounding instructions are not completely understood or when in doubt as to whether the ...

Страница 4: ...a paint or a solvent containing halogenated hydrocarbons Keep spray area well ventilated Keep a good supply of fresh air moving through the area Keep pump assembly in a well ventilated area Do not spray pump assembly Do not smoke in the spray area Do not operate light switches engines or similar spark producing products in the spray area Keep area clean and free of paint or solvent containers rags...

Страница 5: ...USE HAZARD Misuse can cause death or serious injury Always wear appropriate gloves eye protection and a respirator or mask when painting Do not operate or spray near children Keep children away from equipment at all times Do not overreach or stand on an unstable support Keep effective footing and balance at all times Stay alert and watch what you are doing Do not leave the unit energized or under ...

Страница 6: ...shed in the eyes or on skin inhaled or swallowed Read MSDSs to know the specific hazards of the fluids you are using Store hazardous fluid in approved containers and dispose of it according to applicable guidelines PERSONAL PROTECTIVE EQUIPMENT Wear appropriate protective equipment when in the work area to help prevent serious injury including eye injury hearing loss inhalation of toxic fumes and ...

Страница 7: ...Notes 333126A 7 Notes ...

Страница 8: ...Component Identification 8 333126A Component Identification 1 2 3 4 5 6 7 10 11 14 15 16 17 9 8 15 12 1 2 3 4 5 6 7 8 9 10 11 14 15 16 17 15 12 ti22593a FinishPro II 395 FinishPro II 595 ti22594a ...

Страница 9: ...se Connection 3 Prime Spray Valve 4 Fluid Outlet 5 Air Fluid Supply Hose 6 Displacement Pump 7 Gun see manual 8 Filter Manifold 9 Fluid Pressure Control 10 Power Function Selector 11 Suction Tube 12 Gun Air Regulator 14 Sprayer Air Pressure Regulator 15 Digital Display 16 Air Pressure Gauge 17 Gun Filter ...

Страница 10: ...WG 2 5 mm2 minimum Longer cords reduce sprayer performance Pails Solvent and oil based fluids follow local code Use only conductive metal pails placed on a grounded sur face such as concrete Do not place pail on a nonconductive surface such as paper or cardboard which interrupts grounding continuity Grounding a metal pail connect a ground wire to the pail by clamping one end to pail and other end ...

Страница 11: ...pressure has not been fully relieved after follow ing these steps VERY SLOWLY loosen tip guard retaining nut or hose end coupling to relieve pressure gradually then loosen completely Clear tip or hose obstruction 5 Engage trigger lock This equipment stays pressurized until pressure is manually relieved To help prevent serious injury from pressurized fluid such as skin injection splashing fluid and...

Страница 12: ...isk of burns fire or explosion do not operate sprayer with cover removed To reduce risk of serious injury including electric shock Do not touch moving or electric parts with fingers or tools while testing repair Unplug sprayer when power is not required for testing Install all covers gaskets screws and washers before you operate sprayer NOTICE Do not run sprayer dry for more than 30 seconds Doing ...

Страница 13: ...arm area to thaw Do not start sprayer until thawed completely If paint hardened dried in sprayer replace pump packings See page 18 Displacement Pump Replacement 2 Displacement pump connecting rod pin Pin must be completely pushed into connecting rod and retaining spring must be firmly in groove or pump pin Push pin into place and secure with spring retainer See page 18 Displacement Pump Replacemen...

Страница 14: ...ve continuity through thermal switch Replace motor See page 35 Motor Replacement 6 Brush cap missing or loose brush lead connections FinishPro II 395 only Install brush cap or replace brushes if leads are damaged See page 23 Motor Brush Replace ment 7 Brush length which must be 1 4 in 6mm minimum FinishPro II 395 only NOTE Brushes do not wear at the same rate on both sides of motor Check both brus...

Страница 15: ...ed extension cord See page 10 Grounding and Electric Requirements 7 Leads from motor to circuit board for damaged or loose wire connectors Inspect wiring insulation and termi nals for signs of overheating Be sure male terminal pins are centered and firmly connected to female terminals Replace any loose terminals or damaged wiring Securely reconnect terminals 8 Worn motor brushes which must be 1 4 ...

Страница 16: ...Motor is hot and runs intermittently 1 Be sure ambient temperature where sprayer is located is not more than 115 F 46 C and sprayer is not located in direct sun Move sprayer to shaded cooler area if possible 2 Motor has burned windings indicated by removing positive red brush and seeing burned adjacent commutator bars Replace motor See page 35 Motor Replacement 3 Tightness of pump packing nut Over...

Страница 17: ... Startup Operation Manual 311905 8 Compressor thermal switch is open Ensure ambient temperature is below 115 F 46 C Move sprayer to shaded cooler area 9 Low compressor performance Worn compressor repair compressor with Compressor Service Kit 288723 Poor air spray pattern 1 Air cap air ports clogged Soak in solvent to clean 2 Air cap worn Replace air cap 3 Worn spray tip Relieve pressure page 11 Re...

Страница 18: ...0 and rotate cover 44 3 Loosen nut A and remove suction hose 35 Loosen nut B and remove the high pressure hose 14 4 Cycle pump until pin 32 is in position to be removed 5 Disconnect power cord from outlet 6 Using a flat screwdriver push retaining spring C up Push out pump pin 32 7 Using a hammer loosen pump jam nut 11 Unscrew and remove pump 9 30 44 ti6140a 14 B A 35 ti6105b TI A C 32 11 11 9 ti61...

Страница 19: ...hen tap 1 8 to 1 4 turn with a 20 oz maximum hammer to approximately 75 ft lb 102 N m 8 Install suction tube 35 and high pressure hose 14 Tighten nuts A and B 9 Fill packing nut with Graco TSL until fluid flows onto top of seal Rotate cover 44 Tighten screws 30 If pump pin works loose parts could break off due to force of pumping action Parts could project through air and result in serious injury ...

Страница 20: ...ion 1 Apply a liberal coat of grease to gears and needle bearing surfaces Install thrust bearing 4 and gears 2 and 3 in front endbell housing 2 Push drive housing into front endbell housing Insert gear crank 3 through hole in connecting rod 7 3 Install four screws 6 4 Install cover 32 with two screws 30 5 Install pump 9 Displacement Pump Replace ment page 18 NOTICE Do not drop gear cluster 3 and 2...

Страница 21: ...ons before complete stop there are no electrical shorts If motor does not spin freely armature is shorted Replace motor page 35 Armature Brushes and Motor Wiring Open Circuit Test Continuity 1 Connect red and black motor leads with test lead Turn motor fan by hand at about two revolutions per second 2 If uneven or no resistance check for missing brush caps broken brush springs brush leads and worn...

Страница 22: ...ur screws 12 and shroud 23 3 Remove retaining component 126 on fan 125 4 Pull off fan Installation 1 Slide new fan 125 on back of motor Be sure blades of fan face motor as shown 2 Install retaining component 126 3 Replace shroud 23 and four screws 12 12 23 125 126 ti9604a Finish Pro 395 Finish Pro 595 ti9604a 12 23 125 126 ...

Страница 23: ...with lead into brush holder D 2 Slide brush lead E onto terminal F 3 Install spring clip B Push down to set hook C into brush holder D 4 Repeat for other side 5 Test brushes a Remove pump Displacement Pump Replace ment page 18 b With sprayer OFF turn pressure control knob fully counter clockwise to minimum pressure Plug in sprayer c Turn sprayer ON Slowly increase pressure until motor is at full s...

Страница 24: ... and cover 50 3 Disconnect all leads to motor control board 49 4 Remove screws 6 and motor control board Installation 1 Clean pad on rear of motor control board 49 Apply small amount of thermal compound to pad 2 Install motor control board with screws 6 3 Connect all leads to motor control board 4 Bundle and tie all loose wires so none are in contact with inductor coil 5 Install cover 50 with four...

Страница 25: ...sembling 4 Disconnect three wires A from ON OFF switch 58 5 Remove toggle boot nut 30 120V models only 6 Remove two yellow wires B from ON OFF switch Remove ON OFF switch Installation 1 Connect two yellow wires B to ON OFF switch 58 2 Install new ON OFF switch 58 Install toggle boot nut 30 3 Connect three wires A to ON OFF switch 4 Install pressure control cover 50 with four screws 12 B A ti22705a...

Страница 26: ...A Removing and Installing Air Filter 1 Remove four screws 12 from back louvered cover 64 2 Unscrew filter D from back of sprayer Install new filter from Compressor Filter Kit 288724 3 Install back cover 64 with four screws 12 ti22706a 12 D 64 12 ...

Страница 27: ...ngs from the front and rear of the sprayer 5 Remove tubing 6 Disconnect electrical connection from solenoid valve at the rear of the sprayer 7 Remove air filter from the back of the compressor 8 Remove the four screws from the sprayer that are located underneath the removed toolbox NOTE Remove bottom screws first When you have one screw left to remove hold onto the compressor so it doesn t fall ou...

Страница 28: ...ues to blink two times repeatedly Run away pressure Pressure greater than 4500 psi 310 bar or damaged pressure transducer Replace motor control board or pressure transducer Three times repeatedly Sprayer shuts down and LED continues to blink three times repeatedly Pressure transducer is faulty or missing Check transducer connection Open drain valve Substitute new transducer for transducer in spray...

Страница 29: ...a or a pressure transducer is faulty Replace pressure control board or pressure transducer E 03 Sprayer stops Power is applied Pressure transducer faulty bad connection or broken wire Check transducer connection Open drain valve Substitute new transducer for transducer in sprayer If sprayer runs replace transducer E 04 Sprayer stops Power is applied Line voltage too high Check for voltage supply p...

Страница 30: ... Check transducer connection Open drain valve Substitute new transducer for transducer in sprayer If sprayer runs replace transducer E 04 Sprayer shuts down and LED continues to blink four times repeatedly Power is applied Line voltage is too high Check for voltage supply problems E 05 Sprayer does not start or stops and LED continues to blink five times repeatedly Power is applied Motor fault Che...

Страница 31: ...ilter housing Torque to 30 35 ft lb 2 Thread transducer lead plastic connector up through transducer grommet 3 Install filter housing with two screws 4 Connect lead to motor control board 5 Install cover with screws Pressure Adjust Potentiometer Removal 1 Relieve pressure page 11 Disconnect sprayer 2 Remove screws and cover 3 Disconnect leads from motor control board 4 Remove potentiometer knob nu...

Страница 32: ... ON 4 Release display button about 1 second after turning on sprayer NOTE Sprayer model number displays for a few seconds and then data point 1 displays 5 Push display button and next data point displays 6 Turn sprayer OFF and then ON to leave in stored data mode Data Point Definition 1 Number of hours power switch has been ON with power applied 2 Number of hours motor has been running 3 Last erro...

Страница 33: ...rain valve 23 and remove it from manifold 15 Installation NOTE Before installing new drain valve be sure old gasket 23a and seat 23b are not still inside manifold 1 Thread drain valve 23 into manifold 15 opening 2 Hand tighten securely Using a wrench torque to 120 to 130 in lb 3 Push base 24 over drain valve 23 and then drain handle 25 over base 24 4 Replace pin 26 in drain handle 25 If necessary ...

Страница 34: ...Drain Line Removal Replacement 34 333126A Drain Line Removal Replacement Removal Unscrew drain line 55 from filter manifold 15 Installation Screw drain line 55 into filter manifold 15 55 15 ti9603a ...

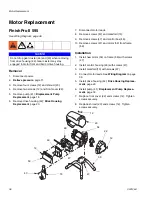
Страница 35: ...nifold 15 9 Remove screws 47 and motor 54 from frame 59 Installation 1 Install new motor 54 on frame 59 with screws 47 2 Install manifold 15 with screws 47 3 Install control housing 48 with screws 47 4 Install board 49 with screws 6 Connect all leads to board See wiring diagram for your sprayer model on page 36 5 Install drive housing 42 Drive Housing Replace ment page 20 6 Install pump 41 Displac...

Страница 36: ...nd motor 54 from frame 59 Installation 1 Install new motor 54 on frame 59 with screws 47 2 Install control housing 48 with screws 47 3 Install manifold 15 with screws 47 4 Connect motor leads See Wiring Diagram on page 36 5 Install drive housing 42 Drive Housing Replace ment page 20 6 Install pump 41 Displacement Pump Replace ment page 18 7 Replace front cover 22 and screws 12 Tighten screws secur...

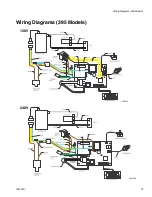
Страница 37: ...Wiring Diagrams 395 Models 333126A 37 Wiring Diagrams 395 Models RED BLACK WHITE ti22727a 240V 120V RED BLACK WHITE ti22728a ...

Страница 38: ...POWER PLUG ECM FILTER L2B L2B1 GREEN YELLOW PRESSURE SWITCH COMPRESSOR CORD BLUE BROWN BROWN BROWN DIGITAL DISPLAY FROM MOTOR POTENTIOMETER TRANSDUCER ON OFF SWITCH TIMER WHITE WHITE SOLENOID BLACK BLACK L1 LIB L2B L2B1 ORANGE ORANGE GROUND CONNECTS TO CASTING ON OFF SWITCH POTENTIOMETER TRANSDUCER AASB AASA ti22659a 240V 120V ti22660a ...

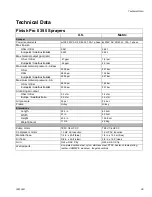
Страница 39: ...US UK 2800 psi 193 bar Europe Asia Australia 3300 psi 227 bar Atomizing air output US UK 3 2 cfm 3 2 cfm Europe Asia Australia 2 9 cfm 2 9 cfm Air pressure 35 psi 2 4 bar Frame Hi boy Hi boy Dimensions Length 32 5 in 82 5 cm Width 21 in 53 3 cm Height 40 5 in 102 8 cm Weight bare 110 lb 49 9 kg Pump motor TEFC 7 8 HP DC TEFC 7 8 HP DC Compressor motor 1 0 HP AC Induction 1 0 HP AC Induction Materi...

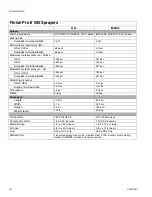
Страница 40: ... bar Europe Asia Australia 3300 psi 227 bar Atomizing air output US UK 3 2 cfm 3 2 cfm Europe Asia Australia 2 9 cfm 2 9 cfm Air pressure 35 psi 2 4 bar Frame Hi boy Hi boy Dimensions Length 32 5 in 82 5 cm Width 21 in 53 3 cm Height 40 5 in 102 8 cm Weight bare 112 lb 50 8 kg Pump motor TEFC 7 8 HP DC 9110 HP Brushless Compressor motor 1 0 HP AC Induction 1 0 HP AC Induction Material hose 1 4 in ...

Страница 41: ...Notes 333126A 41 Notes ...

Страница 42: ...isclose any defect in material or workmanship repairs will be made at a reasonable charge which charges may include the costs of parts labor and transportation THIS WARRANTY IS EXCLUSIVE AND IS IN LIEU OF ANY OTHER WARRANTIES EXPRESS OR IMPLIED INCLUDING BUT NOT LIMITED TO WARRANTY OF MERCHANTABILITY OR WARRANTY OF FITNESS FOR A PARTICULAR PURPOSE Graco s sole obligation and buyer s sole remedy fo...

Отзывы: