background image

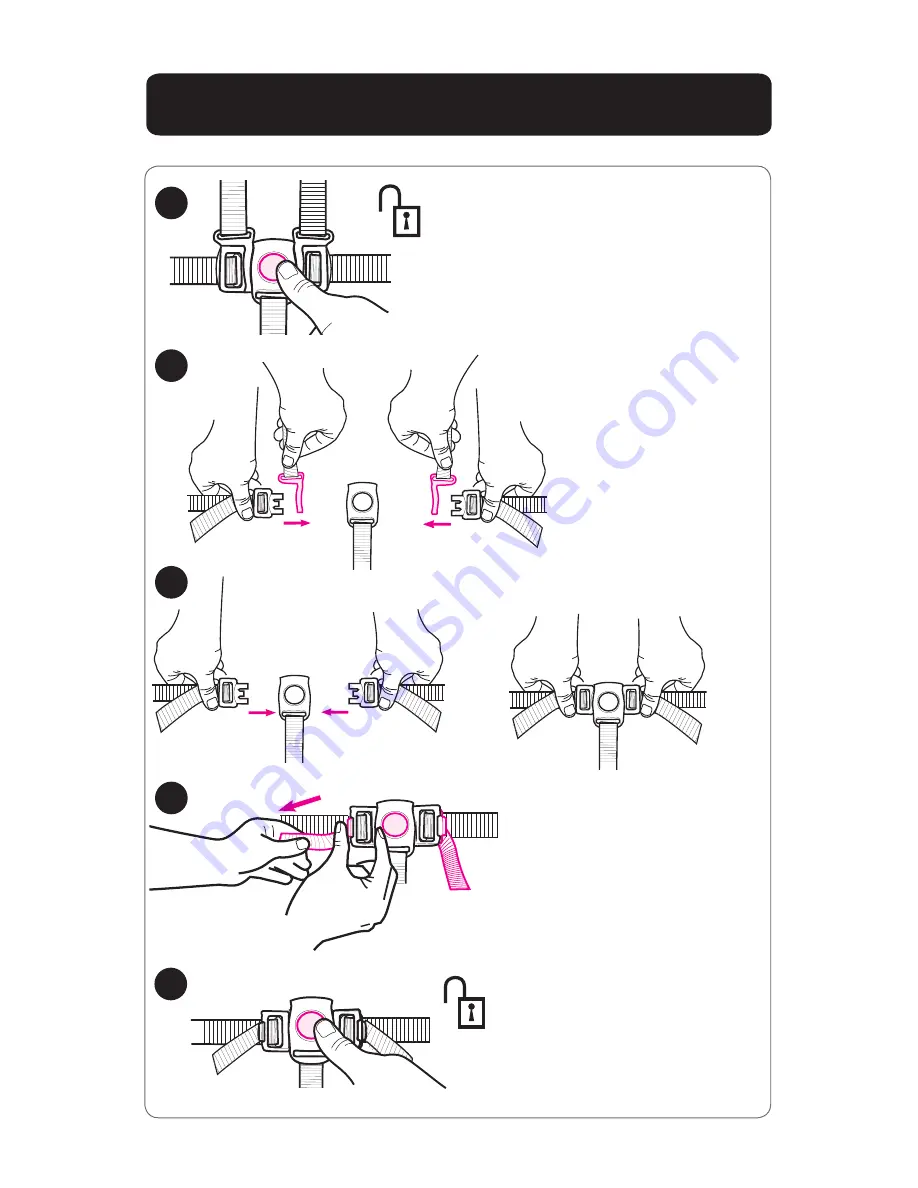
0OINT"UCKLE


1

2

3

4

To convert to 3-pt harness.

Use slide adjuster at waist for 
tighter adjustment. When 
using bench seat, follow 
steps 3-5 on this page.

5

Содержание click connect

Страница 1: ...WNER S ANUAL 2EADY ROW LICK ONNECT Graco PD232784A 3 13...

Страница 2: ...not intended for use while jogging skating etc s USE OF THE front seat bench seat or standing platform with a child weighing more than 50 lbs 22 7 kg or taller than 45 in 114 3 cm will cause excessive...

Страница 3: ...ath s READ THE MANUAL provided with your Graco car seat before using it with your stroller s Front tray MUST be installed in the front location to be used for the car seat s ALWAYS SECURE your child w...

Страница 4: ...LIST Check that you have all the parts for this model BEFORE assembling your product If any parts are missing call Customer Service No tools required LL MODELS N CERTAIN MODELS 2X 2X 2X 2X 2X 2X 2X 2X...

Страница 5: ...To Open Stroller 1 2 CHECK that the stroller is completely latched open every time you open the stroller and before continuing with the rest of the assembly steps 3 SNAP...

Страница 6: ...2 0ARENTS 4RAY 1 2X Attach tray by sliding onto mounts as shown Secure tray to the stroller with the 2 screws provided...

Страница 7: ...Rotate tray down until it snaps into place Never use stroller without the parent tray completely latched into place SNAP SNAP 3...

Страница 8: ...foam on the rear axle 1 2 SNAP BEFORE attaching wheel Be sure to place stroller on top of a piece of card board or some other protective cover to prevent any damage to floor Insert brake assembly onto...

Страница 9: ...Lift the standing platform up and make sure the 3 hooks latch onto the crossbrace as shown Slide the sides of the standing platform onto the frame legs as shown Hooks 1 2 3 3TANDING 0LATFORM...

Страница 10: ...Check that the tabs on both sides of the standing platform are snapped in place 4 SNAP 2EAR 7HEELS Firmly attach hub adapter onto wheel 1...

Страница 11: ...2 3 Place wheel on axle Place washer on axle...

Страница 12: ...Push straight side of pin through axle hole Pin will separate around the axle Curved end of pin MUST face up as shown 4 5 SNAP Snap hubcap over pin as shown Repeat steps 1 5 Rear Wheels on other side...

Страница 13: ...OOTREST 1 2 Attach footrest as shown Make sure to slide the peg into the channel of the footrest...

Страница 14: ...3 Insert the tab over the footrest pin as shown...

Страница 15: ...Check that wheels are securely attached by pulling on wheel assemblies SNAP 2X 1 2 RONT 7HEELS...

Страница 16: ...mounts on each side of the stroller with the padded edge facing towards the front as shown Insert large canopy into the canopy mounts on each side of the stroller with the padded edge facing towards t...

Страница 17: ...To adjust 3...

Страница 18: ...ays secure your child with the seat belt The tray is not a restraint device DO NOT lift the stroller by the child s tray Use care when snapping the tray on the stroller with a child in the stroller SN...

Страница 19: ...D 2EAR 3EAT Make sure seat is snapped securely onto pegs on each side of the frame Attach seat as shown 1 2 SNAP WARNING Do not allow child to stand on seat Never use seat in vehicle or in any other p...

Страница 20: ...4 You must rst attach the hook on the ap to the stroller frame before fastening the snap Fasten the snap button to the stroller frame as shown Repeat on other side 3...

Страница 21: ...5 6 Insert the crotch strap buckle into the underside of the parent tray SNAP To release crotch strap press button as shown To remove elevated seat reverse steps...

Страница 22: ...oward the middle of seat and rotate forward as shown Do not allow child to stand on seat Never use seat in motor vehicle or on any other product ENCH 3EAT 1 To close Push seat up and snap the side tab...

Страница 23: ...4O 3ECURE HILD 2 Use slide adjuster at shoulder and waist for tighter adjustment To change shoulder harness slots 4 1 3 0OINT ARNESS...

Страница 24: ...0OINT UCKLE 1 2 3 4 To convert to 3 pt harness Use slide adjuster at waist for tighter adjustment When using bench seat follow steps 3 5 on this page 5...

Страница 25: ...To Change Shoulder Harness Slots Remove harness covers as shown 1 2 Slide adjuster...

Страница 26: ...Remove both shoulder harness straps as shown 5 Remove head support as shown 3 4...

Страница 27: ...4O 2ECLINE RONT 3EAT 1 Recline tab Recline strap WARNING When making adjustments to the stroller seat make sure child s head arms and legs are clear of moving seat parts and stroller frame...

Страница 28: ...2 3 To recline pull recline tab down To raise pull recline strap up...

Страница 29: ...Head Support on certain models Only use this head support on this stroller Never use this head support on any other product RAKE WARNING CHECK that brake is on by trying to push stroller 1 2...

Страница 30: ...3WIVEL 7HEELS 1 2 Front swivel wheels lock for use on uneven surfaces such as grass stones or gravel...

Страница 31: ...4O OLD 3TROLLER 3 Before folding stroller 1 remove infant carrier if in use 2 adjust seat back to upright position 3 lock brake 4 fold canopies 1 2 1 2 3 4...

Страница 32: ...use seat in vehicle or in any other product To Attach Graco Infant Car Seat on Elevated Rear Seat Pull ap over the seat pad as shown 1 Check to make sure the aps are installed before beginning to atta...

Страница 33: ...3 2 Remove both shoulder harness straps and the waist straps as shown Remove head support and harness covers...

Страница 34: ...on car seat until the latches snap into the Click Connect mounts Check that infant car seat is securely attached by pulling up on it Push seat pad down into the seat to expose the Click Connect mount...

Страница 35: ...7 s To remove car seat squeeze release handle at back of car seat and lift car seat out of the stroller To Attach Graco Infant Car Seat to Front Seat 1 Remove small canopy...

Страница 36: ...roller seat back to its lowest position and insert carseat into stroller and push down on car seat until the latches snap into the Click Connect mounts Open flaps inside seating area to expose Click C...

Страница 37: ...4 5 SNAP s To remove car seat squeeze release handle at back of car seat and lift car seat out of the stroller Check that infant car seat is securely attached by pulling up on it...

Страница 38: ...READY2GROW CLICK CONNECT Use Positions WARNING DO NOT allow child to stand on platform facing backwards To avoid falling child must hold onto stroller frame...

Страница 39: ...or loose screws worn parts torn material or stitching Replace or repair the parts as needed Use only Graco replacement parts s EXCESSIVE EXPOSURE TO SUN OR HEAT could cause fading or warping of parts...

Отзывы: