


Maintenance
309550ZAP
27
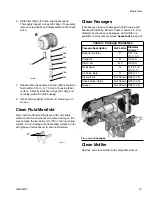
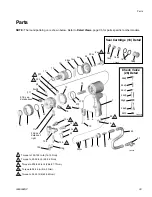
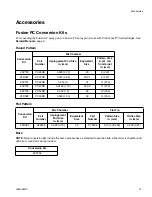
6. Slide filter (26d) off. Clean and inspect parts.
Thoroughly inspect o-rings (26f, 26g). If necessary,
remove screw (26b) and disassemble entire check
valve.
7. Reassemble check valves. Screw (26b) should be
flush (within 1/16 in. or 1.5 mm) of housing (26a)
surface. Liberally lubricate o-rings (26f, 26g) and
carefully reinstall in fluid housing.
8. Attach fluid manifold. Connect air. Return gun to
service.
Clean Fluid Manifold
Clean fluid manifold sealing faces with compatible
solvent and a brush whenever removed from gun. Be
sure to clean the two fluid ports (FP) in the top mating
surface. Do not damage the flat sealing surfaces. Coat
with grease if left exposed, to seal out moisture.
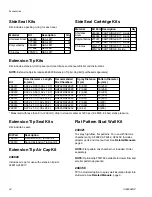
Clean Passages
If necessary, clean out passages in fluid housing and
handle with drill bits. Refer to T
diameter and location of passages. All drill bits are
available in an accessory kit see
Clean Muffler
Remove and clean muffler with compatible solvent.
A
B
26b
26e
26c
26d
26g
26a
26f
26
TI2429A
FP
TI2411-1
Table 3: Passage Diameters
Passage Description
Ref. Letter
Diameter
in. (mm)
Optional Air Inlet
C
7/16, 1/8
(11.0, 3.1)
Purge Air
D
1/8 (3.1)
Piston Air
E, F
1/8 (3.1)
Air Exhaust
G
11/32, 1/8
(8.7, 3.1)
Air Valve Bore
H
9/32 (7.1)
Cleanoff Air
Not Shown 3/32 (2.35)
Check Valve Holes
Not Shown 3/32 (2.35)
Grease
Not Shown 3/32 (2.35)
F
IG
. 2 Gun Passages
C
G
D E F
H