10
307851
Service (Model 204464)
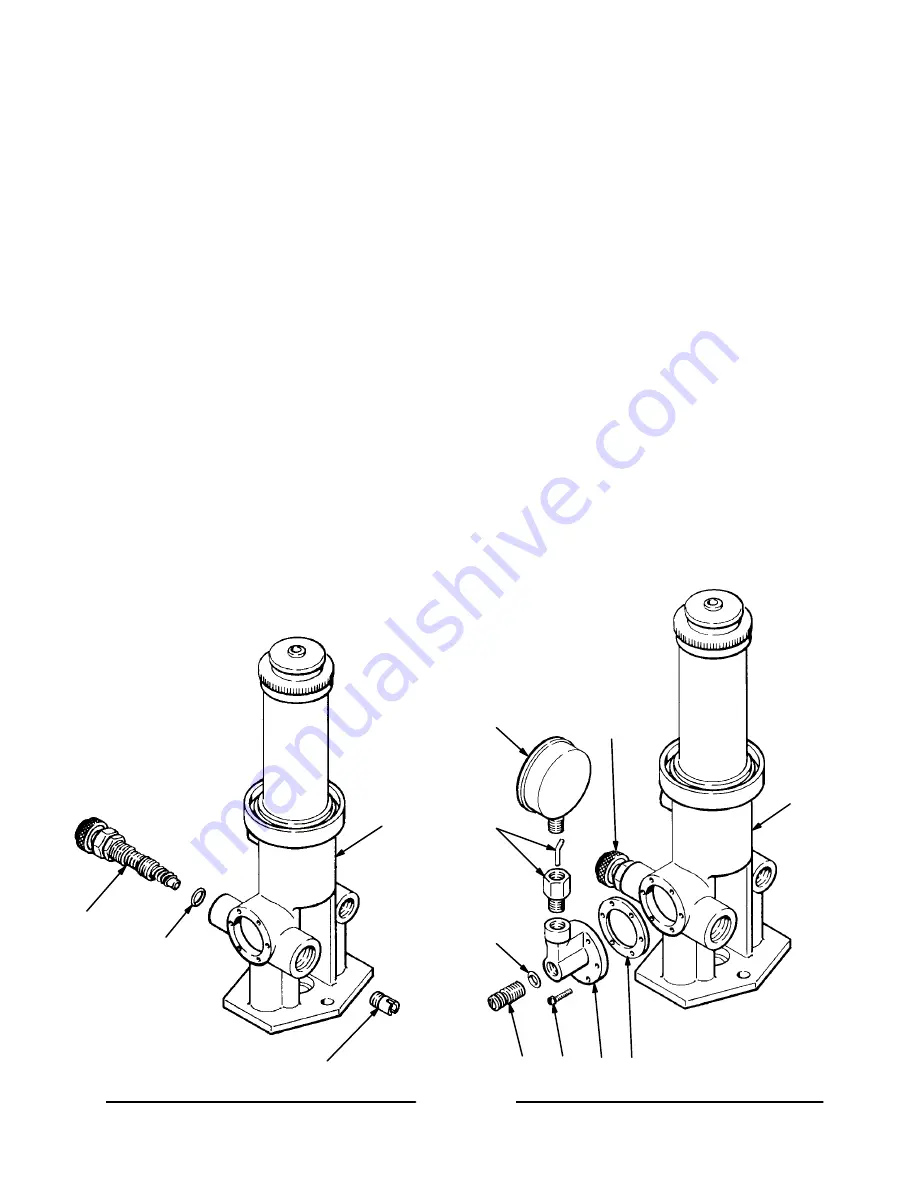
Restrictor Valve Repair
1.
Loosen the hex nut on the valve stem (6*) and
remove the stem and o-ring (14*) from the base
(20). See Fig. 4.
2.
Use a screwdriver to remove the valve seat (23).
3.
Clean and inspect all parts. Replace as necessary.
Reassemble in the reverse order of disassembly.
Fluid Pressure Gauge Repair
1.
To recalibrate the gauge (2c), adjust the valve (6)
so the gauge needle points to the first dial gradua-
tion mark above the zero stop. Refer to Fig. 5.
Turn the calibration screw (2f) clockwise to in-
crease and counterclockwise to decrease the
setting. Do not remove the calibration screw from
the housing. Any loss of oil results in lower sensi-
tivity.
2.
If the gauge needs frequent calibration or loses
sensitivity, check the housing (2a) for oil leaks.
Connections between the gauge and housing must
be tight. If oil leaks around the calibration screw
(2f), or the screw cannot be turned inward, disas-
semble and recharge, as explained in the following
steps.
3.
To recharge the gauge, remove the six screws (8)
from the housing (2a). Clean and inspect the
diaphragm inside the housing (2a). If the housing
diaphragm has cracks or leaks, replace the hous-
ing (2a).
4.
Remove the calibration screw (2f) and inspect the
o-ring (2d*) for damage. Replace if necessary.
5.
Remove the gauge (2c) from the pulsation damp-
ener (2b) carefully, to avoid all loss. Check the
gauge with air pressure, and replace it if it is
damaged.
6.
Place the housing (2a), with its base face down, on
a flat surface. Fill the housing with light machine
oil, such as SAE 5W, through the calibration screw
(2f) opening. When nearly full, place a finger over
the gauge opening and fill the screw opening to
overflowing. Install the screw (2f) and o-ring (2d*)
until flush, then turn in two full turns.
7.
Place the housing in a vise with the gauge opening
up and fill with oil to overflowing. Using thread
sealant, tighten the gauge securely into the hous-
ing. If the gauge is fully charged, it should read 20
or 30 lb. Calibrate as explained in step 1.
Fig. 4
Fig. 5
20
23
*6
*14
2c
2b
*2d
8
2f
2a 2e*
20
6*
Содержание 204464 B Series
Страница 15: ...15 307851 Notes...


