Gracious Home GH3024SH-WH Скачать руководство пользователя страница 8

GH3024SH-WH 

GH3024SH-WN 

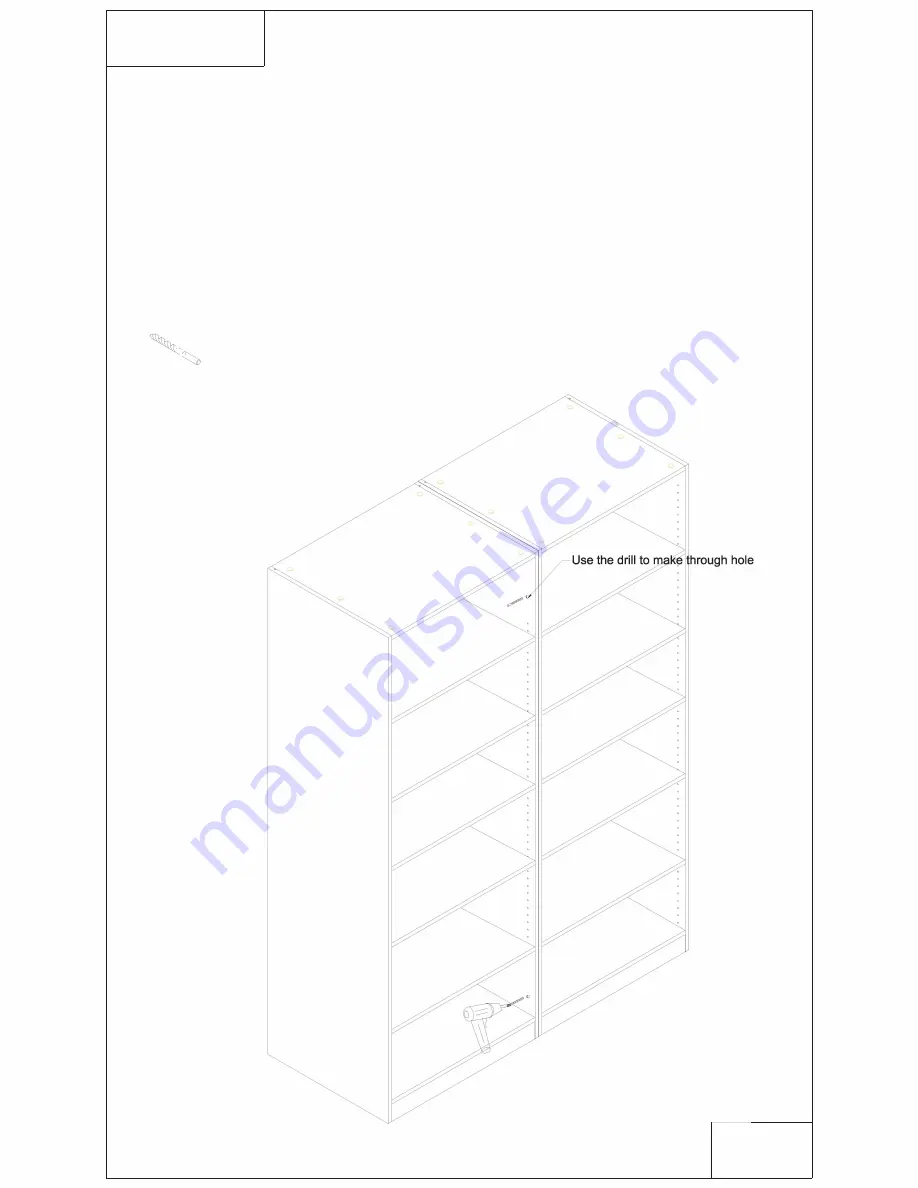
7. When placing two cabinets next to each other use below hardware 

to connect the two cabinets for extra strength

Drill a hole in the two side panels that are next to each other then 

secure the closet with the screw through the hole 

Qty 1


Page 8 

Содержание GH3024SH-WH

Страница 1: ...D KLJK TXDOLW SURGXFW GHVLJQHG WR IDFH WKH WHVW RI GDLO XVH DQG JXDUDQWHHLQJ RXU HQMR PHQW IRU PDQ HDUV WR FRPH DUHIXOO UHDG WKH LQVWUXFWLRQV EHIRUH VWDUWLQJ WKH LQVWDOODWLRQ XULQJ DVVHPEO SOHDVH IROORZ DOO JHQHUDOO DFFHSWHG VDIHW SURFHGXUHV DLOXUH WR DGKHUH WR WKH IROORZLQJ LQVWUXFWLRQV ZLOO LQYDOLGDWH WKH ZDUUDQW DQG DELQHWV 7R R ZLOO GHFOLQH DQ UHVSRQVLELOLW IRU DQ GDPDJHV FDXVHG Q LQVWDOODWLRQ...

Страница 2: ... I l l Iii Qty22 Qty22 Qty 20 Qty20 Qty22 Qty18 Qty180 Qty1 Qty4 Qty2 Qty4 Cabinet Parts Detail H B C F B _ B NO ITEM QTY G D A Right Side Panel 1 B Back Rail 3 C Left Side Panel 1 D Bottom Panel 1 E Shelf 5 F Back Panel 1 G Toe Kick 1 H Top Panel 1 Page2 ...

Страница 3: ...GH3024SH WH GH3024SH WN After unpacking place the panels on a soft surface 1 Screw the hardware into the side panel with drill Qty 22 A Page3 ...

Страница 4: ...SH WH GH3024SH WN 2 Install the wooden dowels on the top bottom panel back rail and toe kick with the hammer Connect with the right side panel Tighten it with a screwdriver Insert the back D G b Qty 11 Page4 ...

Страница 5: ... WH GH3024SH WN 3 Fasten the left side panel with a screwdriver then paste perfect paste to the hole b f Qty 11 Qty 22 4 Put the shelf support into the shelf hole e I I I Qty 20 J I I I I I I J I I I C E Page 5 ...

Страница 6: ...GH3024SH WH GH3024SH WN 5 Put the screw in to shelf hole place the shelf then lock it d Qty 20 Page6 ...

Страница 7: ...GH3024SH WH GH3024SH WN 6 Insert the plastic plug to the rest of the shelf hole Qty 180 Page 7 ...

Страница 8: ...cing two cabinets next to each other use below hardware to connect the two cabinets for extra strength Drill a hole in the two side panels that are next to each other then secure the closet with the screw through the hole j Qty 1 Page 8 ...

Страница 9: ......

Страница 10: ...T Qty 2 Wooden walls Page 10 2 Anti tipping hardware kits are included to secure the closet to the wall If there is not a stud in the wall to secure the hardware use the wall anchor for support and attach both of the hardware to the top panel and wall evenly distributed for weight bearing ...

Страница 11: ...rease or alter the obligations or limitations of this warranty THE SOLE REMEDY PROVIDED BY THIS WARRANTY IS THE REPAIR OR REPLACEMENT OF ANY PART OR PARTS THAT MAY PROVE DEFFECTIVE UNDER NORMAL RESIDENTIAL USAGE THIS WARRANTY DOES NOT COVER THE COST OF REMOVAL INSTALLATION DELAY OR TRANSPORTATION OF NEW PRODUCT For daily cleaning use a dry cloth and a soft liquid cleaner Never use abrasive cleaner...

Отзывы: