background image

81

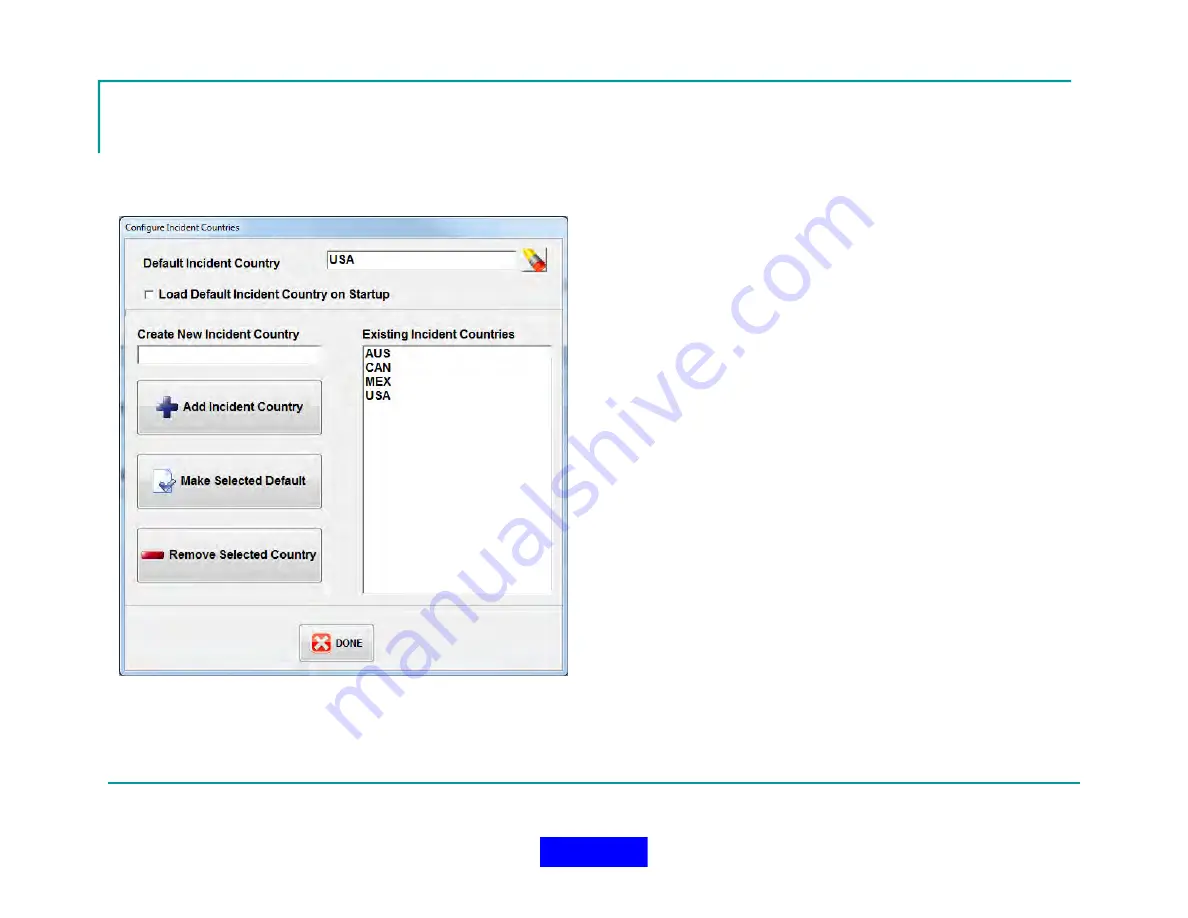
Configuring Incident Countries

Press the Countries Button to Edit Incident 
Countries

Enter a Country into the Create New Box 
and Press Add Incident Country - The 
Country Will Be Added to the Dialog Box on 
the Right

Highlight a Country and Press Remove to 
Remove a Country from the List

Highlight a Country and Press Make Default 
to Make the Country the Default

Check Load Default Country to load this 
Country as the Default on the Operation 
Setup Screen when Grace-Watch is started

Press Done when finished

Return to TOC

Содержание Grace-Watch

Страница 1: ...Grace Watch Advanced Safety Monitoring System User s Information Grace Industries Inc Grace Watch 3 05 0100 Patent Protected US 7 538 666 ...

Страница 2: ...With advanced hardware and software features Grace Watch systems provide an unbeatable method of protecting your personnel at any facility while simplifying the Accountability responsibilities of monitoring personnel 04 2020 ...

Страница 3: ...s Set the Receiver Type 25 User Setup 26 Create a Name File 27 Prepared to Monitor Users 41 Configuring Incident Settings 42 Location Setup 49 GPS Device Mapping 60 Setting Audio Alarms 84 Configuring Notifications 87 Save and Exit Configuration 96 Start an Incident 98 Monitoring Screen 99 User Status Images 113 Performing Actions on Users 130 Viewing System Information 154 Saving the Incident 171...

Страница 4: ...tware and the components listed below to provide complete accountability for your personnel System Components MX900 H Transceiver Worker worn man down devices assigned to personnel for monitoring Repeaters Remote Enhanced Transceivers External Antennas and Locators may be added as needed to enhance system effectiveness Grace Worker Worn Man Down Devices Return to TOC ...

Страница 5: ...l Back Report In or Roll Call Signal with a simple button press All personnel within range at the facility are automatically populated in the Grace Watch software and are sorted in real time based on priority with Fall Alarm being the highest priority When an Alarm Call Back Report In or Roll Call signal is present the worker worn device will go into a loud audio alarm indicating to the wearer tha...

Страница 6: ... Grace worker worn devices and transmits Call Back Report In and Roll Call signals to those devices Monitors PC communications through the USB port and goes into Alarm if the communications fail at any time External Antennas may also be used as needed Return to TOC ...

Страница 7: ...ystems Windows 7 8 10 32 bit and 64 bit Administrative rights required RAM 4GB Monitor 1024 768 Touchscreen Recommended Note Use of two screens is recommended when mapping modes are in use Internet Connection Required for GPS functionality Hard Disk Size 80GB Minimum USB 2 0 1 Available Required per Receiver Speakers Return to TOC ...

Страница 8: ... development and supplies robust USB communication and functionality in our product Grace Watch Installation Flash Drive Insert the Installation USB flash drive When prompted select Open folder to view files or manually go to USB flash drive directory and select GCLaunch exe When you have the option left click the Install button for Drivers Return to TOC ...

Страница 9: ...lug the MX900 H USB cable into the Laptop Computer This will connect and power up the MX900 H Microsoft Windows recognizes the MX900 H as a USB device This action will create a new com port on your Windows computer populated anywhere from Com2 Com32 depending on your existing Com Ports available in Windows Return to TOC ...

Страница 10: ...select Open folder to view files or manually go to USB flash drive directory and select GCLaunch exe When you have the option left click the Install button for Grace Watch Software Follow the on screen prompts You must accept the license agreement to install the product A serial key is required to complete the installation and should have been provided when you purchased the software Return to TOC...

Страница 11: ...11 Starting the Software Locate the Grace Watch Icon on the Desktop and double click The software will start up and the Operation Setup Screen will appear Return to TOC ...

Страница 12: ...Number and Time Date are auto filled Must Enter Incident Type and Position to Start an Incident Location Files May be Pre Loaded to fill in Location Fields Automatically Utilities Bar Can be Shown or Hidden by Pressing Show Utilities Button Return to TOC ...

Страница 13: ...d contains the Incident number and is auto loaded by the Grace Watch software when an incident is started The value will begin at 1 and continue incrementing for every incident saved If an incident is canceled the incident number will not be incremented on the next start of Grace Watch INCIDENT DATE AND TIME This field contains the Incident date and time stamp of when the incident was started and ...

Страница 14: ...ea so that easy loading of locations is available Direct typing of the location field is not permitted i e all locations must be pre configured LOCATION STREET NUMBER This field contains the Incident address Street Number and is an optional setting Direct typing of the Incident Street Number is required as the combination of numbers is too great to allow a combobox LOCATION STREET PREFIX This fiel...

Страница 15: ...lays the utilities menu bar across the top of the Grace Watch setup screen Available utilities such as Help PASS Device Programming and File Maintenance are available from this menu bar Note that once an incident is started entering the configuration area is disabled START INCIDENT BUTTON This button starts the incident and displays the main monitor screen of the Grace Watch Software This is the m...

Страница 16: ...lities Bar Help Manual Launches Grace Watch Help Manual Program TPass Program Worker Worn Device ID Numbers File Maintenance Backup Restore Grace Watch Settings Import Export Names Messages Etc Return to TOC ...

Страница 17: ...while putting the device into alarm to learn the current settings of the device you want to change Once discovered enter the new device ID in the TPASS ID Program section Press Program and wait for power up chirp to verify ID programming was successful Return to TOC ...

Страница 18: ...s on the User Profile screen This includes User Ranks User Division User SubDivision and User In addition it allows the creation of a user name file specific to your system and worker worn devices being used SYSTEM SETUP The System Setup section allows the configuration of all the operation specific options on the system including System ID Aux ID Groups to allow receiving etc GENERAL SETTINGS Thi...

Страница 19: ...19 Configuration Screen Return to TOC ...

Страница 20: ... is setting the proper System ID for the Grace Watch System NOTE System ID must match System ID of the worker worn devices for the units to be displayed and monitored Click the System Setup tab near the top of the screen to access the System Settings Dialog Return to TOC ...

Страница 21: ...roup ID of 5 as it s most significant digit will be received by the MX900 H Using the hexadecimal numbering system the system block consists of the groups 50 51 52 53 54 55 56 57 58 59 5A 5B 5C 5D 5E 5F Each group has 1 99 users worker worn devices and 9 Micro Repeaters available Example worker worn device ID range would be from 5101 to 5199 Repeater ID range would be from 51R1 to 51R9 Repeaters m...

Страница 22: ...22 System Settings Dialog Return to TOC ...

Страница 23: ...cked Leave No Signal Setting to 15 Minutes Leave the Action and Clear Key Hold Times Set a 5 and 1 second Leave No Signal Causes Alarm Enable Alarm Clear Flag Sort Priority Mode and Radio Data Log Filter set to default values Use the Configure Connections button to manually configure com ports See Configure Connections on page 25 Return to TOC ...

Страница 24: ...at a worker worn device radio signal must be received within in order to avoid a no signal flag from being activated ACTION KEY HOLD TIME This field allows setting of the action key hold time required to perform a device command from the monitor screen CLEAR KEY HOLD TIME This field allows setting of the clear key hold time required to perform a device clear of a status image from the monitor scre...

Страница 25: ...n used to select type of receiver for the connection BAUD RATE Dropdown used to select baud rate Select 38400 when using the MXH COM Port Dropdown used to select from available port numbers Clear Button Used to clear the selected row Return to TOC ...

Страница 26: ...26 User Setup Screen Press the User Setup Tab to Access the User Setup Area Return to TOC ...

Страница 27: ... and cannot be changed from this screen Select Groups to include in the Name File Set Range of Users in Each Group Enable Micro Repeater IDs In Each Group Set Range of Micro Repeaters In Each Group Leave all 3 Special Instructions Check Boxes on Bottom Left Unchecked Select Default Names e g 01 01 Press Create Name File Button Press Done When Finished Return to TOC ...

Страница 28: ...28 Name File Return to TOC ...

Страница 29: ...tive Name File The Name File just created must now be set to the Active Name File so that it is loaded when an incident is started Press the Choose Active Name File Button and select the file just created Return to TOC ...

Страница 30: ...r Rank The Title Will Be Added to the Dialog Box on the Right Highlight a Title and Press Remove button to Remove a Title from the List Highlight a Title and Press Make Default to Make the Selected Title the Default Check Load Default Title to Load this Rank as the Default when a name file is created Press Done when finished Return to TOC ...

Страница 31: ...o the Dialog Box on the Right Highlight a Division and Press Remove to Remove A Division from the List Highlight a Division and Press Make Default to Make the Selected Division the Default Check Load Default Checkbox to Load this Division as the Default when a name file is created Enter the Custom Label to use for Divisions e g Sector Unit etc Press Done when finished Return to TOC ...

Страница 32: ... Be Added to the Dialog Box on the Right Highlight an Entry on the right and Press Remove to Remove a Sub Division from the List Highlight an Entry and Press Make Default to Make the Selected Entry the Default Check Load Default Checkbox to load the Default when a name file is created Enter the Custom Label to use for Sub Divisions Resource Room etc Press Done when finished Return to TOC ...

Страница 33: ...Setting the User Note Titles Press the Note Titles Button to Edit User Note Titles Enter the Titles for Each User Notes Tab to be displayed on the User Profile Screen Press Done when Finished Return to TOC ...

Страница 34: ...ames Dialog Double Click a user name or Highlight the User and Press the Edit Button to view the User Profile Dialog Enter Information and Press Save to Save the Changes Continue with each User until all user information has been entered using the next and previous buttons to step through the name file Return to TOC ...

Страница 35: ...displayed Add a User Picture if Desired for best results use a picture size is 75 by 100 pixels Note that pictures must be added to the Program Path UserImages Folder An import button is provided to make this process easier Add Notes To Each User Notes Tabbed Area Each Note may be up to 255 characters in length Return to TOC ...

Страница 36: ...ouble click the Picture image or press the Picture button from the User Profile Screen Highlight the Picture Desired and press select Highlighted Picture Press the Accept Button to load the picture into the profile Return to TOC ...

Страница 37: ...37 Editing User Notes Click on Each Note Tab to Reveal the Memo Area for Each User Note Memo Enter information into each note memo Press Save when Complete Return to TOC ...

Страница 38: ...ressing Add User Enter the Group and User ID for the User desired Press Default to automatically create a default name entry or enter the name manually Press the Create Button If the Name Exists a warning will be issued otherwise the name will be created in the user list Press Done when Complete Return to TOC ...

Страница 39: ...rom a Name File Users May Be deleted from the Name File from the Edit Name File List screen by pressing Delete User A Confirmation Window will appear to insure deletion is desired Press Yes to delete the Name Return to TOC ...

Страница 40: ...ile Name Files May Be Deleted from the System using the Delete Name File Button on the User Setup Screen Press the Delete File Button and select the file to be deleted Press Yes to confirm and delete the file Return to TOC ...

Страница 41: ...r Type to MX900 H 3 Set the Com Port for the MX900 H Communications 4 Create a Name file based on your System ID with the correct range of user IDs representing your worker worn man down devices and Micro Repeaters 5 Make this created Name file the Active Name File Once these Five Steps are complete the system can monitor worker worn devices Press the Save Changes and Exit Button to Save this conf...

Страница 42: ...ent Settings Press the Incident Settings Tab from the Configuration Area There are two basic sub categories Incident Data Settings Incident Location Settings Press Each Button to Access the area to configure Return to TOC ...

Страница 43: ... The Type Will Be Added to the Dialog Box on the Right Highlight a Type and Press Remove to Remove a Type from the List Highlight a Type and Press Make Default to Make the Selected Type the Default Check Load Default Type to Load this Type as the Default on the Operation Setup Screen when Grace Watch is started Press Done when finished Return to TOC ...

Страница 44: ... Position Will Be Added to the Dialog Box on the Right Highlight a Position and Press Remove to Remove a Position from the List Highlight a Position and Press Make Default to Make the Selected Position the Default Check Load Default Position to Load this Position as the Default on the Operation Setup Screen when Grace Watch is started Press Done when finished Return to TOC ...

Страница 45: ...The Shift Will Be Added to the Dialog Box on the Right Highlight a Shift and Press Remove to Remove a Shift from the List Highlight a Shift and Press Make Default to Make the Selected Shift the Default Check Load Default Shift to Load this Shift as the Default on the Operation Setup Screen when Grace Watch is started Press Done when finished Return to TOC ...

Страница 46: ...n the Right Highlight an Entry and Press Remove to Remove A Plan Number from the List Highlight an Entry and Press Make Default to Make the Selected Plan Number the Default Check Load Default Checkbox to Load this Plan Number as the Default on the operation setup screen when Grace Watch is started Enter the Custom Label to use for Plan Numbers e g Box Alarm etc Press Done when finished Return to T...

Страница 47: ...nder Will Be Added to the Dialog Box on the Right Highlight a Commander and Press Remove to Remove a Commander from the List Highlight a Commander and Press Make Default to Make the Selected Commander the Default Check Load Default Commander to Load this Commander as the Default on the Operation Setup Screen when Grace Watch is started Press Done when finished Return to TOC ...

Страница 48: ... Run Card Will Be Added to the Dialog Box on the Right Highlight a Run Card and Press Remove to Remove a Run Card from the List Highlight a Run Card and Press Make Default to Make the Selected Run Card the Default Check Load Default Run Card to Load this Run Card as the Default on the Operation Setup Screen when Grace Watch is started Press Done when finished Return to TOC ...

Страница 49: ... Edit a Highlighted Location Highlight a Location and Press Remove to Remove a Location from the List Highlight a Location and Press Make Default to Make the Selected Location the Default Check Load Default Location to Load this Location on the Operation Setup Screen when Grace Watch is started Press Done when finished The number of Location files possible is virtually unlimited limited by availab...

Страница 50: ...er all fields including name description and address fields Press Load Picture to add a picture of the location Press Done when finished This Feature is NOT Available for International Use with MX900 H Transceiver Return to TOC ...

Страница 51: ...51 Adding a Location Picture Select The picture desired from the existing pictures box Press Select Highlighted Picture Press Accept to accept the picture Press Cancel to cancel the action Return to TOC ...

Страница 52: ...g an Existing Location Select a Location from the list on the Edit Locations Dialog and press the Edit Location button Change any fields except the name and picture desired Press Done when finished Return to TOC ...

Страница 53: ...ransceiver Locator Image Mapping provides the ability to associate locators to points on an image Images would typically be maps of your establishment where locators are positioned The configuration screen can be invoked by editing a location and selecting Plot Locators To Maps Return to TOC ...

Страница 54: ...54 Locator Image Mapping This Feature is NOT Available for International Use with MX900 H Transceiver Return to TOC ...

Страница 55: ... loaded image is saved to the configuration folder The original is not disturbed Remove Map Button Removes a map association and any locator mapping that was already configured Clear Map Button Clears any locator mappings that are already in place Maps Window Displays a list of loaded maps Location Points Displays a list of location points This is a list of locators defined under locator setup Ret...

Страница 56: ...g This Feature is NOT Available for International Use with MX900 H Transceiver To map a location point click and drag the desired locator to a point on the map and drop it The mapping details screen will pop up Return to TOC ...

Страница 57: ...sired image on the map Display Image The image to be displayed Two locator image provided for contrast Run Time Parameters These options describe how the location point will appear on an image at run time Include Text There are two options for the text to display with the image The locator name or the User name Display User Image This option will use the User Image assigned to a given user in user...

Страница 58: ...58 Locator Image Mapping This Feature is NOT Available for International Use with MX900 H Transceiver Return to TOC ...

Страница 59: ...ou can choose a user from the list to make that user the selected user There are drop down boxes at the top of the screen to allow you to quickly select a different map or location The upper left of the screen will always show the selected users status bits The list box to the left of the screen can display other users located at the current location or all users of the system If a selected user h...

Страница 60: ...devices you can view the device s actual location on a real time map Units that have acquired a GPS lock will appear on the main incident screen with the GPS symbol next to the device type Double clicking the GPS symbol will invoke the map 60 Return to TOC ...

Страница 61: ...splayed as a visible layer on top of the Base Map Supported layer formats are Esri Shapefiles and Google KML You can apply multiple layers and manipulate properties of each layer to adjust order colors and hint attributes You can Add new layers Delete layers and change the order of layers using the top right control buttons The 2 base Grace layers do not have properties and cannot be removed Once ...

Страница 62: ...GPS Device Mapping Layer Management Screenshot 62 Return to TOC ...

Страница 63: ...GPS Device Mapping Screenshot showing local lake marked with an imported Esri Shapefile layer 63 Return to TOC ...

Страница 64: ...ent and open the map tool When creating or editing a static marker the marker management window is used to make changes to the Title Marker Image Latitude and Longitude and Notes fields There is a search function below the markers to help you find a marker by key word The search function works across all categories Latitude and Longitude values will be automatically populated when invoking the mar...

Страница 65: ...GPS Device Mapping Screenshot showing 2 static markers used to mark a parking area and wooded area 65 Return to TOC ...

Страница 66: ...y will be seen as a semi transparent radius around the marker that will vary in size depending on the quality of the signal A smaller radius indicates a better signal The radius will also use color as a visual indicator of signal quality Green Good Yellow Fair Red Poor Fix Radius will only apply to the selected user and can only be seen at certain zoom levels of the map Live Marker Images Showing ...

Страница 67: ...GPS Device Mapping Screenshot showing Selected and Non Selected Device Markers Notice the Selected Marker has the GPS Fix Radius 67 Return to TOC ...

Страница 68: ...an incident is started You can also limit the functionality that will be available when an incident is started You can specify which base maps Commander can choose from You can pre cache areas of the map for offline use You can preconfigure and hide mapping functionality As an example you could create static markers and then set the Static Markers button to be hidden so that you cannot change stat...

Страница 69: ...a is cacheable Press the cache button to display the caching start progress window You must have an internet connection for this feature to be available Warning Caching maps requires large amounts of map data to be downloaded over an internet connection Depending on the internet connection speed this may take a considerable amount of time to complete It is highly recommended the map caching setup ...

Страница 70: ... buttons on and off This allows you to define these items in configuration mode so that layers and static markers are projected on to the map but the Grace Watch user cannot modify them You can also change the look of the mapping screens by using the Application Skin drop down and selecting an alternate skin 70 Return to TOC ...

Страница 71: ...that will be available to the Grace Watch When choosing any of the Bing map types the Bing Maps API Key is required The Clear Map Cache button is available so you can delete all of the map tiles that are currently downloaded and available to the application 71 Return to TOC ...

Страница 72: ...l fields including name description and address fields Press Load Picture to add a picture of the location Press Done when finished Manage Locators and Plot Locators To Maps are only used when using Grace Locators 72 Return to TOC ...

Страница 73: ...t corresponds to the locator ID Locators can be associated to GPS Coordinates by entering the latitude and longitude values Use the lookup to assist in entering these values Locator Configuration This Feature is NOT Available for International Use with MX900 H Transceiver Return to TOC ...

Страница 74: ... tools to find the desired location on the map Use the mouse to choose the location on the map The latitude and longitude fields will be populated Press ok and the locator fields will be populated with these values 74 Return to TOC ...

Страница 75: ...The Prefix Will Be Added to the Dialog Box on the Right Highlight a Prefix and Press Remove to Remove a Prefix from the List Highlight a Prefix and Press Make Default to Make the Prefix the Default Check Load Default Prefix to load this Prefix as the Default on the Operation Setup Screen when Grace Watch is started Press Done when finished Return to TOC ...

Страница 76: ...he Street Will Be Added to the Dialog Box on the Right Highlight a Street and Press Remove to Remove a Street from the List Highlight a Street and Press Make Default to Make the Street the Default Check Load Default Street to load this Street as the Default on the Operation Setup Screen when Grace Watch is started Press Done when finished Return to TOC ...

Страница 77: ...The Suffix Will Be Added to the Dialog Box on the Right Highlight a Suffix and Press Remove to Remove a Suffix from the List Highlight a Suffix and Press Make Default to Make the Suffix the Default Check Load Default Suffix to load this Suffix as the Default on the Operation Setup Screen when Grace Watch is started Press Done when finished Return to TOC ...

Страница 78: ...y The City Will Be Added to the Dialog Box on the Right Highlight a City and Press Remove to Remove a City from the List Highlight a City and Press Make Default to Make the City the Default Check Load Default City to load this City as the Default on the Operation Setup Screen when Grace Watch is started Press Done when finished Return to TOC ...

Страница 79: ...The State Will Be Added to the Dialog Box on the Right Highlight a State and Press Remove to Remove a State from the List Highlight a State and Press Make Default to Make the State the Default Check Load Default State to load this State as the Default on the Operation Setup Screen when Grace Watch is started Press Done when finished Return to TOC ...

Страница 80: ... Zip Code Will Be Added to the Dialog Box on the Right Highlight a Zip Code and Press Remove to Remove a Zip Code from the List Highlight a Zip Code and Press Make Default to Make the Zip Code the Default Check Load Default Zip Code to load this Zip Code as the Default on the Operation Setup Screen when Grace Watch is started Press Done when finished Return to TOC ...

Страница 81: ...he Country Will Be Added to the Dialog Box on the Right Highlight a Country and Press Remove to Remove a Country from the List Highlight a Country and Press Make Default to Make the Country the Default Check Load Default Country to load this Country as the Default on the Operation Setup Screen when Grace Watch is started Press Done when finished Return to TOC ...

Страница 82: ...82 Configuring General Setup Return to TOC ...

Страница 83: ...e from the General settings Tab Select a picture from the list and press Select Highlighted Picture Logo graphic files must be placed in Program Folder logos Press Accept to Accept the new picture or Cancel to cancel the action Return to TOC ...

Страница 84: ...that says Play Sound File For Alarms Select the audio file from the drop down and test it Custom audio files can be used by creating a sound file in the mid wav or mp3 format and placing a copy of it into the Alarms folder in the user configuration folder where the application is installed Ex C ProgramData Grace Industries Grace Watch Alarms Return to TOC ...

Страница 85: ...timestamp when configuration changes are made Located in Program Data Logs Check Password Protect and provide a password to force a login screen when a user invokes the configuration screens NOTE Passwords are not managed by the software If a password is forgotten administrators can reset this feature using the DisableConfigPassword exe tool located in the program folder Return to TOC ...

Страница 86: ...ed messages desired to all 120 locations SuperCELL and WorkForce WF2 currently support 16 canned messages Grace Watch supports 80 canned messages to account for future SuperCELL and WorkForce Development Each canned message may contain 16 Characters Return to TOC ...

Страница 87: ...MS Notifications A notification is the ability of the system to be configured to respond to a specific event by sending an email text message or Grace system message to one or more recipients 87 Return to TOC ...

Страница 88: ...be the same SMTP Server Specify the SMTP server address SMTP Port Specify the Port used Typically 25 unless the server uses TLS SSL Requires SSL Check this if your server uses TLS SSL encryption Authentication Select Login if your server requires credentials User Name User Name for the account if required Password Password for the account if required Press the test button to test your setup You sh...

Страница 89: ...89 Configuring Notifications Triggers Return to TOC ...

Страница 90: ...oxes User ID Range Select a range of user IDs that the trigger should apply to To set it up for only one user ID you should include that ID in both boxes Time Range Enter the time range that this trigger will be active Providing the same time for upper and lower ranges will cause the trigger to always be active Trigger Event This is the actual event of the trigger Ex Alarm low battery etc Locator ...

Страница 91: ...91 Configuring Notifications Email Return to TOC ...

Страница 92: ...email address Most SMTP servers require that a from field is provided To Enter a valid email address to send the email to You can provide multiple addresses by using a semicolon as a separator Subject Enter a short generic description about the email Message You can provide additional information in the message part of the email to give special instructions to the recipient The system will prefix ...

Страница 93: ...SMS notification Log To Incident Check this box if you want to write to the incident log when a notification occurs Triggers Use the Select Trigger button to bring up the list of triggers you created in Trigger setup Select one or more to associate them to the SMS notification Use the Remove Trigger button to remove a trigger from the SMS notification From Enter a valid email address Most SMTP ser...

Страница 94: ... if you want to write to the incident log when a notification occurs Triggers Use the Select Trigger button to bring up the list of triggers you created in Trigger setup Select one or more to associate them to the Grace Message notification Use the Remove Trigger button to remove a trigger from the Grace Message notification Grace Message To Send Select on or more messages to send using the Select...

Страница 95: ...95 Incident and Data management Return to TOC ...

Страница 96: ...s Choose yes to save changes no to discard changes and cancel to remain in the configuration screen After choosing yes or no the user will be returned to the Operations screen Note that changes to name files location files and canned messages are updated and saved immediately upon exit of the edit screens and aren t affected by this button Return to TOC ...

Страница 97: ...97 The Operation Setup Screen Return to TOC ...

Страница 98: ...Incident Type and Position These fields MUST be populated to access the Start Incident Button and start an incident The Name Incident Number and Time Date fields are auto filled once an Incident is started Selecting a location auto fills all location fields Press the Start Incident Button to Advance to the Monitoring screen Return to TOC ...

Страница 99: ...99 The Monitoring Screen Return to TOC ...

Страница 100: ...Messaging Bar The Monitoring Window with users monitored a Selection Bar and Navigation Bar The Action Bar with action buttons and clear buttons Note that users are grayed out until they come online If the MX900 H communication is not established a Communications Alarm will show up flashing red in the Alarm Box Return to TOC ...

Страница 101: ...ers on scene are shown as active Use to the navigation buttons and scroll bar on the right of the screen to move up and down the list of users If a user s worker worn device goes into alarm an immediate alarm status image will be displayed in that user s block and the user will be sorted to the top of the screen In addition a flashing ALARM message will be displayed in the alarm status box Once a ...

Страница 102: ... in the name column All incident events and radio messages are stored in the Incident log and the Radio data log during an incident These logs are saved in an incident file and can be viewed at a later date using the Grace Watch Incident Viewer The logs can be viewed at any time by pressing the appropriate buttons on the monitor main tool bar A snapshot of the incident details can be viewed at any...

Страница 103: ... communicate at least once every 2 seconds with the computer a Communication Fault will appear in the Alarm Status Box The Communication Fault will clear automatically when communication is restored between the computer and the MX900 H Return to TOC ...

Страница 104: ...104 Monitor Screen with Active Users Return to TOC ...

Страница 105: ... shown on the right Users are sorted real time based on status Alarm is the highest followed by Abandon Call Back Report In Roll Call Auto Report In No Signal PASS Device ON and PASS Device OFF The Monitor window may be scrolled down to see all users that are active on the system Return to TOC ...

Страница 106: ...s images User status images reflect the various functions of the user including Alarm No Signal Call Back Report In and Roll Call User Profiles may be viewed quickly by double clicking on the User Name column of the Information Bar User Assignments may be changed quickly by double clicking in and around the user assignment column of the Information Bar Return to TOC ...

Страница 107: ...ing a User Profile The User Profile may be quickly viewed from the monitor screen by clicking on that user s name column in the user s information bar When complete press the Done Button to close Return to TOC ...

Страница 108: ...nment Dialog Select the Division Group and Resource for the individual When complete press the Save button Then select Previous or Next Button to adjust another individual or Press Done to close the dialog Return to TOC ...

Страница 109: ...gned to a Division and Sub Division to help track their location and assignment during a work operation Users may be assigned at any time by clicking on the User s Assignment column in the Information Bar in the Monitor Area Return to TOC ...

Страница 110: ...ar at the Right Use the Top Button to return quickly to top of the list Use the Page Up button to move up ten users Use the Page Down Button to move down ten users Use the Bottom Button to move to the end of the list Use the Scroll Bar to freely position anywhere within the list Return to TOC ...

Страница 111: ...ers Can Be Selected Use the Select All button select all active users in the list Use the Select Page to select the ten users on the monitor screen Use De select Page to de select the ten users on the monitor screen Use De Select All to de select all users in the list You can also select a user by single clicking on that user s information bar Single clicking again will de select that user Return ...

Страница 112: ...ed or de selected at any one time Selection is used to perform actions on users Once an action is performed the users are automatically deselected To perform another action re select the users This prevents selected users from being sorted off screen and inadvertently being tagged for an action at a later time Return to TOC ...

Страница 113: ...None Only when user is inactive Alarm Alarm Cleared No Signal No Signal Cleared Abandon Call Back Command Call Back Sent Call Back Rxd Call Back Ack Report In Command Report In Sent Report In Rxd Report In Ack Roll Call Command Roll Call Sent Roll Call Rxd Roll Call Ack Auto Report In Command Auto Report In Sent Auto Report In Rxd Auto Report In Ack Return to TOC ...

Страница 114: ...114 On Off or No Status No Status User Inactive i e has not checked into the system OFF Status User s worker worn device is turned OFF ON Status User s worker worn device is turned ON Return to TOC ...

Страница 115: ...Device is in ALARM Caused by Emergency Alarm Button Press on worker worn device or from a Lack of Motion condition or by a fall detected with the WorkForce Alarm Cleared Status Alarm has been cleared at computer May be enabled or disabled from configuration Return to TOC ...

Страница 116: ...e from a device within the No Signal Time setting Default setting for No Signal is 5 minutes Automatically Clears when a Message is received from the device No Signal Cleared Status Image No Signal condition has been Manually cleared Places Marker for devices in which signal is no longer present Return to TOC ...

Страница 117: ...andon has been commanded Abandon Sent Status Image Abandon Message has been sent to the worker worn device Abandon Received Status Image Abandon Received Message has been transmitted from the worker s device Abandon Acknowledged Status Image Abandon Acknowledge Message has been transmitted from the worker s device Return to TOC ...

Страница 118: ...nt Status Image A Call Back Message has been sent to the worker worn device Call Back Received Status Image A Call Back Received Message has been transmitted from the worker s device Call Back Acknowledged Status Image A Call Back Acknowledge Message has been transmitted from the worker s device Return to TOC ...

Страница 119: ...nt Status Image A Report In Message has been sent to the worker worn device Report In Received Status Image A Report In Received Message has been transmitted from the worker s device Report In Acknowledged Status Image A Report In Acknowledge Message has been transmitted from the worker s device Return to TOC ...

Страница 120: ...t Status An Auto Report In Message has been sent to the worker worn device Auto Report In Received Status A Report In Received Message has been transmitted from the worker s device Auto Report In Acknowledged Status An Auto Report In Acknowledge Message has been Automatically transmitted from the worker s device Return to TOC ...

Страница 121: ...l Sent Status Image A Roll Call Message has been sent to the worker worn Device Roll Call Received Status Image A Roll Call Received Message has been transmitted from the worker s device Roll Call Acknowledged Status Image A Roll Call Acknowledge Message has been transmitted from the worker s device Return to TOC ...

Страница 122: ...d Roll Call Status Roll Call Commanded Sent Received and Acknowledged Report In and Auto Report In Status Report In Commanded Sent Received and Acknowledged Withdrawn Status in Mode 2 NOTE In Mode 1 this status will be sorted below Off status User On Status in Mode 2 NOTE In Mode 1 this status will be sorted below Off status User Off Status in Mode 2 NOTE In Mode 1 this image will be sorted above ...

Страница 123: ...y are listed in system setups i e Alarms in the Root System ID and an Auxiliary ID would be grouped together but the Root System ID alarm would take precedence and display on top Mode 1 vs Mode 2 The mode used for sorting can be configured on the System Setup Screen of the Configuration Module There are two options Mode 1 OFF HIGHER THAN ACTIVE Mode 2 ACTIVE HIGHER THAN OFF These two options rever...

Страница 124: ...n a group called INTERIOR Groups can be collapsed so that you only see the group as an item in the monitored list The example above shows the group expanded so you can see the details for each user The Group displays status images just like a user does except the images displayed are calculated from the users that the group contains 124 Return to TOC ...

Страница 125: ...l priority as configured Selecting a group and performing an operation such as Call Back Roll Call and Report In will apply the action to all of the active users within the group Users within a group cannot be individually selected so individual operations cannot be performed There is no notion of grouping outside the incident monitoring screen What this means is that when you look at logs they wi...

Страница 126: ...126 Managing Groups Return to TOC ...

Страница 127: ...ew group name and press the Create Group button Add Selected Users To Existing Group Enabled when one or more users are selected and there are available groups Select a group and press the Add User button Move Grouped Users To A Different Group Enabled when a group is selected and there are available groups Select a group and press the Move Users Button Undo Grouping For Selected Groups Enabled wh...

Страница 128: ...ined If this checkbox is not checked you will have to pre configure your grouping This is done by creating Groups See next page and configuring each user to belong to a group This is done in the User edit screen under configuration When checked this tells the system that any changes made to grouping during an incident will be maintained You can create groups and assign users to groups from the man...

Страница 129: ...129 Group Configuration Continued Group Names can be pre configured by going into Configuration User Setup and choosing the Groups button Here you can add or remove groups from the list Return to TOC ...

Страница 130: ...tion to be performed on Active User s in the list User s must be selected before an action can be performed Actions Available are Send Abandon Send Call Back Call for Report In Call for Roll Call Clear Alarm Clear No Signal Condition Clear Abandon Clear Roll Call Clear Report In Clear Call Back Return to TOC ...

Страница 131: ... Initiated and Sent to the selected user s Watch for the Abandon Received Status Image for each user being sent abandon to be achieved indicating the worker worn device has received the signal Watch for the Abandon Acknowledge Status Image for each user being sent Abandon to be achieved indicating the user has pressed his side reset buttons to acknowledge the Abandon Command Return to TOC ...

Страница 132: ...t User s to have their Abandon Status Images cleared Press and hold the Clear Abandon Button for one second or longer than the hold time set in configuration Watch as Abandon Status Images are Cleared from the Monitor Screen Return to TOC ...

Страница 133: ... Initiated and Sent to the selected user s Watch for the Call Back Received Status Image for each user being called back to be achieved indicating the worker worn device has received the signal Watch Call Back Acknowledge Status Image for each user being called back to be achieved indicating the user has pressed his side reset buttons to acknowledge the Call Back Command Return to TOC ...

Страница 134: ...User s to have their Call Back Status Images cleared Press and hold the Clear Call Back Button for one second or longer than the hold time set in configuration Watch as Call Back Status Images are Cleared from the Monitor Screen Return to TOC ...

Страница 135: ...e Initiated and Sent to the selected user s Watch for the Report In Received Status Image for each user being contacted for Report In to be achieved indicating the worker worn device has received the signal Watch Report In Acknowledge Status Image for each user being contacted for Report In to be achieved indicating the user has pressed his side reset buttons to acknowledge the Report In Command R...

Страница 136: ...User s to have their Report In Status Images cleared Press and hold the Clear Report In Button for one second or longer than the hold time set in configuration Watch as Report In Status Images are Cleared from the Monitor Screen Return to TOC ...

Страница 137: ...ated and Sent to the selected user s Watch for the Roll Call Received Status Image for each user being contacted for Roll Call to be achieved indicating the worker worn device has received the signal Watch Roll Call Acknowledge Status Image for each user being contacted for Roll Call to be achieved indicating the user has pressed his side reset buttons to acknowledge the Roll Call Command Return t...

Страница 138: ... s to have their Roll Call Status Images cleared Press and hold the Clear Roll Call Button for one second or longer than the hold time set in configuration Watch as Roll Call Status Images are Cleared from the Monitor Screen Return to TOC ...

Страница 139: ...larm Status Box at the top of the screen will show a flashing red alarm active message Once a User has reset the ALARM condition at the worker worn device you can clear the alarm condition on the screen by selecting that user s and holding the Clear Alarm Button for one second User s will be sorted to normal priority position in the list Return to TOC ...

Страница 140: ...tes the No Signal Status will appear and the user s will be sorted to the top of the list If a message from the worker worn device in No Signal is received the No Signal Condition will be cleared automatically To Manually Clear the No Signal Condition select the User s and hold the Clear No Signal Button for 1 second Return to TOC ...

Страница 141: ...er s View Incident Log View Data Log System Info and Location information and to Report In Setup It also contains the Operation Setup button to return to operation setup and save or cancel an incident The Auto Report In feature is a great way to perform Report In checks at regular intervals with minimal time and labor required Return to TOC ...

Страница 142: ...142 Auto Report In Setup Press the Report In Setup button on Main Bar the above dialog will appear Automatic Report In must be enabled and setup before use Return to TOC ...

Страница 143: ...rt In Start Method to Prompt or Automatic depending on preference Prompt will Prompt the user before Auto Report In starts Set the Report In Check Time to the time limit that all Report In responses should be received in order to recognize the Report In check as successful Set the Report In Feature to Enabled and Press the Done Button Return to TOC ...

Страница 144: ... the Auto Report In is enabled notice that the Alarm Status Box will display the remaining time before the Report In is initiated If an Alarm occurs the Alarm Message will be displayed over top of the Auto Report In countdown Return to TOC ...

Страница 145: ...heck will begin automatically if the Report In start method is set to Automatic Otherwise the above message will appear Selecting Yes will start the Report In check Selecting No will reset the Report In timer to the Report In Check time value and begin counting down once again Return to TOC ...

Страница 146: ...ically responds with an acknowledge signal Auto Report In commands will be sent until all users have responded with an Acknowledge If all users do not respond within the Report In check time the Report In check should be considered as Failed Auto Report In Status Images must be cleared using the Clear Report In button If a new Auto Report In check starts all Auto Report In Status are cleared autom...

Страница 147: ... have acknowledged within the Report In check time a Roll Call should be initiated either using the Report In button on the Action Bar or by setting up the Auto Roll call feature in the Report In setup area which will display the above prompt before starting Auto Roll Call Return to TOC ...

Страница 148: ...148 Setting up Auto Roll Call Press the Report In Setup button on the Main Bar and the above Dialog will appear Automatic Roll Call must be enabled and setup before use Return to TOC ...

Страница 149: ... Call will begin automatically if the Roll Call start method is set to Automatic Otherwise the above message will appear Selecting Yes will start the Auto Roll Call Selecting No will reset the Report In timer to the Report In time value and begin counting down once again Return to TOC ...

Страница 150: ...ly responds with a received signal As each User acknowledges Roll Call the Roll Call Ack will appear Auto Roll Call will be sent until all users have responded with an Acknowledge If all users do not respond within the Report In check time the Roll Call check should be considered as Failed Roll Call status must be cleared using the Clear Roll Call button All Roll Call must be cleared before a new ...

Страница 151: ...er unable to or are out of range In either case an active check on that user s should be performed It may be desirable to perform an Call Back if a Roll Call check fails Note once again that a new Report In check will not begin until the Roll Call Status have been cleared using the Clear Roll Call Button Return to TOC ...

Страница 152: ...n Information may be viewed for the incident at any time by selecting the View Location Button from the Main Bar Note that Locations must have been created in Configuration and loaded from the Operation Setup Screen to be Viewed Return to TOC ...

Страница 153: ...153 Location View Dialog Return to TOC ...

Страница 154: ...ation may be viewed at anytime for the incident by Pressing the View System Info Button on the Main Bar System Information contains Incident Details Active groups and user count System and Aux ID values and Options set on the system Return to TOC ...

Страница 155: ...155 System Information Dialog Return to TOC ...

Страница 156: ... kept with time and date stamps and may be viewed at any time during the incident by pressing the View Incident Log Button on the Main Bar Important events during the incident are automatically logged with a time and date stamp in an easy to read sentence format Return to TOC ...

Страница 157: ...157 The Incident Log Return to TOC ...

Страница 158: ... Notes can be Added to the Incident Log at any time by pressing the Add Note Button from the Incident Log Dialog Simply type the note on the line provided and press Add The Note will be added to the Incident Log with a Time and Date Stamp Return to TOC ...

Страница 159: ...ived is kept with time and date stamp and may be viewed at anytime during the incident by pressing the View Incident Log Button on the Main Bar Radio messages are logged either by change messages only or all messages depending on configuration Grace messages received are also logged Return to TOC ...

Страница 160: ...160 The Radio Data Log Return to TOC ...

Страница 161: ...The Edit Users Dialog will appear as described in the configuration section User Profiles are accessible from the Edit Dialog as described in the configuration section Users may be added to the incident from here but the delete user function is disabled during an incident User Status will be updated real time on the User Profile screen while editing Return to TOC ...

Страница 162: ...162 Edit Users Dialog Return to TOC ...

Страница 163: ...163 User Profile Dialog Return to TOC ...

Страница 164: ...from SuperCELL and WorkForce WF2 Devices The Grace Message area is located just beneath the Action Bar on the Monitor screen When no messages are active the message area will be grayed out with the No Message status displayed Return to TOC ...

Страница 165: ...and the Grace Message will be displayed along with a time and date stamp The red indicator square will flash on and off To reset this active message press the Reset button The message box will return to the No Message status Only the most recent Grace Message received will be displayed in the message box Return to TOC ...

Страница 166: ... Canned Messages received press the View All button and the dialog at the right will appear listing all canned messages received with time and date stamp These messages are also stored in the incident and radio data logs Press Done to exit Return to TOC ...

Страница 167: ...ssage tab Simply use the Prev and Next buttons or select the message from the list Press the send button The indicator box will flash red indicating the message has been sent There are 16 messages available SuperCELL Devices must have the same 16 Canned Messages programmed to properly display the message Messages sent will be added to the Incident Log Return to TOC ...

Страница 168: ... message box The send Grace message dialog will appear Select the Free Form Tab Key in your message Select destination device IDs or select All Press the send button The indicator box will flash red indicating the message has been sent Messages sent will be added to the Incident Log Return to TOC ...

Страница 169: ...l be auto filled using the Location file name followed by Inc_date_time e g 305BendHillRd_Inc_040207_092823am If no location file is specified the street address will be used with PreSreetSuffix followed by Inc_date_time e g 305BendHillRd_Inc_040207_ 092823am Blank fields will be ignored If no street address data is present the Incident file will simply be named Inc_Date_Time e g Inc_040207_092823...

Страница 170: ...170 Auto Filled Incident Fields Return to TOC ...

Страница 171: ...ed in the Incident name field The file is saved in the Program Folder Incidents Folder on your hard drive The Incident may be later viewed by using the Grace Watch Incident Viewer program The Incident number will be automatically incremented for the next incident Cancelling the Incident To Cancel an Incident without saving simply press the Cancel Button located at the Bottom of the Operation Setup...

Страница 172: ...Using the Incident Viewer To View Saved Incident Data the Incident Viewer is installed along with the Grace Watch Software Select the Incident Viewer Icon and double click to start the program Return to TOC ...

Страница 173: ...173 Incident Viewer Screen Return to TOC ...

Страница 174: ... print the Incident Data The Main Form show the Incident Data entered from the Operation Setup Screen of Grace Watch for that incident including Incident name number time date Incident Data Settings and Location Settings Incident data saved includes Incident Details of the Incident Active Users that checked in at the incident along with profiles Complete Incident Log of the Incident Complete Radio...

Страница 175: ...175 Users Present at the Incident Return to TOC ...

Страница 176: ...e Incident Only users with devices that checked into the Grace Watch System during the incident will be saved in the incident file Users are sorted by Group and ID Number The User Profile may be viewed for any user on the list by double clicking on that user User Information can be printed from the Print Button on the Main Form Return to TOC ...

Страница 177: ...177 Viewing User Profiles Return to TOC ...

Страница 178: ...by pressing the View Incident Log Button and View Radio Data log Button from the Main Bar All Logs begin with an Incident Started Entry These Logs can be printed using the Print Button on the Main Form System Info at the time the Incident was saved can also be viewed showing total Incident time total users monitored etc Return to TOC ...

Страница 179: ...179 Viewing the Incident Log Return to TOC ...

Страница 180: ...180 Viewing the Radio Data Log Return to TOC ...

Страница 181: ...181 Viewing the System Information Return to TOC ...

Страница 182: ...are suitable for mounting on ceilings doorways and walls throughout a facility including outdoor areas The Grace Watch System supports over 4 000 unique locations and is scalable to any size facility Location resolution the number of Coverage Zones in a given area is adjustable and is determined by the proximity and placement of Beacons When the Coverage Zone of a Locator Beacon is entered by a us...

Страница 183: ...lete accountability for your firefighters and other personnel The system provides the necessary incident management features and documentation for tracking personnel on the scene The system is easy to setup and operate allowing personnel to achieve their primary goal WORKING THE SCENE AND STAYING ALIVE Return to TOC ...

Отзывы: