11
18
17
16
15
14
1
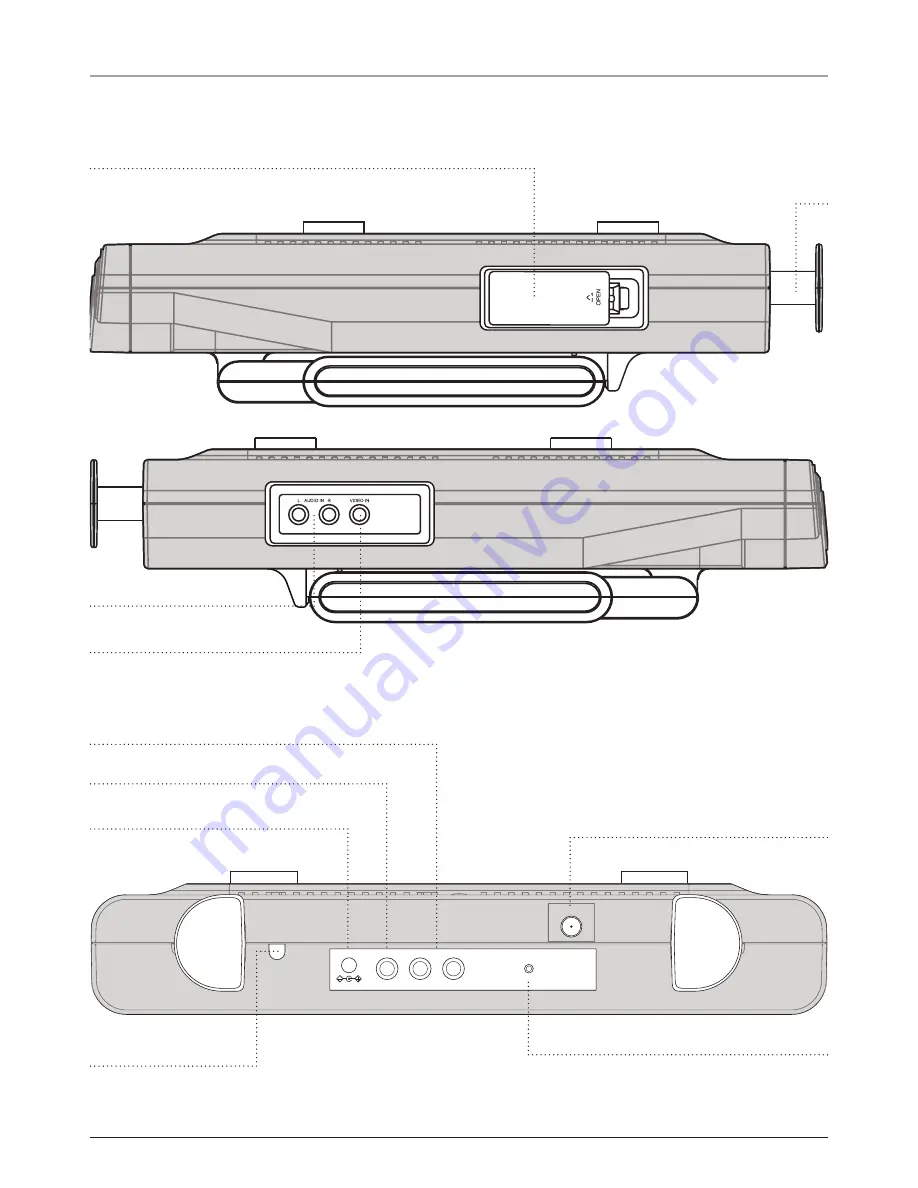
Location of Controls: Side & Back Views
FM ANT
AC~
DC 12V
VIDEO IN
AUDIO IN
R
L
TV ANT
4
7
8
5
0
6
Страница 1: ...Features 4 Mounting the Unit Powering the Unit 5 Setting the Clock 6 Connecting to a TV Signal 7 AM FM Radio Station Presets 8 Setting the Timer 9 Audio Video Inputs 10 Special Features 11 Controls De...
Страница 2: ...e of this unit near fluorescent lighting may cause interference regarding use of the remote If the unit is displaying erratic behavior move away from any fluorescent lighting as it may be the cause NO...
Страница 3: ...with the apparatus When a cart is used use caution when mov ing the cart apparatus combination to avoid injury from tip over 13 Lightning Unplug this apparatus and disconnect the antenna or cable syst...
Страница 4: ...variable viewing angles 2 sets of Audio Video Input Jacks Dual Front Firing Speakers Built In FM Wire Antenna AC Powered Built In AC Line Cord Battery Back Up for clock only Uses 2 AAA Batteries for b...
Страница 5: ...to an AC outlet using the attached AC cord 2 The plastic extensions on the back of the unit provide a holder for excess cord To mount the unit under a cabinet follow the directions on the included Mou...
Страница 6: ...k Buttons to choose the current hour Press the Mem Clock Adj Button to make the selection The minute number will blink to indicate that it is being changed 5 Use the Tune Clk Buttons to choose the cur...
Страница 7: ...ection was made switch the unit to ATSC Mode by pressing the TV Mode Button 5 If a Cable TV Coaxial connection was made switch the unit to NTSC Mode by pressing the TV Mode Button 6 Press the TV Scan...
Страница 8: ...Memory Preset Number will blink to indicate that it can be changed 6 Press the Tune Clk Buttons to adjust the Memory Preset Number 7 Press the Memory Mem Clock Adj Button to save the current AM of FM...
Страница 9: ...te at a time 2 After the allotted time has expired an alarm will sound Press the Standby Button to turn the alarm off 3 To cancel the timer before the time has expired press and hold the Timer Button...
Страница 10: ...DVD Player or Set Top Box RCA Cable not included 2 Turn the unit on by pressing the Standby Button 3 Press the AV Input Button 4 Audio and video played through the connected DVD Player or Set Top Box...
Страница 11: ...Battery Backup LCD Swivel Screen Opening the LCD TV Screen Swiveling the LCD TV Screen Use 2 AAA Batteries to serve as a backup power source for the clock only Batteries not included...
Страница 12: ...Location of Controls Front View MEM CLOCK ADJ BAND EQ TV RADIO DISPLAY TUNE CLK TIMER VOLUME CH TV SCAN TV MODE CH MEM MHz FM RADIO 1 2 3 11 10 6 7 8 9 18 17 16 15 14 5 4 13 12...
Страница 13: ...Location of Controls Side Back Views FM ANT AC DC 12V VIDEO IN AUDIO IN R L TV ANT 24 23 22 27 28 25 20 21 19 26...
Страница 14: ...and or Video Inputs 10 Mount Connections The Mount Connections serve as screw receptacles when attaching the unit to a cabinet 11 Volume Buttons Press the Volume Buttons to adjust the volume of the u...
Страница 15: ...video from a DVD player set top box or Mp3 player on the unit 24 DC Power Input The DC Power Input provides power to the unit when plugged in 25 Attached AC Cord Plug in the Attached AC Cord to a stan...
Страница 16: ...te TV SCAN TV MODE AUDIO EPG INFO SETUP TFT VOL UP DISP SET FUNCTION STANDBY AIR CATV WIDE ON OFF MEM TIMER BAND DN TUNE CLK MENU TV ENTER MEM CLK TFT 30 31 32 34 36 37 38 33 29 39 40 41 42 43 44 46 4...
Страница 17: ...TSC Digital and NTSC Analog TV Modes 41 Audio Button Press the Audio Button to change the audio language when available 42 EPG Button Press the EPG Button to display the Extended Program Guide 43 Info...
Страница 18: ...Language Screen Format Time Closed Caption Source Transparent Default English Auto AIR Off MENU TV Setup Menu To access the TV Setup Menu press the TV Menu Button...
Страница 19: ...ss the Enter Button to turn Closed Captions Off or On and select an Analog Type and Digital Type Analog Type Choose the closed captioning option to be used when watching an analog TV signal Digital Ty...
Страница 20: ...visit the Support section at www gpx com Para descargar este manual de instrucci n en ingl s espa ol o franc s visite la secci n de la ayu da en www gpx com Pour t l charger ce manuel d instruction e...