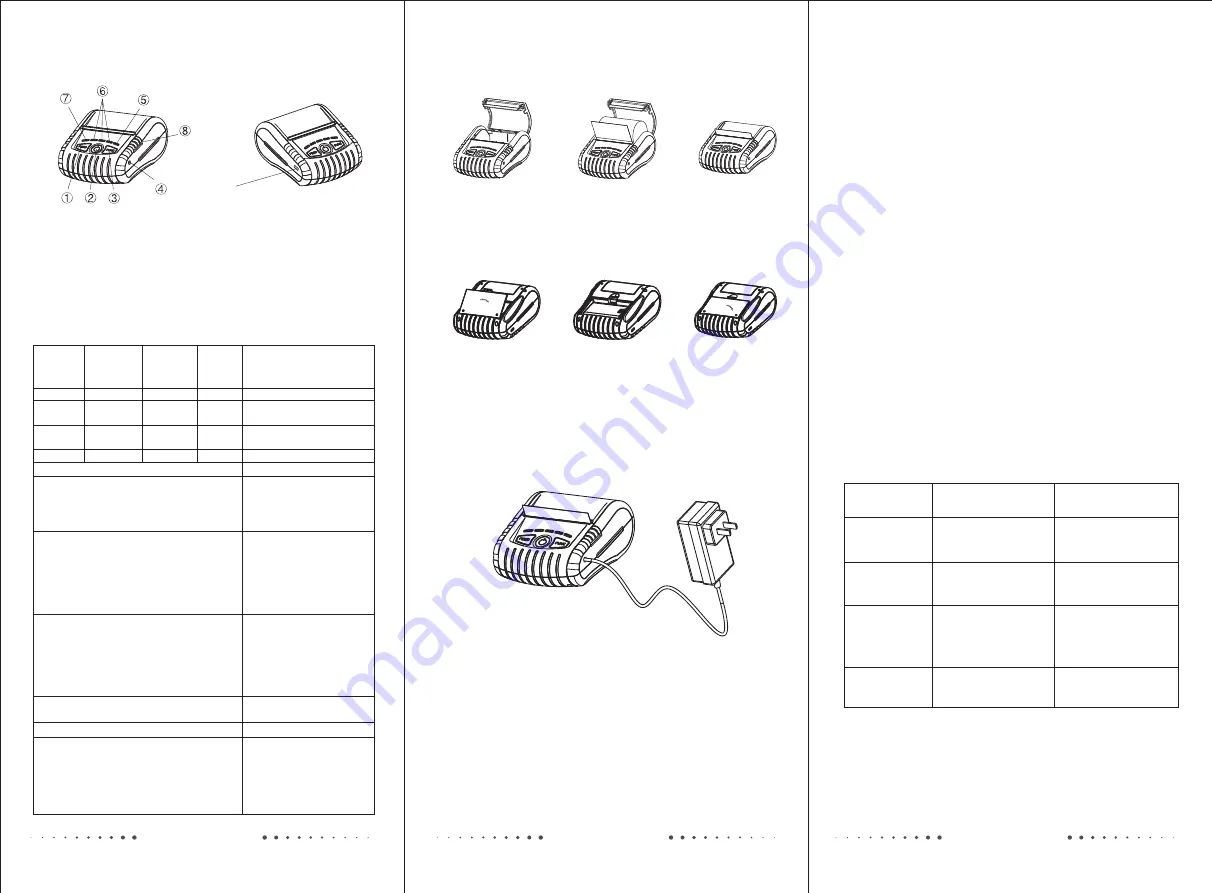
Printer parts:
1
.
2
.
Power button
3
.
Function key button
4
.
Power port
5
.
Status indicator (Blue)
Feed button
6
.
Battery status indicator (Green)
7
.
Error indicator (Red)
8
.
Cover
open
button
9
.
USB port
⑨
Indicators, Beeper and Buttons:
Status
ERROR
indicator
(Red)
Battery
status
indicator
(Green)
STATUS
indicator
(Blue)
Beeper
OFF
Blinking
OFF
OFF
OFF
ON
ON
ON
OFF
OFF
OFF
ON
No
Yes
No
No
Printer power off.
Printer power on, but out
of paper.
Printer is powered on and
in normal print mode.
Bluetooth/WiFi connected.
Long press the power button for 3 seconds.
Printer power ON/OFF.
Printer initialization
Hexadecimal Dumping
Turn off the printer power, press the FEED button and
the POWER button simultaneously, wait for all the
lights are bright, then release the POWER button
firstly, wait for STATUS indicator (blue light) dims,
then release the FEED button.
Print Self-test page
Turn off the printer power, press the FEED
button and the POWER button simultaneously,
wait for all the lights are bright, then release the
POWER button firstly; after the blue light and
red light dims in turn, then release the FEED
button, meanwhile the printer prints out
"Hexadecimal Dump" page, then printer is
changed to Dump mode.
Interface information
Printer power on, press the FUNC button once.
Paper Roll Installation
a
.
Open the cover.
.
Battery Installation
1
.
Open
the
cover.
2
.
Insert the left side to install
the battery at the rear of the
printer, push the right side
of the battery.
3
.
Close
the
cover
.
Battery Charging
NOTE:
1. Charging the battery must be in the state of power-on.
Printer
Input: AC100-220V
Output: DC9V/1A
Note:The printer can not be printed without using battery.
c
.
Close the top cover,
keep 1 label outside.
Connect printer with computer via USB cable, and then turn on
the printer power, a U-Disk appears in computer, which saved
the driver software into a zipped package. Please copy to your
local disk for driver installation.
Driver software
Troubleshooting
Problem
Possible Cause
Recovery Procedure
The battery is not properly
installed.
The battery is used up.
The printer is not turned on.
Reinstall the battery.
Charge the battery.
Switch the printer on.
The following guide lists the most common problems that may
be encountered when operating this printer. If the printer still
does not function after all suggested solutions have been
invoked, please contact the Customer Service Department of
your purchased reseller or distributor for assistance.
Poor print quality
Poor media quality.
The print head is dirty.
The platen roller is dirty.
Change proper media
roll.
Please use the lint-free
cloth with 100% ethanol
to wipe the print head
and the platen roller.
Power indicator
doesn’t illuminate
Set paper shortage threshold value
Portable Thermal Printer
Portable Thermal Printer
Portable Thermal Printer
Change print mode
Turn off the printer power, press and hold on the
P O W E R a n d PA U S E a n d F E E D b u t t o n
, wait for all lights are bright, then
release POWER button firstly, keep on pressing
FEED and FUNC button till the printer prints out a
page showed
release two
buttons. Repeat the steps above to change the
printing mode in between label and receipt mode.
simultaneously
current printing mode,
Turn off the printer power,
and FEED button simultaneously, wait for all lights
bright in turn, then release the POWER button firstly.
Keep on pressing the FEED button all the time, wait for
Blue light and red light dims in turn, hear a beep, and
printer prints out a page showed “Restore factory
setting completed”, release FEED button.
press the POWER button
are
In receipt mode, keep without paper roll, long press FUNC button to
set paper shortage threshold value.
NOTE
:
KEEP
WITHOUT
PAPER
ROLL
Gap sensor calibration
In label mode, long press FUNC button to calibrate
the label.
Open/Close U-disk
After printing the self-test page, press FEED button once to open or
close U-disk.
*
*
*
*
*
*
*
Paper roll installed,
media calibration
error or red Indicator
flashes.
Gap sensor calibration
error
Re-set paper shortage
threshold value.
Please use soft brush
to clean the sensor.
Need to set paper shortage
threshold value.
The print head sensor is
dirty.
Poor media quality.
Change good quality media
roll.
Re-calibrate gap sensor.
.
*
*
*
*
*
*
*
*
*
*
*
*
1. Calibrating Media sensor by Gpsettingtool.
In label mode, checking “POWER ON TEST PAPER: ON/OFF” from
self-test page, set “OFF” as default.
2. Auto calibration once the printer resumes working from paper shortage
state.
Auto calibration when printer is powered on
b
.
Install the paper roll into
the slot (keep right side).


