background image

NSV-Series

Video wall

www.gpodisplay.com

NSV-series Video wall

14

Cable Connections (VGA)

Cable Connections (RS232)

Содержание NSV series

Страница 1: ...NSV Series Video wall www gpodisplay com NSV series Video wall NSV Series Video Wall Before operating the unit please read this manual thoroughly and retain it for future reference User Guide...

Страница 2: ...com NSV series Video wall 1 Instructions 2 Safety precautions for NSV series systems 3 Mechanical Layout 4 Connections 5 SICP 6 Remote Control 7 Viewing the Menus 8 ACR Agent Network 9 ACR Monitor 10...

Страница 3: ...instructions are for use by qualified service personnel only To reduce the risk of electric shock do not perform any service other than that contained in the operating instructions unless you are qua...

Страница 4: ...cart display combination to avoid injury from tip over 13 Unplug this display during lightning storms or when unused for long periods of time 14 Refer all servicing to qualified service personnel Serv...

Страница 5: ...read the manual carefully before installing or using the product After reading this manual please retain for future reference If you have any questions or a problem occurs please contact either the c...

Страница 6: ...temperature between 32 95 Please make sure to grounded Earthing AC power plugs and sockets Considering NSV Series Max power consumption check the main electric specification Clearance for Ventilation...

Страница 7: ...furnished for heat dispersion If the area in front of NSV Series displays must be sealed there must be consideration for the heat dispersion on the rear side of NSV Series to compensate Precautions fo...

Страница 8: ...lation holes Carefully install NSV Series not to cover the fan air holes with any structural object If the holes are covered with anything the inner temperature can be raised rapidly and it can cause...

Страница 9: ...the LCD panel surface If you need to lay down LCD in a panel face up position please be cautious and avoid falling objects on the surface of the LCD Handle with Caution Shock Impact on the display s s...

Страница 10: ...r as well as the bottom of the display simultaneously for stability When carrying the product with the panel positioned upwards as shown below please hold as shown in the diagram Application informati...

Страница 11: ...Receiver Aim the remote controller towards this spot on the LCD Display 2 LED indicator Indicates LCD Power Status On BLUE Off RED 3 OSD KEY Input Power Menu Source Left Right Up Down a Power Turns th...

Страница 12: ...12 For use HDMI signal use an HDMI to DVI cable between HDMI signal source and master set Input Output Input Input Distribution Amplifier PC Input Max Timing Daisy Chain DVI 1920 X 1080 3 Displays VGA...

Страница 13: ...NSV Series Video wall www gpodisplay com NSV series Video wall Cable Connections DVI 13 Cable Connections HDMI Cable Connections DisplayPort...

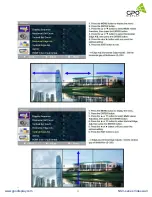
Страница 14: ...NSV Series Video wall www gpodisplay com NSV series Video wall 14 Cable Connections VGA Cable Connections RS232...

Страница 15: ...WER Turns the LCD Display On and Off 3 UP Controls the UP cursor in the menu 4 LEFT Controls the LEFT cursor in the menu 5 RIGHT Controls the RIGHT cursor in the menu 6 ENTER Controls the ENTER cursor...

Страница 16: ...Sound Setup and PIP Changing the Picture Standard 1 Press the MENU button to display the menu 2 Press the or button to select Picture then press the ENTER button 3 Press the ENTER button twice 4 Selec...

Страница 17: ...tton 3 Press the or button to select Custom then press the ENTER button 4 Select the desired mode by pressing the or button then press the ENTER button 5 Select the desired option by pressing the or b...

Страница 18: ...NSV Series Video wall www gpodisplay com NSV series Video wall 18...

Страница 19: ...NSV Series Video wall www gpodisplay com NSV series Video wall 19...

Страница 20: ...NSV Series Video wall www gpodisplay com NSV series Video wall 20...

Страница 21: ...NSV Series Video wall www gpodisplay com NSV series Video wall 21...

Страница 22: ...NSV Series Video wall www gpodisplay com NSV series Video wall 22...

Страница 23: ...NSV Series Video wall www gpodisplay com NSV series Video wall 23...

Страница 24: ...NSV Series Video wall www gpodisplay com NSV series Video wall 24...

Страница 25: ...NSV Series Video wall www gpodisplay com NSV series Video wall 25...

Страница 26: ...NSV Series Video wall www gpodisplay com NSV series Video wall 26...

Страница 27: ...mplemented starting from the concept of a master slave structure where the display is the slave The first action is always taken by the master which can be either a PC or any controlling device acting...

Страница 28: ...mizing the functions and specifications of each product may vary Notice Please extract VBRunTimesR7 zip and install the program on VISTA WIN7 8 10 before installing SICP 2 Installing SICP V3 01 Run th...

Страница 29: ...2 communication 2 Horizontal Vertical Select Horizontal Vertical count of sets in array 3 Communication Select the COM Port connected to the PC 4 Panel Configuration Indicates information such as disp...

Страница 30: ...y be running under this port Cannot connect with Easy DID System RS232 Cable may not be connected properly or Set ID may be incorrect Re check on Set ID 5 Multi vision Control Users can control each d...

Страница 31: ...would Note Functions in Slide Tab will be described in 6 Slide Function 3 Color Setting Users may access the Color Setting mode only after entering Supervisor Mode In order to enter Supervisor mode g...

Страница 32: ...ting only if after entering Supervisor Mode In order to enter Supervisor mode go to Control Mode in the tool bar top and select Setting Mode Hot key Ctrl F3 Click OK Commands are writable only not rea...

Страница 33: ...previous page shows H Set Count of 3 V Set Count Vertical Set Count Number of displays in array vertically counting top to bottom E g Diagram of array on previous page shows V Set Count of 3 H Edge Ad...

Страница 34: ...rmat issues often manifest themselves in the form of a magenta pink tint on display panels If this issue arises check the type of source being used If for example a Blu Ray player is being used the HD...

Страница 35: ...scribed in on the image above Select PC as described in on the image above Select the area by clicking and dragging as described in of the image above The complete image will appear as the image on th...

Страница 36: ...le Go to Slide File top left of SICP program GUI and press File Save in order to save the file in the folder you wish to select The file format is sld Open a file Go to Slide File and press File Open...

Страница 37: ...ement is as follows ex STX 001PWR OFF ETX Set ID 1 Power Off Acknowledgement ex STX 001PWRWOFF0 ETX Set ID 1 Power Off Send 7 Error Acknowledgement The Error Values will be sent by the display to the...

Страница 38: ...A1 DA3 001 Set ID Number Ex STX FFFSIDW0010 ETX Write Set ID 1 Acknowledgement STX 001SID 001 ETX 9 Command List Power On Off PWR STX ID1 ID2 ID3 CM1 CM2 CM3 R W DA1 DA2 DA3 IND ETX 0x0f F F F S I D R...

Страница 39: ...0 ETX Lock ON Acknowledgement STX 001KPL ON ETX Source Change MIN STX ID1 ID2 ID3 CM1 CM2 CM3 R W DA1 DA2 DA3 IND ETX 0x0f R M L W 0 0x0d Hex ASCII capital letter Hex STX ID1 ID2 ID3 CM1 CM2 CM3 R W D...

Страница 40: ...STX 001HSC 010 ETX STX ID1 ID2 ID3 CM1 CM2 CM3 R W DA1 DA2 DA3 IND ETX 0x0f R M T W 0 0x0d Hex ASCII capital letter Hex Ex STX 001RMTWSOU0 ETX Remote Source Button Acknowledgement STX 001RMT SOU ETX...

Страница 41: ...quence 1 Acknowledgement STX 001SDS 001 ETX Horizontal Edge Adjust HEG ID1 ID3 Set ID 001 100 DA1 DA3 001 010 Ex STX 001HEGW0300 ETX H Edge Adjust 30 Acknowledgement STX 001HEG 030 ETX STX ID1 ID2 ID3...

Страница 42: ...Input format RGB444 Acknowledgement STX 001IVF R44 ETX Color Adjust DVI FCD ID1 ID3 Set ID 001 100 DA1 DA3 000 255 Color Value R W W Write R Read IND 0 Sub Brightness 1 R Offset 2 G Offset 3 B Offset...

Страница 43: ...n 7 B Gain Ex STX 001FCAW1004 ETX Write VGA Sub Contrast 100 Acknowledgement STX 001FCA 1004 ETX Ex STX 001FCAR0002 ETX Read VGA G Offset Acknowledgement STX 001FCA 1102 ETX G Offset 110 Zoom IN OUT Z...

Страница 44: ...On Off Status PWS ID1 ID3 Set ID 001 100 DA1 DA3 ON Power On OFF Power Off Ex STX 001PWSR0000 ETX Set ID 1 Read Power Status Acknowledgement STX 001PWR OFF ETX STX ID1 ID2 ID3 CM1 CM2 CM3 R W DA1 DA2...

Страница 45: ...ate 162 MHz DP 1 1a DVI Digital RGB H 20 80 kHz V 55 75 Hz Maximum resolution 1920x1080 60Hz Maximum pixel rate 160 MHz HDCP support HDMI H 20 80 kHz V 55 75 Hz Maximum resolution 1920x1080 60Hz Maxim...

Страница 46: ...000 VESA 800 x 600 37 879 60 317 40 000 VESA 800 x 600 48 077 72 188 50 000 VESA 800 x 600 46 875 75 000 49 500 VESA 800 x 600 53 674 85 061 56 250 VESA 1024 x 768 48 363 60 004 65 000 VESA 1024 x 768...

Отзывы: