GPI Sports & Fitness TREADMILL 304 Скачать руководство пользователя страница 7


- 6 - 

5.


ASSEMBLY STEPS


Two persons are required to finish the assembly 

steps. 

(Caution!! Please follow the assembly 

procedure below to avoid injury. ) 
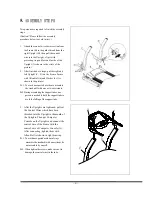
 

1.


Attach the control wire-lower section from 

the Frame (B) to the guide thread from the   

right Upright (D), then pull the control 

wire into the Upright , clip it with 

protecting ring and fasten it inside of the 

Upright. (As shown in the circle of the 

picture.) 

2.


After finish above steps, put the right and 

left Upright (C

D) on the Frame. Secure 

with Allen Bolt (a) and Washer (h). (As 

shown in the picture) 

Ps.1. To avoid unexpected accidents, assemble 

the treadmill with one or two assistants. 

Ps.2


During assembling the support tubes, one 

person is needed to hold the support tube to 

avoid the falling of the support tube. 


3.


After the Uprights are tightened, pull out 

the Control Wires which have been 

threaded into the Upright to the month of 

the Uprights. Then put Computer 

Console on the Uprights and connect the 

control wire of the Frame with the 

control wire of Computer Console (A). 

After connecting, tighten them with 

Allen Bolt (c) shown in right drawing. 

Ps.1. To avoid unexpected accident, always 

assemble the treadmill with an assistant, do 

not assemble by oneself. 

Ps.2. When tighten the screws, make sure not to 

damage the control wires in the tube. 


A

C

D

c

c


Содержание TREADMILL 304

Страница 1: ...TREADMILL 304 OWNER S MANUAL...

Страница 2: ...1 INDEX 1 OVERVIEW DRAWING 2 2 IMPORTANT SAFETY INSTRUCTIONS 3 3 GROUNDING INSTRUCTIONS 4 4 PRE ASSEMBLY CHECK LIST 5 5 ASSEMBLY STEPS 6 CAUTION 7 MAINTENANCE 8 COMPUTER OPERATION INSTRUCTIONS...

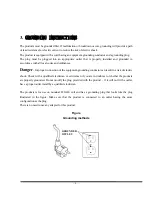
Страница 3: ...2 1 OVERVIEW DRAWING Computer Safety Key Clip Frame Base Power Switch Circuit Breaker Power Cord...

Страница 4: ...r to avoid any danger or accidents 4 Never operate the product if it has a damaged cord or plug if it is not working properly if it has been damaged or dropped into water Please return the product to...

Страница 5: ...oper connection of the equipment grounding conductor can result in a risk of electric shock Check with a qualified electrician or serviceman if you are in doubt as to whether the products are properly...

Страница 6: ...Allen Bolt M8xP1 25x15 12 B Frame 1 b Washer 8x 16x1 5t 12 C Upright L 1 c Allen Bolt M8xP1 25x60 4 D Upright R 1 d Screw M5xP0 8x18 4 E Cover 2 e SILICON 1 F Decorative Cover L 1 f Allen Wrench Screw...

Страница 7: ...oid unexpected accidents assemble the treadmill with one or two assistants Ps 2 During assembling the support tubes one person is needed to hold the support tube to avoid the falling of the support tu...

Страница 8: ...eps ahead make sure that the cover be set on the handrail as showed on the right E Then cap the Decorative Cover L and the Decorative Cover R to the frame and then fix with the screw according to righ...

Страница 9: ...make sure you hear a click sound to ensure the tread board is fixed in the position If you want to use the treadmill step on the tread board as the direction shown in the right drawing to release the...

Страница 10: ...us due to user s weight and running condition The belt needs not to be adjusted as long as it doesn t rub against the parts aside 2 It is strongly suggested to follow the below table to apply lubricat...

Страница 11: ...d the beeper will sound and then the treadmill will stop running At this time place the SAFETY KEY back and all the values will go back to the initial position 3 Under the common Start Ready status if...

Страница 12: ...veryone is 3 minutes The setting time except anterior and later which mean 6 minutes will be execute averagely by surplus 24 levels 5 9 HOLES mode have not functions of WARM UP or COOL DOWN When dista...

Страница 13: ...ing time can execute in 30 level averagely 1 After entering into the mode function at this time the LEVEL light is on window flashes This function is to select acuteness level of movement L1 L10 You c...

Страница 14: ...96 124 124 32 179 113 113 50 162 102 102 68 144 91 91 15 195 123 123 33 178 112 112 51 161 101 101 69 143 91 91 16 194 122 122 34 177 112 112 52 160 101 101 70 143 90 90 17 193 122 122 35 176 111 111...

Страница 15: ...0 1 0 1 0 1 0 1 0 4 0 1 0 1 0 1 0 3 0 4 0 1 0 1 0 1 0 1 0 4 0 1 0 1 0 1 0 1 0 1 0 1 0 1 0 0 0 MPH 1 0 1 5 2 0 2 0 2 0 2 0 2 0 2 0 2 0 2 0 2 0 2 0 2 0 2 0 2 0 2 0 2 0 2 0 2 0 2 0 2 0 2 0 2 0 2 0 2 0 2...

Страница 16: ...0 KPH 3 2 4 0 4 8 8 8 5 6 8 8 5 6 9 6 6 4 9 6 6 4 9 6 7 2 9 6 7 2 9 6 7 2 9 6 7 2 9 6 6 4 9 6 6 4 9 6 5 6 8 8 7 2 4 8 4 0 3 2 Level 6 2 0 2 0 3 0 3 0 3 0 4 0 4 0 4 0 4 0 5 0 5 0 5 0 5 0 6 0 6 0 6 0 5...

Страница 17: ...8 8 0 8 8 9 6 8 8 9 6 8 8 9 6 8 8 9 6 8 8 9 6 8 8 9 6 8 8 9 6 8 8 9 6 8 8 9 6 8 8 9 6 8 8 8 0 7 2 4 8 4 0 3 2 Level 6 0 0 0 0 0 0 0 0 0 0 1 0 1 0 1 0 1 0 1 0 1 0 1 0 1 0 1 0 1 0 1 0 1 0 1 0 1 0 1 0 1...

Страница 18: ...0 KPH 3 2 4 0 4 8 8 8 6 4 8 8 6 4 8 8 6 4 8 8 6 4 8 8 6 4 8 8 6 4 8 8 6 4 8 8 6 4 8 8 6 4 8 8 6 4 8 8 6 4 8 8 7 2 4 8 4 0 3 2 Level 6 MPH 2 0 2 5 3 0 6 0 4 5 6 0 4 5 6 0 4 5 6 0 4 5 6 0 4 5 6 0 4 5 6...

Страница 19: ...4 8 6 4 8 0 8 8 8 0 9 6 8 8 9 6 8 8 9 6 8 8 9 6 8 8 9 6 8 8 9 6 8 8 9 6 8 8 9 6 8 8 9 6 8 8 8 0 6 4 4 8 4 0 3 2 Level 6 MPH 2 0 2 5 3 0 4 0 5 0 5 5 6 0 6 5 6 0 6 5 6 0 6 5 6 0 6 5 6 0 6 5 6 0 6 5 6 0...

Страница 20: ...1 5 1 0 KPH 1 6 2 4 3 2 4 8 5 6 6 4 7 2 7 2 7 2 8 0 8 0 8 0 8 0 8 8 8 8 8 8 8 8 8 0 8 0 8 0 7 2 7 2 7 2 6 4 6 4 6 4 5 6 3 2 2 4 1 6 Level 6 MPH 1 0 1 5 2 0 3 5 4 0 4 5 5 0 5 0 5 0 5 5 5 5 5 5 5 5 6 0...

Страница 21: ...20...

Отзывы: