background image

VCR Operation

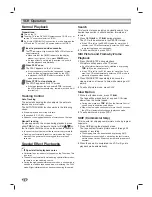
Normal Playback

Preparations:

Turn on the TV.
Tune the TV to the DVD+VCR output channel (CH 3 or 4) or
set the TV’s source selector to VIDEO.
If a direct VIDEO/AUDIO connection is made between the
VCR and the TV, set the TV’s source selector to VIDEO.

11

Insert a prerecorded video cassette.

The 

indicator will light and the DVD+VCR will power-

up automatically. 

Make sure that the TIMER indicator in the display
window is not lighted. If it is, press 

POWER

once.

If a tape without a safety tab is inserted, the unit will
start the playback automatically.

22

Press PLAY once.

The PLAY appears on the TV screen . 

It is not necessary to select the tape speed for play-
back. It will be automatically selected by the VCR.
In playback, the 

TV/VCR

selector switches to VCR

mode automatically.

33

Press STOP to stop playback.

The STOP appears on the TV screen.

If the tape reaches the end before 

STOP

is pressed,

the VCR will automatically stop, rewind, eject, and it will
turn itself off.

Tracking Control

Auto Tracking

The automatic tracking function adjusts the picture to
remove snow or streaks.
The AUTO TRACKING function works in the following
cases:

A tape is played back for the first time.
Tape speed (SP, LP, EP) changes.
Streaks or snow appear because of scratches on the tape.

Manual Tracking

If noise appears on the screen during playback, press
either 

TRK (+/-) 

on the remote control or 

CH (

3

3

4

4

on

the front panel until the noise on the screen is reduced.

In case of vertical jitter, adjust these controls very carefully.
Tracking is automatically reset to normal when the tape is
ejected or the power cord is unplugged for more than 3 
seconds.

Special Effect Playbacks

Special effects playback notes

Horizontal lines (noise bars) will appear on the TV screen. This
is normal.
The audio is automatically muted during special effect modes,
so there is no sound during search.
During the high-speed picture search modes, a short period is
needed to stabilize tape speed when re-entering the PLAY

mode. Slight interference may be observed during this period.

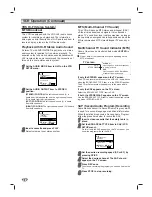
Search

This function lets you quickly and visually search for a
desired tape section in either direction: forward and
reverse.

1

Press REW 

.

or FF 

>

during playback.

The VCR will be activated in the SEARCH mode.

If the VCR is left in the SEARCH mode for more than 3
minutes, the VCR will automatically enter the PLAY mode,
to protect the tape and video heads.

2

To exit search mode, press PLAY.

Still Picture and Frame-by-Frame
Playback

1

Press PAUSE/STEP during playback.
Still picture will appear on the TV screen.

If a still picture vibrates vertically, stabilize it by pressing

TRK (+/-)

on the remote control.

If the VCR is left in the STILL mode for more than 5 min-
utes, the VCR will automatically enter the STOP mode to
protect the tape and video heads.

2

Press PAUSE/STEP repeatedly to advance the 
video picture one frame at a time while viewing a still
picture.

3

To exit still picture mode, press PLAY.

Slow Motion

1

While in still video mode, press FF 

>

.

The tape will be played back at a speed 1/19 times
slower than the normal speed. 

During slow playback, 

TRK (+/-) 

on the Remote Control

can be used to minimize noise bands.
When the slow mode continues for more than 30 seconds,
the VCR will automatically change to playback mode.

2

To exit search mode, press PLAY.

SKIP (Commercial Skip)

This is useful for skipping commercials or short program 
segments.

1

Press SKIP during the playback mode.
The tape will fast forward picture search through 30
seconds of recording. 

The skipping time can be extended by pressing SKIP.
Subsequent presses result in advancing the fast forward
picture search time by 30-second increments (maximum 2
minutes). 

2

When the search is completed, the VCR will go into
playback mode automatically.

22

Содержание Sonic Blue DVR4250

Страница 1: ......

Страница 2: ...energy and if not installed and used in accordance with the instruction manual may cause harmful interference to radio communications However there is no guarantee that interference will not occur in...

Страница 3: ...utlets extension cords or integral convenience receptacles this can result in a risk of fire or electric shock 13 Outdoor Antenna Grounding If an outside antenna or cable system is connected to the pr...

Страница 4: ...product is in proper operating condition 23 Disc Tray Keep your fingers well clear of the disc tray as it is closing It can cause personal injury 24 Burden Do not place a heavy object on or step on th...

Страница 5: ...TS Broadcast 26 Tape Counter Memory Feature 27 Additional Information 27 DVD and Audio CD Operation 28 31 Playing a DVD and Audio CD 28 General Features 28 Moving to another TITLE 28 Moving to another...

Страница 6: ...even though their playback is prohibited by area limits Note on DTS encoded CDs When playing DTS encoded CDs excessive noise may be exhibited from the analog stereo output To avoid possible damage to...

Страница 7: ...details please contact your nearest dealer Notes on Discs Handling discs Do not touch the playback side of the disc Hold the disc by the edges so that fingerprints will not get on the surface Do not s...

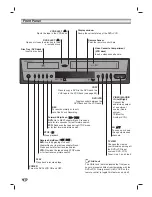
Страница 8: ...ous chapter track Press and hold for fast reverse search VCR Rewinds the tape during STOP mode or for fast reverse picture search PLAY Plays back a recorded tape STOP x x Stops playback CH v v V V To...

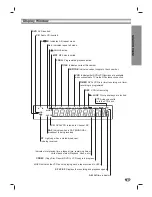
Страница 9: ...is playing back a tape recorded in HI FI CDREC Copy Disc Record DVD to VCR copy is in progress Indicates total playing time elapsed time remaining time or current deck status Playback Pause etc CH DV...

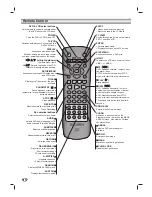
Страница 10: ...lays tracks in random order Fast forwards through 30 seconds of recording A B SP EP Repeats sequence Selects recording speed SEARCH Displays MARK SEARCH menu LAST CH Displays last channel viewed EJECT...

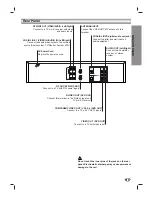
Страница 11: ...or Another VCR ANTENNA INPUT Connect the VHF UHF CATV antenna to this terminal DVD VHS OUT VIDEO AUDIO Left Right Connect to a TV or A V receiver with video and audio inputs AUDIO OUT Left Right Conne...

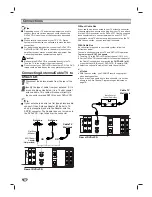
Страница 12: ...m not supplied and slip the Adapter onto the ANT IN connector The Adapter does not screw on to the DVD VCR it just slips over the connector Without Cable Box If your cable wire is connected to your TV...

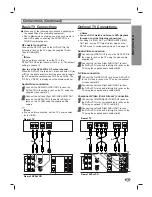
Страница 13: ...rce selec tor to VIDEO Optional TV Connections Notes You can ONLY watch and listen to DVD playback through one of the following connections For using S VIDEO OUT or COMPONENT VIDEO OUT jack set the TV...

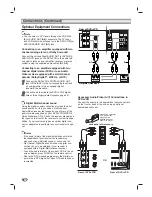
Страница 14: ...eiver that supports one or more of the audio formats supported by your DVD VCR MPEG 2 Dolby Digital and DTS Check the receiver manual and the logos on the front of the receiver to confirm its capa bil...

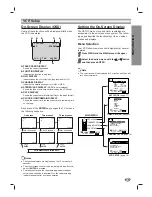
Страница 15: ...ck and timer recordings are accessible via the on screen menu system The follow ing pages describe the functionality of the on screen menus and displays Menu Selection Your VCR allows remote control a...

Страница 16: ...when a stereo tape is played the stereo sound will be heard through the left and right channels If a mono tape is played and the audio output is set to stereo the same mono sound will be heard from b...

Страница 17: ...ormation or they send the wrong date and time In this case we recom mend that you set the clock manually Manual Clock Set Example July 5 2002 2 15 AM 1 1 Press MENU and the MAIN menu will appear 2 2 P...

Страница 18: ...s the on screen display disappears OFF A B ALL TRACK CHAPT TITLE Items Title Number Chapter Number Time search Audio language and Digital Audio Output mode Subtitle language Angle Sound Function Press...

Страница 19: ...Displays pictures cropped to fill your TV screen Both sides of the picture are cut off 16 9 Wide Select when a 16 9 wide TV is connected Note The Aspect Ratio you select may not be available on all d...

Страница 20: ...Vocal settings can be changed Press v v V V to select the desired item and press ENTER The setting of the selected item is changed between On and Off Dynamic Range Control DRC With the DVD format you...

Страница 21: ...he 4 digit pass word or change the rating level in order to play the disc 5 5 Press ENTER to confirm your rating selection then press SETUP MENU to exit the menu Password If you change the rating leve...

Страница 22: ...udio is automatically muted during special effect modes so there is no sound during search During the high speed picture search modes a short period is needed to stabilize tape speed when re entering...

Страница 23: ...up to 8 pro grams within a period of 1 year For unattended record ing the timer needs to know the channels to be recorded and the starting and ending times Preparations Turn on the power of both the V...

Страница 24: ...n the DVD VCR power off for a timer recording to take place Tip If you are finished programming and you want to set the VCR to record the programs you have entered A MAKE SURE YOU HAVE INSERTED A TAPE...

Страница 25: ...rder or another VCR recordings to this VCR the rear or Front panel mounted Audio and Video A V input jacks make the connections quick and easy The direct A V jacks will also provide better picture res...

Страница 26: ...the indicators will light depending on the MTS broadcast If only the STEREO appears on the TV screen The VCR can record in stereo onto the VHS Hi Fi audio tracks when the BROADCAST TYPE item is in the...

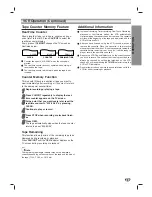
Страница 27: ...e of the remaining tape to be displayed during recording or playback Press CLK CNT until the REM indicator displays on the TV screen during recording or playback Note The remaining tape length indicat...

Страница 28: ...r The screen saver picture appears when you leave the DVD VCR in stop mode for about five minutes General Features Note Unless stated otherwise all operations described use the remote control Some fea...

Страница 29: ...REPEAT The Repeat Chapter icon appears on the TV screen 2 To repeat the title currently playing press REPEAT a second time The Repeat Title icon appears on the TV screen 3 To exit Repeat mode press R...

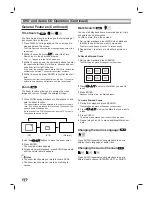
Страница 30: ...buttons to move the zoom point 3 Press ENTER The zoomed picture appears 4 To resume normal playback press ZOOM repeatedly until the normal picture appears Notes The zoom function may not work for some...

Страница 31: ...anguages Note If appears the feature is not available on the disc Programmed Playback with Audio CD Program allows you to store your favorite tracks for a particular disc in the DVD VCR memory Program...

Страница 32: ...tain technical standards in order to achieve optimal playback quality Pre recorded DVDs are automatically set to these standards There are many different types of recordable disc formats including CD...

Страница 33: ...ed when the disc is removed Repeat Playback with MP3 Discs To playback a track repeatedly Press REPEAT once during playback The current track will be played back repeatedly To playback a entire direct...

Страница 34: ...sted Correction Plug the power cord into the wall outlet securely Insert a disc or tape Check that the disc or tape indicator in the display window is lit Select the appropriate video input mode on th...

Страница 35: ...V Correction Use ADD DEL CH to restore channels See Channel Selection on page 16 Tighten connections or replace cable Try all CHANNEL SOURCE options See Channel Selection on page 16 for details Turn c...

Страница 36: ...Korean 7585 Kurdish 7679 Laothian 7665 Latin 7686 Latvian Lettish Code Language 7678 Lingala 7684 Lithuanian 7775 Macedonian 7771 Malagasy 7783 Malay 7776 Malayalam 7784 Maltese 7773 Maori 7782 Marath...

Страница 37: ...or 4 VCR Specification Head system Four head helical scan azimuth system Timer 12 hour display type with AM PM Tape speed SP 33 35 mm sec LP 16 67 mm sec EP 11 12 mm sec Tape width 12 7 mm Maximum re...

Страница 38: ...al use has the same warranty coverage as stated in this warranty What are the Exceptions This warranty does not cover 1 Normal maintenance service such as video head cleaning 2 Damage from mis use abu...

Отзывы: