background image

40

41

Step 1

Step 2

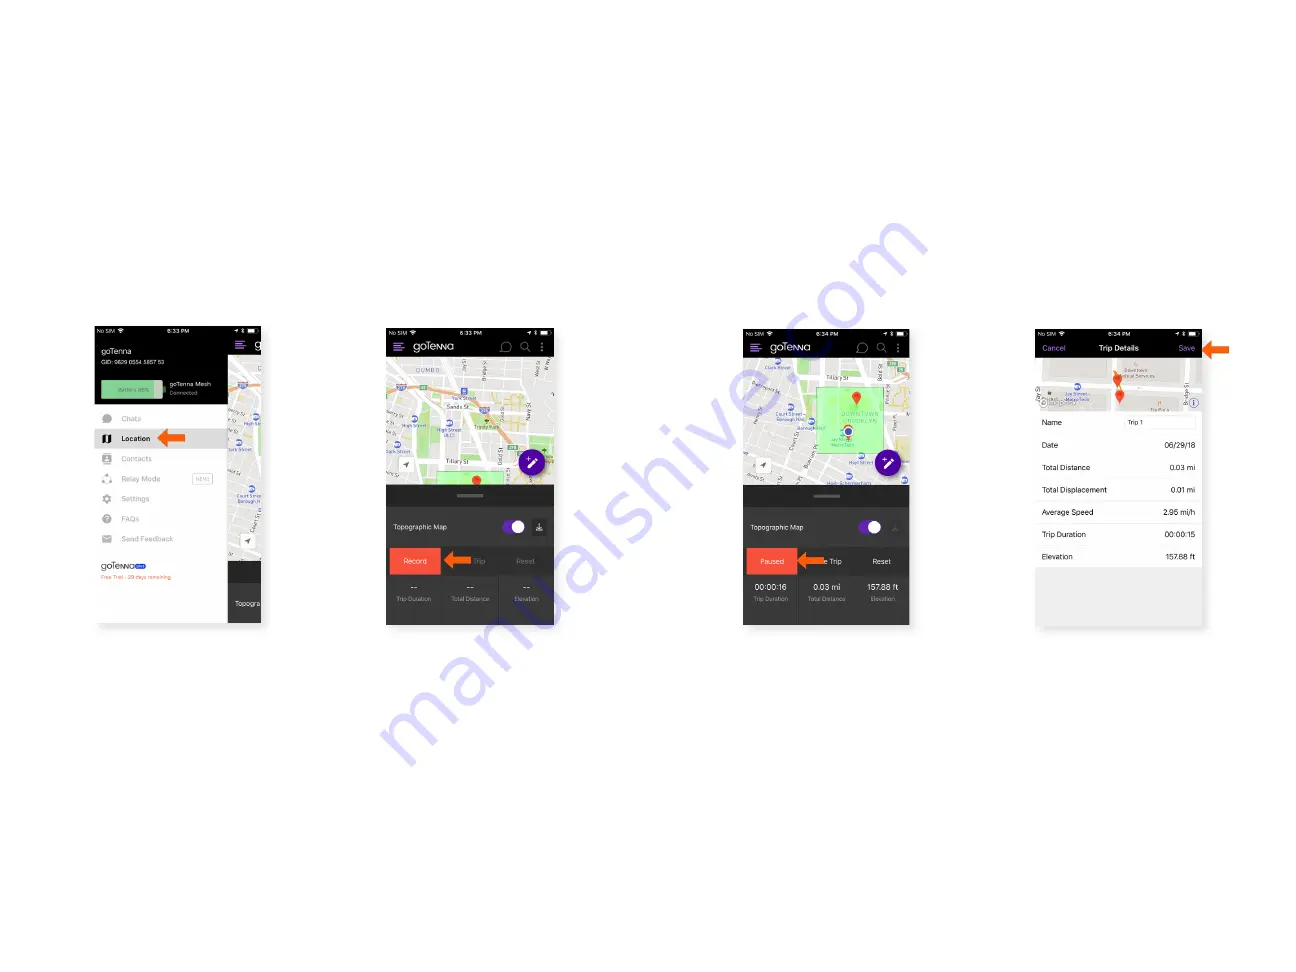
Trip Statistics

Enabling trip statistics will record your exact trip and 

document it along the way. Statistics visible at the bottom 

of the screen can be changed by the user. Options include: 

altitude, stopped time, moving time, distance, current 

speed, average speed and pace. Saving your trip will reveal 

all options on one summary page.

Select

 ‘Location’ 

from the 

Side Menu.

Swipe up on the black 

bottom bar. Tap 

‘Record’


to begin recording your trip. 

When recording, this button 

will show

 ‘Recording...’

.

Record Trip Statistics: 

Step 4

To pause recording, tap 

‘Recording...’.

 which will 

then show 

‘Paused

’. To 

reset your trip, tap 

‘Reset’

.

Step 5

To save your trip, tap 

‘Save’

.

Содержание Mesh 5.0

Страница 1: ...goTenna Mesh 5 0 User Manual ...

Страница 2: ...Emergency Beacon 18 Contacts Create a Contact 20 Mapping Location Download a Map 21 Delete a Downloaded Map 22 Find your Location 23 Create a Pin 24 Share your Location 25 Settings Settings 28 Confirm your goTenna Firmware is Up to Date 30 Pair your goTenna Mesh Device 31 Unpair your goTenna Mesh Device 32 Stationary Relay Mode 34 goTenna Plus Features Location Tethering 36 SMS Network Relay 38 Tr...

Страница 3: ...ting a network that gets stronger the more people join it In this manual you ll find information to help orient yourself with your goTenna Mesh You ll learn about the goTenna Mesh device how to set up and use the goTenna app and how your device works in conjunction with the app Welcome to the Mesh Network SILICONE ATTACHMENT STRAP MICRO USB CHARGING 1 WATT UHF RADIO FLASH MEMORY FOR 100S OF MESSAG...

Страница 4: ... 5 Step 6 Select Allow to allow goTenna to access your location You can download the goTenna app through the Apple App Store or the Google Play Store Access to WiFi or 4G LTE is required to download the app The first time you open the goTenna app you ll be prompted to create a goTenna account and pair your goTenna Mesh device Select Get Started If you have an Android device you can download the ap...

Страница 5: ...y through the goTenna app Select Next Hold down the power button until the white light turns on Select Pair to pair with your goTenna Mesh device Once your device pairs you are finished Select Finish On this page you have the option to download an offline map send a message or continue exploring the app Turn off nearby goTenna devices that haven t been paired In order to pair seamlessly you should...

Страница 6: ...e what settings you need to update on your first device If this does not work close the goTenna app reset your device s network settings then power your device off on Open the goTenna app and attempt setup again Place goTenna close to your phone to optimize initial connection strength The light will slowly pulse as goTenna awaits pairing If the light is off you ve paired goTenna to another phone o...

Страница 7: ...Mesh devices if the person you are trying to reach is not directly within range Step 1 Step 2 Select Chats from the side menu Choose an existing chat or create a new chat Step 3 Step 4 Select 1 to 1 Chat Select the intended recipient Step 7 Step 5 Step 6 Type your message Select the send button A green check mark shows it was successfully delivered Chat ...

Страница 8: ...p 1 Step 2 Step 3 Step 4 Step 5 Click the compose icon Select Group Chat Choose the contacts you want to include and select Create Group chat contacts must be within range and connected to a goTenna Mesh Step 6 Step 7 Step 8 Select Start Chatting Type your message Send your message Delivery confirmation is not supported for Group Chats Select Chats from the side menu ...

Страница 9: ...our message Delivery confirmation is not supported for Shout Chats Click the compose icon Emergency Chat transmits messages to all goTenna Mesh users within range These messages mesh through other goTenna Mesh devices to extend their range Only use Emergency Chat during emergencies Emergency Chat Step 2 Step 1 Step 3 Step 4 From the Settings menu select Emergency Settings Select Settings from the ...

Страница 10: ...ergency messages always travel 6 hops Tapping the power button on your device 5 times allows you to broadcast your Emergency Beacon You can customize the message in settings Only use Emergency Beacon during emergencies Step 2 Step 3 Step 4 From the Settings menu select Emergency Settings Select Emergency Beacon Setup Type your info and select Save Step 1 Select Settings from the side menu Emergenc...

Страница 11: ... a message request location auto accept location requests or block the user Contacts Mapping Location The goTenna app allows you to download free detailed maps of anywhere in the world that can be used entirely offline Maps must be downloaded first with WiFi or LTE Once the map is installed within the app you can use it 100 offline Download a Map Step 1 Step 2 Step 3 Select the download icon on th...

Страница 12: ...er Street Level Maps swipe left on the map you would like to delete and select Delete Step 1 Select Location from the side menu Step 4 Select Delete Map Find your Location Step 1 Step 2 Select Location from the side menu Tap the arrow icon in the lower left corner of the map Your location will be displayed by a blue dot ...

Страница 13: ...tively you can exit the screen by selecting the X icon at the bottom of the screen Share your Location Select Chats from the Side Menu Choose an existing chat in which you d like to share a location or create a new chat by clicking the compose icon at the bottom right corner of the screen Select the plus icon to the left of the text box Select Attach My Location or any of the location sharing opti...

Страница 14: ...26 27 Type a message if desired Select the send button Click on the location to view the map Step 5 Step 6 ...

Страница 15: ...ttings Downloaded Maps Saved Pins Units Saved Trips Sound Settings Sounds On Off Vibration On Off Sending Messages Tones Receiving Messages Tones SUPPORT About App Information App Version Build Number Install Date Source Device Information Battery Serial Firmware Installed Region Help FAQ Answers to questions regarding Messaging Maps Location Range Performance etc Privacy Policy Logout If you log ...

Страница 16: ...r firmware If you don t need to update you ll see the latest firmware version listed with no action button Step 2 Step 4 Step 3 Pair your goTenna Mesh Device Select Pair goTenna Select goTenna Mesh You should only attempt to pair one goTenna Mesh device at a time Turn your goTenna Mesh device on When the light is blinking on your goTenna Mesh device follow these steps goTenna Mesh will pair Step 1...

Страница 17: ...32 33 Step 1 Select Settings from the Side Menu Step 2 Step 3 Unpair your goTenna Mesh Device Select Unpair goTenna Select Unpair ...

Страница 18: ...quickly triple press the power button once again to confirm Stationary Relay Mode The light will blink 3 times then turn off To confirm Stationary Relay Mode is on at any point press the power button and the light will blink 3 times To deactivate Stationary Relay Mode 1 Press and hold the power button on your goTenna Mesh device for 5 seconds until the light turns off 2 Turn the goTenna Mesh devic...

Страница 19: ...to designated recipients The times are customizable upon setup Step 1 Step 2 Select Chats from the Side Menu Create a new chat or select the existing chat with the user you d like to location tether with Location Tethering Step 3 Step 4 Select the plus icon to the left of the text box Select Location Sharing Auto Share Step 5 From here you ll toggle location tethering on off Select the frequency e...

Страница 20: ...onfirmation with a green check mark and will appear in the user s text messaging application Step 1 Step 2 Open a chat message and send a message When the message is marked as Delivery unconfirmed select the orange exclamation point Send a Message via SMS Network Relay Step 3 Step 4 Select SMS Network Relay Your message will be sent via SMS You ll see a green check mark when the message is confirm...

Страница 21: ...me moving time distance current speed average speed and pace Saving your trip will reveal all options on one summary page Select Location from the Side Menu Swipe up on the black bottom bar Tap Record to begin recording your trip When recording this button will show Recording Record Trip Statistics Step 4 To pause recording tap Recording which will then show Paused To reset your trip tap Reset Ste...

Страница 22: ...42 Topographic Maps Step 1 Step 3 Step 2 Select Location from the Side Menu Toggle Topographic Map Here is the Topographic Map ...

Отзывы: