background image

OM-04386-04

February 8, 2008

Rev. B  07‐12‐19

GORMAN‐RUPP PUMPS

www.grpumps.com

2008 Gorman‐Rupp Pumps

Printed in U.S.A.

INSTALLATION, OPERATION,

AND MAINTENANCE MANUAL

ROTARY GEAR PUMPS


MODELS

GMS SERIES PUMPS

D, G, J, N & R SIZES

Содержание GHS 1 1/2 GF 32

Страница 1: ...04 February 8 2008 Rev B 07 12 19 GORMAN RUPP PUMPS www grpumps com 2008 Gorman Rupp Pumps Printed in U S A INSTALLATION OPERATION AND MAINTENANCE MANUAL ROTARY GEAR PUMPS MODELS GMS SERIES PUMPS D G J N R SIZES ...

Страница 2: ...erial number and e mail address required RECORD YOUR PUMP MODEL AND SERIAL NUMBER Please record your pump model and serial number in the spaces provided below Your Gorman Rupp distributor needs this information when you require parts or service Pump Model Serial Number ...

Страница 3: ...es PAGE B 5 V BELT TENSIONING PAGE B 5 General Rules of Tensioning PAGE B 5 Tension Measurement PAGE B 6 ELECTRICAL CONNECTIONS PAGE B 7 OPERATION SECTION C PAGE C 1 PUMP OPERATION PAGE C 1 PRE OPERATION PAGE C 1 Before Starting The Pump PAGE C 1 Checking Pump Rotation PAGE C 1 STARTING PAGE C 1 OPERATION PAGE C 2 Liquid Temperature PAGE C 2 Overheating PAGE C 2 Checking Gauges PAGE C 2 Strainer C...

Страница 4: ...EMBLY PAGE E 8 Cleaning and Inspection PAGE E 8 Bushing Preparation PAGE E 9 Housing Assembly 04 PAGE E 9 Backhead Kit 06 PAGE E 9 Rotor Shaft Assembly 03 PAGE E 9 Head Idler Kit 01 02 PAGE E 10 Seal Installation 05 PAGE E 10 Gland Installation 04N PAGE E 10 Foot Bracket Kit 08 PAGE E 10 SETTING END CLEARANCE PAGE E 10 RELIEF VALVE DISASSEMBLY PAGE E 11 RELIEF VALVE REASSEMBLY PAGE E 12 Relief Val...

Страница 5: ...c options may be used with water consult the factory If there are any questions regarding the pump or drive unit which are not covered in this manual or in other literature accompanying this unit please contact your Gorman Rupp distributor or the Gor man Rupp Company The Gorman Rupp Company P O Box 1217 Mansfield Ohio 44901 1217 Phone 419 755 1011 or Gorman Rupp of Canada Limited 70 Burwell Road S...

Страница 6: ...TRODUCTION RECORDING MODEL AND SERIAL NUMBERS Please record the pump model and serial number in the spaces provided below Your Gorman Rupp distributor needs this information when you require parts or service Pump Model Serial Number ...

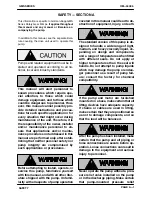
Страница 7: ...mpting to install operate or service this pump familiarize yourself with this manual and with all other liter ature shipped with the pump Unfamil iarity with all aspects of pump operation covered in this manual could lead to de struction of equipment injury or death The standard version of this pump is de signed to handle a wide range of light medium and heavy viscosity liquid de pending on design...

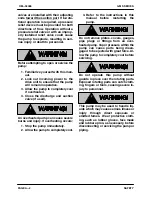
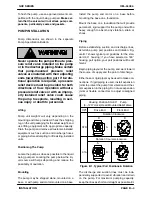
Страница 8: ...overheated pump can cause severe burns and injury If overheating occurs 1 Stop the pump immediately 2 Allow the pump to completely cool 3 Refer to the instructions in this manual before restarting the pump Do not remove plates covers gauges pipe plugs or fittings from an over heated pump Vapor pressure within the pump can cause parts being disen gaged to be ejected with great force Al low the pump...

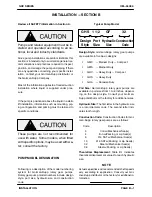
Страница 9: ...man Rupp rotary gear pumps Rotary gear pump model numbers include design style port size hydraulic size and construction code Typical Pump Model GHS 1 1 2 GF 32 Design Style Port Size Hydraulic Size Construction Code Design Style Gorman Rupp rotary gear pumps are available in five basic designs GMC Medium Duty Compact GMS Medium Duty GHC Heavy Duty Compact GHS Heavy Duty GHA Abrasive Duty Port Siz...

Страница 10: ...t flush the pump Ensure that the port plugs shipped with the pump remain in place until piping is installed to help prevent dust or other foreign objects from entering the pump b Pumps that will not be installed for an ex tended period should be stored indoors if possible The factory installed port plugs will not ensure protection from excessive humid ity splash water or rain In very humid or wet ...

Страница 11: ...ng pumped Locating the pump below the liq uid source will help self priming and reduce the possibility of cavitation Mounting The pump may be shipped alone mounted on a base or with pump and motor mounted on a base Install the pump and motor on a base before mounting the base on a foundation Mount the base on a foundation that will provide permanent rigid support for the pump and will be heavy eno...

Страница 12: ...f valves are not recommended for suction lines It is not recommended that a foot valve be installed at the end of the suction line If desired to install a foot valve consult the factory When handling very hot or cold liquids install a pressure relief valve in any part of the system that can be valved off or isolated this will protect piping against damage from liquid thermal expansion or contracti...

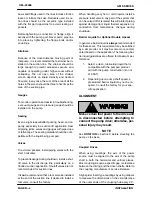
Страница 13: ...se a straightedge along the sides of the pulleys to ensure that they are properly aligned see Figure B 4 In drive sys tems using two or more belts make certain that the belts are a matched set unmatched sets will cause accelerated belt wear MISALIGNED SHAFTS NOT PARALLEL MISALIGNED SHAFTS NOT IN LINE ALIGNED SHAFTS PARALLEL AND SHEAVES IN LINE Figure B 4 V belt Alignment Tighten the belts in accor...

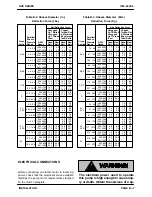
Страница 14: ...ection is C the smallest sheave diameter is 8 inches the pump speed is 1250 RPM and the belts are uncogged Yy T type then 11 5 lbs of force on the tensioner should show 1 2 inch 12 7 mm of deflection A tension tester is available as an option from Gor man Rupp P N 29513 001 Other tension test ers are available from your local belt sheave dis tributor and work on a similar principal To use the Gorm...

Страница 15: ...nge R P M Range Used Belt New Belt Used Belt New Belt Belt Deflection Force Uncogged Hy T Belts Uncogged Hy T Torque Team Cogged Torque Flex Machined Edge torque Team Belts A AX 75 90 1000 2500 2501 4000 1 7 1 3 2 5 1 9 1 9 1 5 2 8 2 3 91 120 1000 2500 2501 4000 2 0 1 7 3 1 2 6 2 3 2 0 3 4 2 9 125 175 1000 2500 2501 4000 2 4 2 1 3 6 3 2 2 6 2 3 4 3 3 4 B BX 85 105 860 2500 2501 4000 2 2 1 9 3 3 2 ...

Страница 16: ...proof motor in an explosive atmo sphere Install connect and operate the motor in accordance with The Na tional Electrical Code and all local codes If there is a conflict between the instructions in the manual accompany ing the unit and The National Electrical Code or the applicable local code The National or local code shall take prece dence ...

Страница 17: ...onsult the drive manufacturer s operating manu al before attempting to start the drive In a suction lift fill the pump housing with liquid to seal clearances and to lubricate Checking Pump Rotation Correct rotation of your pump is shown on the pump serial plate or direction arrow plate In applications with a single direction of flow and a single pump mounted pressure relief valve make certain that...

Страница 18: ...rature bushings as well as optional jackets which may be used to heat or cool the pump are available options for many models Overheating Overheating can occur if the pump is operated with valves in the suction or discharge lines closed Op erating against closed valves could bring the liquid to a boil build pressure and cause the pump to rupture or explode If overheating occurs stop the pump and al...

Страница 19: ...essure set at the factory must be changed see Table E 2 and instructions in Section E MAINTENANCE AND REPAIR Complete By pass Pressure Complete by pass pressure is the maximum pres sure the pump will see when all the pumped fluid is being by passed through the pressure relief valve This pressure will vary depending on the cracking pressure setting liquid viscosity and pump speed pump capacity To d...

Страница 20: ...losed suction line blocked foot valve jammed strainer blocked Liquid too viscous Lift too high Suction line undersized LOW READING Air leak in suction line End of suction line not submerged Pump parts worn or defective Pump needs priming ERRATIC READING Liquid overheated vaporizing Liquid entering intermittently suction air leak end of suction line not submerged Vibration from cavitation misalignm...

Страница 21: ...rainer valves and piping Air leak in suction line end of suction line not submerged foot valve blocked or jammed insufficient liquid in sump or tank Check vacuum gauge disassemble pump and replace faulty parts Relief valve pressure set too low Housing dry Add liquid to housing see OPERATION SECTION C Rotating parts worn or damaged im proper end clearance Replace defective parts see SETTING END CLE...

Страница 22: ...uired Add lubricant as needed Corrosive liquid Check local distributor or factory for parts compatibility with liquid check liq uid for contamination EXCESSIVE WEAR Exceeding operating limits Check performance data in Pump Speci fications Bulletin Insufficient end clearance See SETTING END CLEARANCE in Maintenance And Repair Section E Pump running dry Add liquid to prime See Operation Sec tion C c...

Страница 23: ...olerances within your rotary gear pump wear between rotating parts is normal and expected For new applications a first inspec tion at 250 hours will give insight into the wear rate for your particular application Subsequent inspec tions should be performed at regular intervals of 2000 hours Critical applications should be in spected more frequently Check the thrust washer idler bushing idler pin i...

Страница 24: ...parate document with this manual Below the pump model number on the Parts List is a grouping of several alpha numeric codes This code identifies the optional features of the pump Be sure to include this grouping along with the model number and serial number when ordering parts The sectional views cover disassembly and reassembly for the pump models shown be low Refer to the Parts List for your spe...

Страница 25: ...Relief Valve Also Available With 180 Ports And Or Head Jacket Backhead Jacket And Housing Mounted Relief Valve Coverplate Kit Replaces Either Relief Valve When Not Used NOTE Refer to Seal Appendix Section F for details of the seal assembly and related components 46166 311 Figure E 1 Typical GMS D G J And N Pump Models ...

Страница 26: ...04B FLANGED SHAFT BUSHING 04N GLAND 04R RETAINING RING C STUD D NUT P PIPE PLUG 05 SEAL RELATED COMPONENTS SEE SECTION F 05P GLAND GASKET 08 FOOT BRACKET KIT 08A FOOT BRACKET B CAPSCREW D NUT 10 RELIEF VALVE KIT 10A RELIEF VALVE ASSEMBLY 10AA VALVE BODY 10AB WARNING PLATE BM DRIVE SCREW B CAPSCREW O O RING NOT SHOWN 11 HEAD COVERPLATE KIT 11A COVERPLATE ASSEMBLY 11AA COVERPLATE 11AC WARNING PLATE ...

Страница 27: ...nted Relief Valve Also Available With 180 Ports And Or Head Jacket Backhead Jacket And Housing Mounted Relief Valve Coverplate Kit Replaces Either Relief Valve When Not Used NOTE Refer to Seal Appendix Section F for details of the seal assembly and related components 46166 313 Figure E 2 Typical GMS R Pump Model ...

Страница 28: ...4N GLAND 04R RETAINING RING C STUD D NUT P PIPE PLUG 05 SEAL RELATED COMPONENTS SEE SECTION F 05P GLAND GASKET 06 BACKHEAD ASSEMBLY 06A BACKHEAD 06B BACKHEAD GASKET 08 FOOT BRACKET KIT 08A FOOT BRACKET B CAPSCREW D NUT 10 RELIEF VALVE KIT 10A RELIEF VALVE ASSEMBLY 10AA VALVE BODY 10AB WARNING PLATE BM DRIVE SCREW B CAPSCREW O O RING NOT SHOWN 11 HEAD COVERPLATE KIT 11A COVERPLATE ASSEMBLY 11AA COV...

Страница 29: ...ention to those which could damage equipment and to those which could be dangerous to personnel How ever this manual cannot possibly pro vide detailed instructions and precau tions for each specific application or for every situation that might occur during maintenance of the unit Therefore it is the responsibility of the owner installer and or maintenance personnel to en sure that applications an...

Страница 30: ...ead 01A or in the housing 04A Remove and discard the O rings For relief valve maintenance see RELIEF VALVE DISASSEMBLY followed by RELIEF VALVE REASSEMBLY at the end of this section Foot Bracket Kit 08 R Size Only Remove the hardware B and D securing the foot bracket 08A to the head 01A and backhead 06A Head Idler Kit 01 02 Disengage the hardware B and separate the head jacket if so equipped and o...

Страница 31: ...e in a variety of configurations Check the Parts List furnished with your pump to identify the seal then refer to Seal Appendix Section F for removal of the seal and related components Housing Assembly 04 D G J N Sizes Only Figure E 1 Only NOTE The shaft bushing 04B may be damaged during removal Do not remove the shaft bushing unless replacement is required If your pump is equipped with a graphite...

Страница 32: ... fully seated against the bore shoulder Backhead 06 Figure E 2 Only Clean and inspect the backhead 06 with a cloth soaked in fresh cleaning solvent Replace the backhead if badly worn or damaged Most cleaning solvents are toxic and flammable Use them only in a well ven tilated area free from flame sparks and excessive heat Read and follow all pre cautions printed on solvent containers When installi...

Страница 33: ...01A until the groove in the head matches the groove in the housing Secure the head to the housing with the capscrews B Seal Installation 05 The seal assembly 05 is available in a variety of configurations Check the Parts List furnished with your pump to identify the seal then refer to Seal Appendix Section F for installation of the seal and related components Gland Installation 04N NOTE The seal a...

Страница 34: ...Based on Liquid Viscosity 35C 35D 35J 35L 35M Rotor Trims Feeler Gauge Reading Std Rotor Trims 0 000 0 002 0 003 0 006 0 007 0 010 0 011 0 014 0 015 0 018 1 0 015 1 0 006 2 0 015 2 0 015 2 0 015 1 0 006 2 0 015 1 0 006 2 0 015 2 0 006 Notes For Rotor Trim Codes Not Listed or for Special Applications Consult Your Local Gorman Rupp Distributor or the Factory Consult Pump Parts List For Rotor Trim Co...

Страница 35: ...all it in the groove on the bonnet 10AK Lightly oil the O ring 10AG and install it in the groove on the spring guide 10AH Start the large end of the spring guide into the bonnet 10AK and push the guide in until it bottoms out Insert the valve 10AD finned end first into the valve body 10AA Install the spring s 10AE and or 10AF Make certain that the spring 10AE fits over the spring guide 10AH and th...

Страница 36: ...ing Valve Opening Settings Denotes Factory Setting After adjustment tighten the jam nut D flush against the bonnet Place the optional warning tag 10AR between the bonnet and the cap 10AN Install the cap and tighten until fully seated against the bonnet Relief Valve 10 Installation If pump rotation is changed the position of the head mounted pressure relief valve 10A must also be changed The relief...

Страница 37: ...ON F ASSEMBLED VIEW 03A ROTOR SHAFT ASSY 04A HOUSING 04B FLG SHAFT BUSHING 04N MECH SEAL GLAND 04R SHAFT SNAP RING 05 MECH SEAL ASSY 05P GASKET C STUD D NUT N SHAFT KEY PARTS KEY 16708 4 Figure F 1 Standard Friction Drive And Optional 60A And 61J Mechanical Seals ...

Страница 38: ...arts with extreme caution to prevent damage Use care not to contami nate the precision finished faces even fin gerprints on the faces can shorten seal life If necessary to clean the faces use a clean cloth and wipe in a circular pattern Inspect the seal components for wear scoring grooves and other damage that might cause leak age If any components are worn replace the com plete seal never mix old...

Страница 39: ...PENDIX SEAL APPENDIX SECTION F 03A ROTOR SHAFT ASSY 04A HOUSING 04B FLG SHAFT BUSHING 04N LIP SEAL GLAND 05 LIP SEAL 05P GASKET 06F OIL HOLE COVER C STUD D NUT N SHAFT KEY PARTS KEY ASSEMBLED VIEW 16708 6 Figure F 2 Optional 65A Lip Seal ...

Страница 40: ...pump up to the rotor and shaft assembly 03A Clean the seal cavity and shaft with a cloth soaked in fresh cleaning solvent Most cleaning solvents are toxic and flammable Use them only in a well ven tilated area free from flame sparks and excessive heat Read and follow all pre cautions printed on solvent containers Lightly lubricate the I D of the gland 04N with oil Press the lip seals 05 into the g...

Страница 41: ...EAL APPENDIX SECTION F ASSEMBLED VIEW 03A ROTOR SHAFT ASSY 04A HOUSING 04B FLG SHAFT BUSHING 04N MECH SEAL GLAND 04R SHAFT SNAP RING 05 MECH SEAL ASSY 05P GASKET C STUD D NUT N SHAFT KEY PARTS KEY 16708 5 Figure F 3 Positive Drive Option 60D Seal ...

Страница 42: ...ts for wear scoring grooves and other damage that might cause leak age If any components are worn replace the com plete seal never mix old and new seal parts If a replacement seal is being used unwrap the mechanical seal components Check that the seal faces are clean undamaged and free if any foreign matter New seal assemblies may be equipped with spring holding clips for storage pur poses Do not ...

Страница 43: ...E F 7 SEAL APPENDIX SEAL APPENDIX SECTION F ASSEMBLED VIEW 03A ROTOR SHAFT ASSY 04A HOUSING 04B FLG SHAFT BUSHING 04N GLAND 05 PACKING KIT C STUD D NUT N SHAFT KEY PARTS KEY 16708 7 Figure F 4 Standard Packing Seal Option 65 ...

Страница 44: ...or or the factory However if bulk commercial packing will be used prepare and in stall it in accordance with the steps outlined below in order to ensure that the packing will form a tight seal Figure F 4A Step 1 Determine how much bulk packing will be required to fill the seal cavity and wrap it around a rod the same diameter as the shaft With the pack ing wrapped around the rod cut through each t...

Страница 45: ...e back of the housing 04A Remove the dowel from the gland bore Carefully slide the assembled gland and packing rings onto the shaft until the packing rings seat against the back shoulder on the housing 04A Install the nuts D and tighten them alternately un til the gland begins to compress the packing rings Do not over tighten the gland nuts They should be tight enough to hold the packing in place ...

Страница 46: ...To identify the appropriate 5 digit family number refer to the Parts List accompanying the pump The last 3 digits completing the part number are based on the hydraulic size of the pump Example Model GMS1 1 2GC3 If the Parts List ac companying the pump indicates that it is equipped with Viton O rings family group 25154 then the Coverplate Relief Valve O ring Item 10C would be Part Number 25154 029 ...

Страница 47: ...For Warranty Information Please Visit www grpumps com warranty or call U S 419 755 1280 Canada 519 631 2870 International 1 419 755 1352 GORMAN RUPP PUMPS ...

Отзывы: