background image

74

75

/ Battery

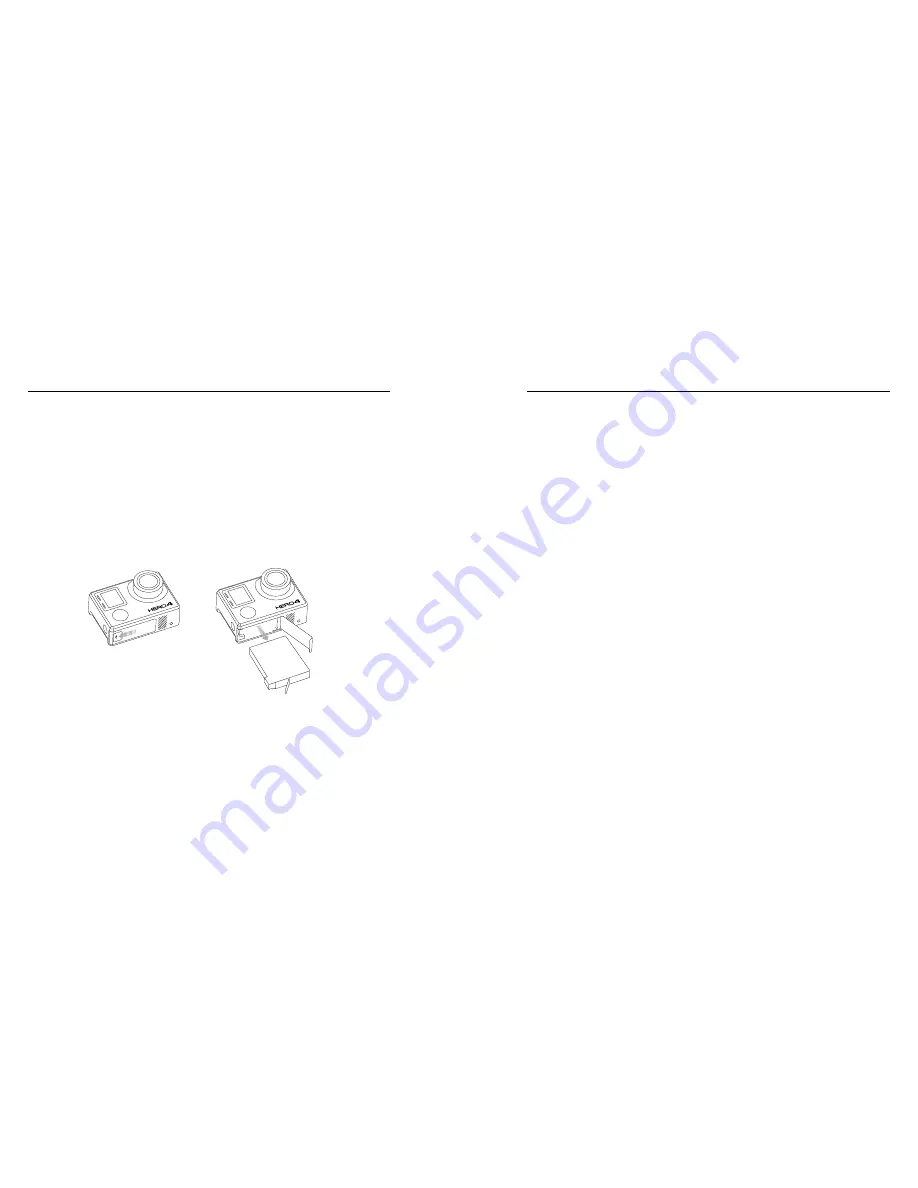
REMOVING THE BATTERY FROM THE CAMERA


The HERO4 Silver battery is designed to have a tight fit to maximize 
reliability in high-vibration activities.

To Remove the Battery:

1. Open the battery door by placing your thumb in the indentation in 

the battery door (on the bottom of the camera) and sliding it to the 
left. Allow the door to open.

2. Grasp the battery pull-tab and remove the battery from the camera.

BATTERY STORAGE AND HANDLING 

The camera contains sensitive components, including the battery. 
Avoid exposing your camera and battery to very cold or very hot 
temperatures. Low or high temperature conditions may temporarily 
shorten the battery life or cause the camera to temporarily stop working 
properly. Avoid dramatic changes in temperature or humidity when 
using the camera, as condensation may form on or within the camera.

The camera housing protects the camera and battery from water 
damage. For more information, see 

Camera Housing

. Do not turn 

on your camera if it is wet. If your camera is already on, turn it 
off and remove the battery immediately. Allow the camera to dry 
thoroughly before using it again. Do not dry the camera or battery 
with an external heat source such as a microwave oven or hair dryer. 
Damage to the camera or battery caused by contact with liquid is not 
covered under the warranty.

Do not store your battery with metal objects, such as coins, keys 
or necklaces. If the battery terminals come in contact with metal 
objects, this may cause a fire.

/ Battery

Содержание Hero4 Silver

Страница 1: ...USER MANUAL...

Страница 2: ...ngue rendez vous sur gopro com support Wenn Sie dieses Benutzerhandbuch in einer anderen Sprache herunterladen m chten besuchen Sie gopro com support Per scaricare questo manuale utente in un altra li...

Страница 3: ...6 Getting Started 8 Camera Displays 14 Camera Icons 18 Camera Menus 20 Camera Modes 22 Navigating Settings Menus 23 Video Mode 25 Photo Mode 36 Multi Shot Mode 43 Playback Mode 52 Setup Mode 56 Conne...

Страница 4: ...he Basics 1 Camera Status Light red 2 Shutter Select Button 3 Wireless Status Light blue 4 Camera Status Screen 5 Power Mode Button 6 Micro HDMI Port cable not included 7 microSD Card Slot microSD car...

Страница 5: ...O TIP With the Dual Battery Charger you can charge your battery outside of the camera For details visit gopro com For more battery information see Battery WARNING Use caution when using your GoPro as...

Страница 6: ...press and hold for Time Lapse photos Press again to stop recording and power off the camera For details see QuikCapture in Setup Mode Getting Started CAMERA SOFTWARE UPDATES To get the latest features...

Страница 7: ...ranges INSERTING REMOVING MICROSD CARDS The HERO4 Silver camera is compatible with 4GB 8GB 16GB 32GB and 64GB capacity microSD microSDHC and microSDXC memory cards sold separately You must use a micr...

Страница 8: ...reless 8 Battery Life Note The icons that appear on the camera status screen vary by mode TOUCH DISPLAY The integrated touch display on the back of the camera lets you control your camera and its sett...

Страница 9: ...e through settings lists p Tap Press hold Swipe up down Swipe from top bottom Swipe from left edge Tap Select an item turn a setting on off Swipe up down hold Swipe down Swipe Down from Top Edge Close...

Страница 10: ...Field of View Frames Per Second Interval ISO Limit LEDs Looping Megapixels Multi Shot Mode Night Lapse Night Photo On Screen Display Orientation Photo Mode Playback Mode Protune QuikCapture Rate Setu...

Страница 11: ...20 21 Camera Menus Camera Menus Camera Reset...

Страница 12: ...an navigate the settings menus using the touch display or the buttons on the camera TO NAVIGATE WITH THE TOUCH DISPLAY 1 Verify that the camera is in the desired camera mode If an icon for that mode d...

Страница 13: ...ious screen or exit the settings menu press the Settings Tag button Navigating Settings Menus Video Mode Video mode contains three capture modes Video Video Photo and Video Looping Capture Mode Descri...

Страница 14: ...memory card is full or the battery is out of power your camera automatically stops recording Your video is saved before the camera powers off PRO TIP When the camera is off and QuikCapture is enabled...

Страница 15: ...ontent can be overwritten during loop recording When viewing this content on a computer you see separate files for each time segment Use GoPro software to combine the files into a longer video VIDEO S...

Страница 16: ...24 24 Ultra Wide Medium Narrow 1920x1080 16 9 1080p SuperView 60 50 48 48 30 25 24 24 Ultra Wide 1920x1080 16 9 960p 100 100 60 50 Ultra Wide 1280x960 4 3 Video Mode Video Mode Video Resolution NTSC P...

Страница 17: ...ions 1080p SuperView SuperView delivers the world s most immersive field of view Recommended for body or gear mounted shots More vertical 4 3 content is automatically stretched to full screen 16 9 for...

Страница 18: ...setting are on default and off SPOT METER Spot Meter lets you film from a dark space while pointing the camera into a brighter setting such as when recording the outdoors from within a car When Spot...

Страница 19: ...right Shutter setting for the situation For details see Shutter in Photo Settings Photo Mode CAPTURING A SINGLE OR NIGHT PHOTO 1 Swipe left to display the camera modes and then tap the middle icon in...

Страница 20: ...er Select button The counter on the camera status screen increases by one for every photo captured PRO TIP While capturing video you can manually take a photo at any time by pressing the Power Mode bu...

Страница 21: ...mplete darkness Photo Mode INTERVAL Interval applies only to Continuous photo Available intervals are 3 default 5 or 10 photos every second MEGAPIXELS The HERO4 Silver captures photos at 12MP 7MP or 5...

Страница 22: ...e To adjust this setting for video capture adjust the setting in Video mode To adjust this setting for multi shot capture adjust the setting in Multi Shot mode Multi Shot Mode Multi Shot mode contains...

Страница 23: ...es and then tap the upper right icon Multi Shot mode b Swipe up to open the settings menu c Tap Mode and then tap the desired capture mode Time Lapse or Night Lapse d Swipe down to close the settings...

Страница 24: ...ngs Menus PRO TIP To open the settings menu for the current mode swipe up on the touch display or press the Settings Tag button Multi Shot Mode Rate applies only to Burst Photos can be captured at the...

Страница 25: ...NTERVAL Interval applies only to Time Lapse and Night Lapse Interval determines the amount of time that passes between each captured frame Time Lapse Intervals Available intervals for Time Lapse range...

Страница 26: ...hile pointing the camera into a brighter setting such as when recording the outdoors from within a car When Spot Meter is turned on appears on the camera status screen The options for this setting are...

Страница 27: ...s 3 Tap a video or photo to open it in full screen view 4 For video tap 5 To return to the thumbnails screen tap 6 To exit Playback mode swipe down and then tap Playback Mode To Play Back Content When...

Страница 28: ...ontent with GoPro software PLAYING BACK VIDEOS AND PHOTOS ON YOUR TV Playing back videos and photos on your TV HDTV requires a micro HDMI composite or combo cable all sold separately To Play Back Cont...

Страница 29: ...amera powered on press and hold the Settings Tag button Two seconds later press and release the Power Mode button Release the Settings Tag button From the Wi Fi reset menu select Reset The default pas...

Страница 30: ...f ORIENTATION If you mount your camera upside down you might have to rotate the files during editing This setting eliminates the need to flip your video or photos after recording Setting Description U...

Страница 31: ...owers on and begins capturing Time Lapse photos To Stop Recording Press and release the Shutter Select button to stop recording and power off the camera Setup Mode LEDS This setting determines which c...

Страница 32: ...n you connect your camera to the GoPro App or GoPro software This setting lets you manually set the date and time If the battery is removed from the camera for an extended period of time you must rese...

Страница 33: ...TIP If the camera is powered on and ready to capture videos or photos you can press and hold the Settings Tag button for two seconds to turn Wireless on off You can also do this when the camera is pow...

Страница 34: ...etting for photo capture adjust the settings in Photo mode To adjust this setting for multi shot capture adjust the settings in Multi Shot mode PROTUNE The options for this setting are off default and...

Страница 35: ...ibility in post production Due to its long curve Flat captures more details in shadows and highlights Protune ISO LIMIT ISO Limit adjusts the camera s sensitivity in low light environments and creates...

Страница 36: ...photo Medium Moderately sharp video or photo Low Softer video or photo Protune EXPOSURE VALUE COMPENSATION EV COMP Exposure Value Compensation affects the brightness of your video or photo Adjusting...

Страница 37: ...he camera in a warm place prior to use Shooting at higher frame rates and resolutions and shooting with Protune turned on increase power consumption PRO TIP QuikCapture helps maximize battery life For...

Страница 38: ...the battery life or cause the camera to temporarily stop working properly Avoid dramatic changes in temperature or humidity when using the camera as condensation may form on or within the camera The...

Страница 39: ...e at call2recycle org or call 1 800 BATTERY in North America to find a convenient recycling location Never dispose of a battery in a fire because it may explode WARNING Do not drop disassemble open cr...

Страница 40: ...se it again Your camera was designed to identify conditions of overheating and is designed to respond accordingly Camera Housing ASSEMBLING THE CAMERA HOUSING To Remove the Camera From the Housing 1 L...

Страница 41: ...tandard Backdoor Skeleton Backdoor and Touch Backdoor The Standard Backdoor makes the housing waterproof to 131 40m Use this door when you need to protect the camera from water dirt sand and other env...

Страница 42: ...MERA Therubbersealthatlinesthecamerahousingformsawaterproofbarrier that protects your HERO4 Silver in wet and underwater conditions Keep the camera housing s rubber seal clean A single hair or grain o...

Страница 43: ...w 72 hours for complete adhesion Adhesive mounts must be mounted only on smooth surfaces Porous or textured surfaces do not enable a proper bond When applying the mount firmly press it into place and...

Страница 44: ...N T POWER ON Make sure your GoPro is charged To charge your camera use the included USB cable and a computer You can also use the GoPro Wall or Auto Charger MY GOPRO WON T RESPOND WHEN I PRESS A BUTTO...

Страница 45: ...less password I POWERED OFF MY GOPRO BUT THE BLUE LIGHTS ARE STILL BLINKING The blue lights indicate that Wireless is on With your camera powered off press and hold the Settings Tag button for four se...

Отзывы: