background image


FIG.1 


ASSEMBLY INSTRUCTION:   


1.PREPARATION: 


A. Before assembling make sure that you will have enough space around the item. 

B. Use the present tooling for assembling. 

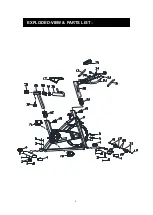
C. Before assembling please check whether all needed parts are available (at the above 

of this instruction sheet you will find an explosion drawing with all single parts (marked 

with numbers) which this item consists of. 


2.ASSEMBLY INSTRUCTION: 


FIG.2 

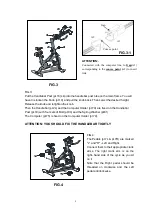
FIG.2: 

Put the Vertical Seat Post (pt.15) slip 

into the seat post tube on the Main 

Frame. You will have to slacken the 

Knob (pt.10) and pull the knob back. 

Then select the desired height. Release 

the knob and retighten the knob. Then 

put the Seat Post (pt.16) slip into the 

Vertical Seat Post (pt.15), use the Knob 

(pt.10) to lock. 

Finally,the  Seat  (pt.17)  fixed  on  the 

Seat  Post  (pt.16)  as  shown,  and  lock 

the nuts under the seat. 


FIG.1: 

Lock  the  Front  Stabilizer  (pt.8)  to  the 

Main  Frame  (pt.9)  with  two  sets  of  Ø8 

Flat  Washer  (pt.5),  M8  Domed  Nut 

(pt.6) and M8*67 Carriage Bolt (pt.3).   

Lock  the  Rear  Stabilizer  (pt.2)  to  the 

Main  Frame  (pt.9)  with  two  sets  of  Ø8 

Flat  Washer  (pt.5),  M8  Domed  Nut 

(pt.6) and M8*67 Carriage Bolt (pt.3). 

Lock the Protection Cover (pt.23) to the 

Main  Frame  (pt.9)  with  two  Screws 

(pt.25)


Содержание SP36126

Страница 1: ...USER S MANUAL Exercise bike SP36126...

Страница 2: ...pain or any other abnormal symptoms STOP the workout at once CONSULT A PHYSICIAN IMMEDIATELY 4 Before beginning training remove all within a radius of 2 meters from the machine DO NOT place any sharp...

Страница 3: ...Remove drops of sweat from the machine immediately after finishing training 13 Always wear appropriate workout clothing when exercising Running or aerobic shoes are also required 14 Before exercising...

Страница 4: ...4 EXPLODED VIEW PARTS LIST...

Страница 5: ...5...

Страница 6: ...B T 5780 2000 M8 40 20 WHEEL 2 69X26 21 LOCK NUT 6 GB T 889 1 2000 M8 22 BEARING 1 2 6004ZZ 23 PROTECTION COVER 1 170 4 115 109 9 24 HANDLE BAR 1 WEDLING 25 SCREW 8 GB T 15856 1 2002 ST4 2X19 26 OUTER...

Страница 7: ...PRING 2 1 1 8X40 60 FIXING NUT 4 1 16 2 16 2 8 M10 61 SPRING 1 1 1 0X55 62 FLAT WASHER 4 1 16 6 t2 5 63 DOMED NUT 2 1 GB T 802 1988 M6 64 SPRING COVER 1 32 23 2 65 SPRING3 1 2 2 66 BLOCK 1 200 47 30 6...

Страница 8: ...Frame You will have to slacken the Knob pt 10 and pull the knob back Then select the desired height Release the knob and retighten the knob Then put the Seat Post pt 16 slip into the Vertical Seat Po...

Страница 9: ...pt 80 and the Spring Washer pt 81 The Computer pt 75 is fixed on the Computer Holder pt 79 ATTENTION YOU SHOULD FIX THE HANDLEBAR TIGHTLY FIG 4 The Pedals pt 7L pt 7R are marked L and R Left and Righ...

Страница 10: ...right To decrease resistance requiring less strength to pedla turn the Emergency Brake Resistance Control Knob pt 56 to the left B The Emergency Brake Function The Emergency Brake Resistance Control K...

Страница 11: ...lide the handlebar post along the housing on the main frame to the desired height and with the holes aligned correctly tighten the spring adjusting knob and then the secondary knob EXERCISE INSTRUCTIO...

Страница 12: ...d to have the resistance set quite high This will put more strain on our leg muscles and may mean you cannot train for as long as you would like If you are also trying to improve your fitness you need...

Страница 13: ...ou could kindly do so like below February 24 2018 Great product so far Fast delivery easy setup and working without any issues Great products so far With your inspiring rating Costway will be more con...

Отзывы: