background image

Shenzhen Gooxi Hengyu Technology Co., Ltd
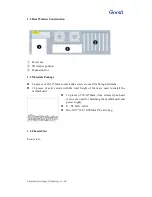
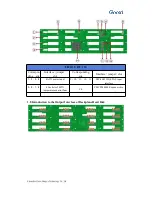
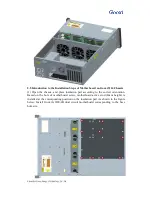
RMC3116-BPE-12G

Correspon

ding site

Interface / jumper /

slot

Corresponding

site

Interface / jumper / slot

1、2、3、4

4 ATX power input

9

10

11

12

13

SFF-8643 12Gb SAS input

interface

5、6、7、8

4 Sockets of 4PIN

temperature control fans

14

PMC PM8044 Expander chip

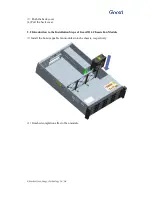
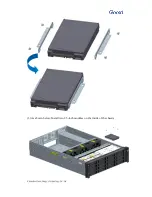
1.8 Introduction to the Output Interface of Backplane Hard Disk

Содержание RMC3116-670-HSE

Страница 1: ...ai RMC3116 670 HSE User Manual Version 1 0...

Страница 2: ...Shenzhen Gooxi Hengyu Technology Co Ltd Content Manual Structure Foreword Chapter 1 Chassis Overview Chapter 2 Easy Installation Instruction Chapter 3 Chassis Parameters...

Страница 3: ...ocuses on the quality and content Gooxi RMC3116 670 HSE server chassis uses imported first class SGCC galvanized steel and possessed with the characteristics of fingerprint resistance corrosion resist...

Страница 4: ...i Hengyu Technology Co Ltd Chapter 1 Chassis Overview 1 1 Chassis Structure 1 Top cover 2 Rear window 3 Front cover 4 Fan 5 Hard disk module 6 Power supply 7 3 5 inch hard disk box 8 Left side ear 9 R...

Страница 5: ...eces of 6 32 5mm countersunk screws are used for fixing hard disks 10 pieces of active studs with the total height of 8mm are used to install the motherboard 16 pieces of 6 32 6mm cross recessed pan h...

Страница 6: ...Shenzhen Gooxi Hengyu Technology Co Ltd Rear view 1 5 Related Indicators of Chassis Panel...

Страница 7: ...O label labeling or customized acrylic label The green light is on The device is on Reset The button is used to restart the server The green light flashes The system is running normally The yellow lig...

Страница 8: ...lt LED Status LED Hard disk at site ON OFF OFF Hard disk activity Flash 4Hz s OFF OFF Hard disk location ON Flash 4Hz s OFF Hard disk fault ON OFF ON RAID reconstruction ON OFF Flash 1Hz s 1 7 Brief I...

Страница 9: ...terface jumper slot Corresponding site Interface jumper slot 1 2 3 4 4 ATX power input 9 10 11 12 13 SFF 8643 12Gb SAS input interface 5 6 7 8 4 Sockets of 4PIN temperature control fans 14 PMC PM8044...

Страница 10: ...Gooxi Hengyu Technology Co Ltd Chapter 2 Easy Installation Instruction 2 1 Introduction to the Disassemble Steps of Gooxi 3116 Chassis Cover Unscrew the top cover screws Press the button of chassis ba...

Страница 11: ...o Ltd Push the back cover 4 Pull the back cover 2 2 Introduction to the Installation Steps of Gooxi3116 Chassis Fan Module Install the hot swappable fan modules into the chassis respectively 1 Finishe...

Страница 12: ...Shenzhen Gooxi Hengyu Technology Co Ltd 2 Finished completion effect of the last three fan modules...

Страница 13: ...Shenzhen Gooxi Hengyu Technology Co Ltd 2 3 Introduction to the Insert and Plug Steps of Gooxi3116 Chassis Hard Disk Press the button to pull out the hard disk from the hard disk site...

Страница 14: ...en Gooxi Hengyu Technology Co Ltd 2 Install the 3 5 inch hard drive to the hard drive bracket according to screw holes as shown in the figure below 3 The installed hard disk is shown in the following...

Страница 15: ...disk to the chassis and close the switch As shown in the following figure 2 4 Introduction to the Installation Steps of Gooxi3116 Chassis Power Supply 1 Place the power supply case to the chassis acc...

Страница 16: ...Shenzhen Gooxi Hengyu Technology Co Ltd 2 Fix the power supply bracket and screw on the screws at the position marked in the figure below...

Страница 17: ...Shenzhen Gooxi Hengyu Technology Co Ltd 3 Insert the hot swappable power modules PSU1 and PSU2 respectively 4 The final installation effect of power supply...

Страница 18: ...the chassis and place insulation pad according to the correct orientation Based on the hole of motherboard screw motherboard active stud 8mm height is installed at the corresponding position on the i...

Страница 19: ...stalled place the motherboard into the chassis and fasten motherboard screw at the hole site As shown in the figure below 2 6 Introduction to the Installation Steps of Built in 2 5 inch Hard Drive on...

Страница 20: ...Shenzhen Gooxi Hengyu Technology Co Ltd 3 As shown below Install two 2 5 inch modules on the inside of the chassis...

Страница 21: ...effect of two built in hard disks 2 7 Introduction to the Installation Steps of Rear Hot swappable 2 5 inch Hard Drive on Gooxi3116 Chassis 1 Replace the rear window of CRPS power supply case the rear...

Страница 22: ...Shenzhen Gooxi Hengyu Technology Co Ltd 2 Completed installation effect 3 Install two 2 5 inch hard disks on the hard disk box...

Страница 23: ...Shenzhen Gooxi Hengyu Technology Co Ltd 4 Insert two 2 5 inch hard drives into the rear hard disk module respectively 5 The completed installation effect is as follows...

Страница 24: ...ects two optional 2 5 inch hot swappable hard drives then Gooxi type CRPS power must be equipped with Chapter 3 Chassis Parameters Basic Parameters Chassis style Rack mount Chassis structure 3U Applic...

Страница 25: ...resonance between the fan and hard disk without affecting the reading and writing speed of hard disks Cooling system 12038 fans of three brands are standard configuration Windshield Support Intellige...

Отзывы: