Goodmans GTVL26W26HDF Скачать руководство пользователя страница 8

English

- 5 -

Before Switching On Your TV

Power Connection

IMPORTANT:

The TV set is designed to operate on

230-240V AC, 50 Hz.

• After unpacking, allow the TV set to reach the ambi-

ent room temperature before you connect the set to
the mains.

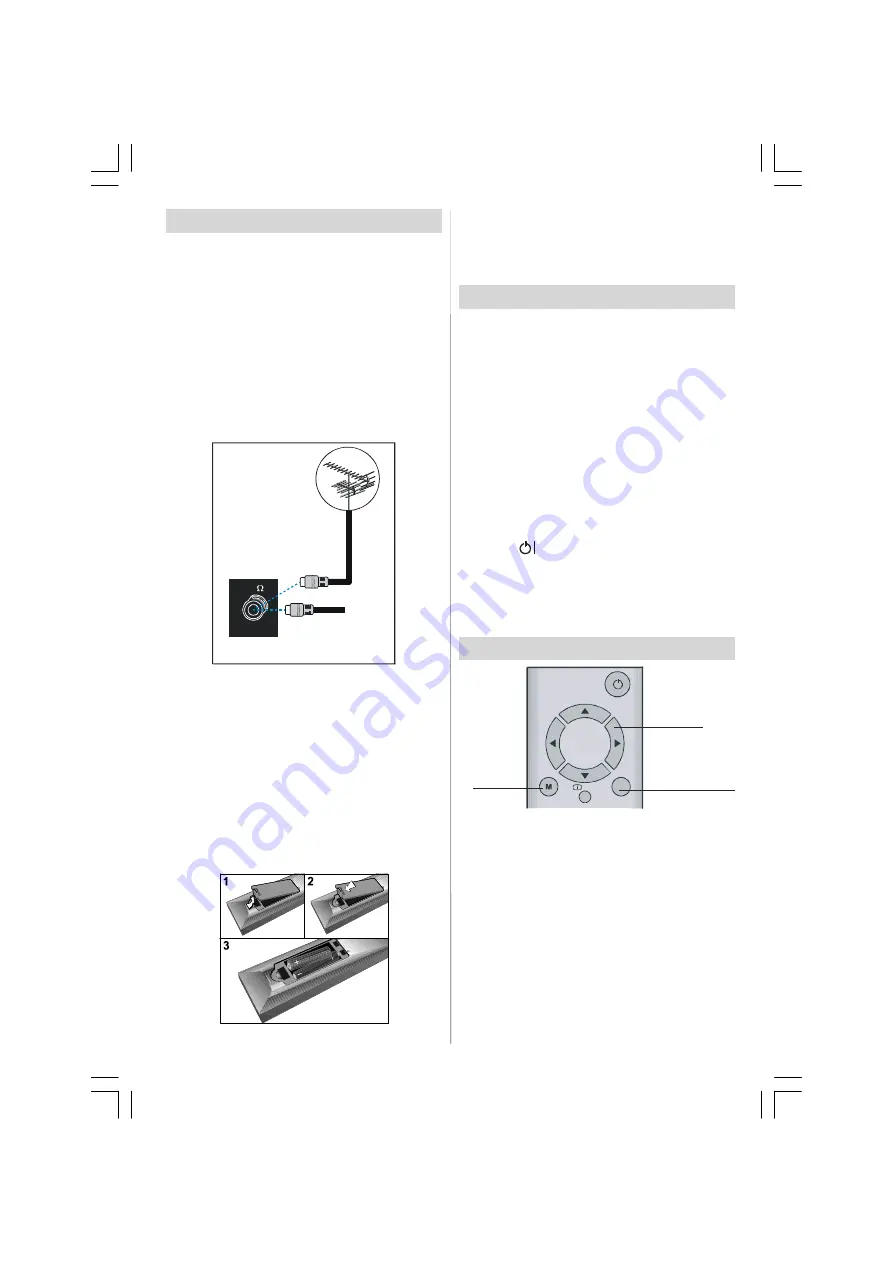
Connections To The Aerial Input Socket

• Connect the aerial or cable TV plug to the Aerial input

socket located at the rear of the TV and connect the
cable plug coming out from the TV out socket lo-
cated on the devices (VCR, DVB etc.) to this socket
as well.

VHF/UHF

75

REAR OF THE TV

CABLE TV

Inserting Batteries In The Remote
Control Handset

WARNING :

Remote control is battery included. A plas-

tic protector is used to disconnect the batteries in
order to prevent the battery life from reducing. Please
remove the plastic protector before the first use.

• Remove the battery cover located on the back of the

handset by gently pulling backwards from the indi-
cated part.

• Insert two

AAA/R03

or equivalent type batteries

inside. Place the batteries in the right directions and
replace the battery cover.

Note: Remove the battery from remote control hand-
set when it is not to be used for a long period. Other-
wise it can be damaged due to any leakage of bat-
tery.

Switching The TV ON/OFF

To switch the TV on:

Your TV will switch on in two steps:

1-

Connect the power supply cord to the system.

Press Power On/Off button.Then the TV switches
itself to stand-by mode (Optional).

2-

To switch on the TV from stand-by mode either:

Press a digit button on the remote control so that a
programme number is selected, or Press the "

-P/CH

"

or "P/CH+

" button on the TV or press the

“P+”

or

“P-”

button on the remote control, so that last mode switched
off is selected.

By either method the TV will switch on.

To switch the TV off:

• Press the “

(stand-by)” button on the remote control

or On/Off switch on the TV, so the TV will switch to
stand-by mode.

To power down the TV completely, press Power On/Off
button or unplug the power cord from the mains socket.

Navigating the Menu System

OK

SELECT

INFO

For displaying

menu options

For navigation

To confirm choices

1-

Press

“M”

to display the menu.

2-

Press “

” or “

” button to select an icon. Press

” for more options.

3-

Use “

” or “

” button to highlight.

4-

Press “

” or “

” buttons to change the settings.

5-

To exit the menu or return from sub-menu screen,

press

“M”

.

These explanations are available for the navigation
of the whole Menu System. To select options that are
explained in the following parts, refer to “Navigating
The Menu System”.

Note: Except for Install menu, other menu options will
be automatically stored when an adjustment is set.

ENG-26770W-1602UK-26 INCH 17MB22 UK IDTV-(WO VGA-WO PIP)-50103428.p65

30.03.2007, 13:45

5

Содержание GTVL26W26HDF

Страница 1: ...Goodmans LCD Colour Television Model GTVL26W26HDF Product Information Helpline 0871 230 1777 User Guide GOODMANS KAPAK 50103428 p65 30 03 2007 15 52 1...

Страница 2: ...BOX CONTENTS 26 LCD TELEVISION REMOTE CONTROL WARRANTYCARD INSTRUCTION BOOKLET BATTERY x 2 3 YEARS INSURANCE PLAN GOODMANS KAPAK 50103428 p65 30 03 2007 15 52 2...

Страница 3: ...GOODMANS KAPAK 50103428 p65 30 03 2007 15 52 3...

Страница 4: ...sic Operations 7 Everyday Operation 7 IDTV Menu System 9 Analogue TV Menu System 15 Other Features 20 Teletext 21 Connect Peripheral Equipment 22 Tips 23 Specifications 23 Appendix A Aerial Connection...

Страница 5: ...function Update No function GUIDE IndexPage Reveal WIDE Expand Image size Mix No function Teletext Time Subpage RED Page Down GREEN PageUp Mute I II Mono Stereo Dual A B Volume Down P CH Programme Do...

Страница 6: ...k cover are in tended for ventilation and to ensure reliable opera tion To prevent overheating these openings must not be blocked or covered in anyway 6 Heat and Flames The set should not be placed ne...

Страница 7: ...old cathode fluoresant lamp in LCD PANEL con tains a small amount of mercury please follow lo cal ordinates or regulations for disposal The mains plug is used to disconnect the TV from the mains and t...

Страница 8: ...witch the TV on Your TV will switch on in two steps 1 Connect the power supply cord to the system Press Power On Off button Then the TV switches itself to stand by mode Optional 2 To switch on the TV...

Страница 9: ...channel search appears on the screen TV switches to the analogue TV mode Yes Do you want to search for analogue channels No To seach for analogue channels select Yes The menu below is displayed to se...

Страница 10: ...conds Press directly the programme number to reselect single digit programmes Everyday Operation Pressing the TV DTV button at any time while watch ing television programmes will switch the TV set be...

Страница 11: ...their first pop song I More Change Day Navigate Change Time With RED GREEN buttons you can change sched ule time By pressing YELLOW BLUE you can ad vance the schedule backward forward of a day If you...

Страница 12: ...to do this you need to setAutomatic Down load to Enabled in Receiver Upgrade setting For de tails see page 13 Widescreen Depending on the type of broadcast being transmitted programmes can be viewed i...

Страница 13: ...e item by pressing or button Press the SELECT to activate rename feature SELECT i SELECT CHANNEL LIST 1 BBC ONE 1 BBC ONE 2 BBC TWO 3 ITV 8 4 Channel 4 5 BBC THREE 6 Teletext 7 BBC FOUR 8 Sky Travel 9...

Страница 14: ...hannels First Time Installation Automatic Search Manual Search AutomaticSearch Automatic search is started by pressing the OK but ton in the auto search pop up menu All the services are searched and a...

Страница 15: ...Menu Channel List Installation Configuration Timers Language TV Setup Common Interface The various configuration functions are displayed in a list along with a quarter screen image of the currently se...

Страница 16: ...tton and acti vated via pressing the SELECT button After Search for New Version is activated the IDTV tunes to each frequency that have been stored in its database and looks for the new software Softw...

Страница 17: ...h the digit buttons on the remote control in 24 hour format The frequency mode determines how often the receiver operates this event and is set with the or button to be either Once Daily or Weekly If...

Страница 18: ...V to the mains supply switch on and then wait for few moments until the card is activated Some CAMs may require the following set up Please set the CAM by entering the IDTV menu Common Interface then...

Страница 19: ...nge the level of the balance Balance level can be adjusted between 32 and 32 Headphone By pressing button select Headphone Press button to enter hedphone menu volume By pressing button select Volume P...

Страница 20: ...alogue TV source as well If this source is set to digital mode connected de vice displays digital source In order to avail this function EXT 2 Output should be set to TV DTV Blue Background You can se...

Страница 21: ...Delete To delete a programme press the YELLOW button Pressing the YELLOW button again erases the se lected programme from the programme list and the programmes below shift one up APS Auto Programming...

Страница 22: ...ed will be displayed on the screen Install menu in AV modes The following screen appears in the install menu INSTALL Colour System VCR Store Colour System By pressing select Colour System By press ing...

Страница 23: ...signal or the signal from an external device the TV automatically changes the ZOOM mode according to the WSS signal When the AUTO mode does not function correctly due to poor WSS signal quality or whe...

Страница 24: ...ill be displayed on screen after pressing button If the programme does not have teletext transmission no information will be displayed When button is pressed while in teletext mode the screen will be...

Страница 25: ...ou may attain a better dis play resolution TV And Video Recorder Connect the aerial cables Better picture quality can be obtained if you also con nect a Scart cable to SCART sockets Playback NTSC Conn...

Страница 26: ...sult your dealer No Picture means that your TV is not receiving a transmission Have you selected the correct button on the remote control Try once more Sound You can not hear any sound Did you perhaps...

Страница 27: ...IDEO IN IN OUT IN OUT HEADPHONE AUDIO VIDEO SATELLITE RECEIVER ANTENNA CAMCORDER VHF UHF 75 Round 75 ohm coaxial cable Rear of TV Outdoor Aerial Connection Appendix A Aerial Connection ENG 26770W 1602...

Страница 28: ...y blend if the two peripherals are used at the same time Thus these two are not to be used at the same time S VHS Input Video Input Audio Inputs s Audio Line Outs s Headphone Power Cord Input Power On...

Страница 29: ...st be connected to the terminal which is marked with the letter E or by the earth symbol or coloured green or green and yellow The wire which is coloured blue or black must be connected to the termina...

Отзывы: