background image

   Do not use old and new batteries together.
   Do not use different types of batteries (for 
   example, Manganese and Alkaline batteries) 
   together.
   Note that there are chargeable and non-
   chargeable batteries.  Do not attempt to charge 
   non-chargeable batteries.
   Remove the batteries from the remote control 
   unit if you do not intend to use the unit for a long 
   time.

   Do not drop the remote control unit.
   Do not subject the remote control unit to 
   physical shocks.
   Keep the remote control unit dry.  Wetting it may 
   cause the unit to malfunction.
   Replace the batteries with new ones when 
   operation of the unit deteriorates.

 Precautions when using batteries


 NOTE: 

1

2

To turn the TV power OFF

Press the Standby button to switch the TV set 
to Standby Mode., then disconnect the power 
plug from the wall outlet. 


To turn the TV power ON

connect the DC plug of the AC-DC adaptor to 
the DC 12V socket at the back of the TV set. 
Connect the adaptor main cord to the wall 
outlet, the power indicator turns red and the TV 
set is in Standby Mode. In  Standby Mode, if 
Standby button is pressed  the power indicator 
will change to green. It takes a few seconds 
before the picture appears.


Operating the TV

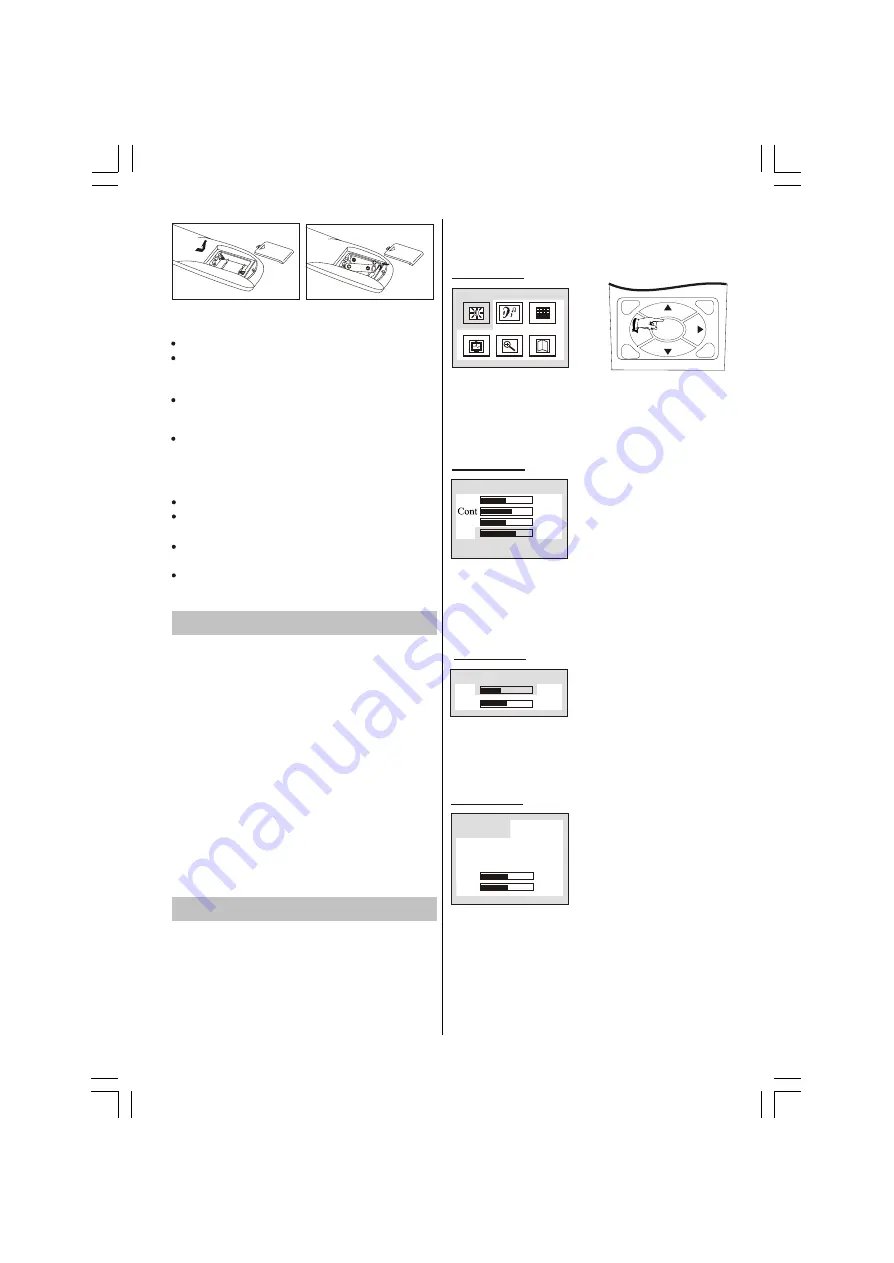
Press MENU button to enter main menu. In the 
main menu select submenu using PROG+/- 
buttons and enter the submenu using the OK
button .To understand the use of the menus,
refer to the menu system section.


This TV set allows the adjustment of any settings 
by selecting from the menu screens.

 Press this button to display main menu, including Picture, 
Sound, Setup, Tune, VGA setup and Exit items. You can 
select them by pressing the PROG+/- or VOL+/- buttons, 
and enter the submenu press the OK button.The 
selected item will change to highlight colour.

Menu button

Picture 

   
MENU

VOL

VOL

PROG

PROG

 P.M.

 OK

 MUTE

 S.

SYS

Picture menu

Picture 
Bri

Col
Shp

48

50
2

60

PICTURE menu by pressing VOL+/- or OK button.
Enter Picture menu, you can select brightness, 
Contrast, Colour, Sharpness and Hue(in NTSC 
system) items by pressing PROG+/- buttons. You 
can adjust the item selected by pressing VOL+/-.

Sound menu

Sound
Vol
Bal

35
50

Press MENU button to 
enter the main menu. In the 
main menu, select SOUND 
by using PROG+/- or

 VOL+/-buttons,then enter the SOUND menu by 
pressing OK button.
Enter the Sound menu, you can adjust Volume and 
Balance by pressing VOL+/-.  

Enter this menu, you can select Input Select 
,Language, Aspect ,Factory Reset, Hpos and Vpos  
items by pressing PROG+/- buttons. You can adjust 
the horizontal and vertical position of  OSD on the  
screen by pressing VOL+/- buttons, or enter the 
submenu including the Input Select menu, 

Setup menu

Setup
Input select

Hpos
Vpos

32
50

Factory Reset

Language          
Aspect               

Press MENU button to 
enter the main menu. In the 
main menu, select SETUP 
by using PROG+/- or 
VOL+/- buttons,then enter 
the SETUP menu.

Switching the TV ON/OFF  

Press MENU button to 
enter the main menu. In 
the main menu, select 
PICTURE by using 
PROG+/- or VOL+/- 
buttons, then enter the

-11- 

Содержание GLCD17W2DVD

Страница 1: ...GLCD17W2DVD LCD DVD Combo...

Страница 2: ...17 LCD DVD Combo...

Страница 3: ...ns lead of this apparatus may not correspond with the coloured markings identifying the terminals in your plug proceed as followings The wire which is coloured green and yellow must be connected to th...

Страница 4: ...Select menu 12 Tunemenu 12 PC MODE 12 Installation 12 VGASET menu 12 13 Teletext Operations 13 Peripheral Equipment Connections 14 PC Sound Connection 14 Via the Scart Sockets 14 ViaAnt Input 14 FOR D...

Страница 5: ...4 15 18 19 21 43 42 40 39 37 36 34 32 31 30 29 28 25 24 23 3 10 17 16 20 41 38 35 22 26 1 2 3 8 12 13 14 15 27 28 29 30 37 9 1 1 FOR TV BUTTONS Power ON Standby Display Sleep 0 9 Direct Program TV AV...

Страница 6: ...5 6 7 8 9 11 12 13 14 15 18 19 21 43 42 40 39 37 36 32 31 30 29 28 25 24 23 3 10 17 16 20 41 38 35 22 26 4 5 6 7 10 16 17 18 19 20 21 22 23 24 25 26 27 31 32 34 35 36 38 39 40 41 1 27 L R LEFT RIGHT...

Страница 7: ...Location of controls 7...

Страница 8: ...VOL Button 10 Power Switch 11 Power Indicator 12 Speakers 4 4 5 5 6 6 7 7 8 8 9 9 10 10 12 12 1 1 2 2 3 3 12 12 11 11 1 1 1 The CD contents must be in front NOTE Precautions when connecting to other e...

Страница 9: ...d never apply an AC mains to the TV directly The AC DC adaptor operates on an AC mains supply the voltage is as indicated on the label of the AC DC adaptor Connect the DC plug of the AC DC adaptor to...

Страница 10: ...TV REAL PANEL 100 240V 10...

Страница 11: ...ystem section This TV set allows the adjustment of any settings by selecting from the menu screens Press this button to display main menu including Picture Sound Setup Tune VGA setup and Exit items Y...

Страница 12: ...increase the frequency 6 Auto Search Press OK button to start search program automatically from V L to UFH the searched program will be stored automatically in order of reception 7 Sound SYS You can s...

Страница 13: ...ong the following Teletext Operations Several languages are supported for teletext by this TV set and are divided into three language groups Press this button to select the teletext language Press thi...

Страница 14: ...oming playback 3 way repeat playback Numeric selection 24 bit 96kHz audio D A converter Playback Features Basic Operation Press EJECT button to load or eject the disc Hold the disc without touching ei...

Страница 15: ...mode Press this button to magnify picture and use direction buttons to select the required part of the zoomed picture This player can magnify a picture upto 3 times Title button DVD disc Press TITLE...

Страница 16: ...JPEG pictures in the current directory forever and ever Sixteen slideshow transition modes are provided use PROGRAM button to select mode 1 wipe top mode 2 wipe bottom mode 3 wipe left mode 4 wipe rig...

Страница 17: ...DUAL MONO Reproduction mode used only when the input consists of two independent audio channels 1 1 mode Possible selections are STEREO Reproduce both channels as is L MONO Reproduce the left channel...

Страница 18: ...igital signals Incorporating a new video compression technology MPEG II and high density recording technology DVD enables esthetically pleasing full motion video to be recorded over long periods of ti...

Страница 19: ...h th e la b e l s id e u p C h e c k th e b a tt e ri e s a re in s ta ll e d p ro p e rl y P o in t th e re m o te c o n tr o l u n it a t th e re m o te c o n tr o l s e n s o r T h e d is ta n c e...

Страница 20: ...K p ro b a b ly s ta ti o n tr o u b le C h e c k a e ri a l c o n n e c ti o n s o n b a c k o f s e t C h e c k a e ri a l fo r b ro k e n w ir e s R e o ri e n t a e ri a l i f in d o o r ty p e P...

Страница 21: ...ingbone pattern and partial picture loss can result from the operation of diathermy equipment from a nearby doctor s surgery or hospital SNOW Weak TV signals from long distant stations result in an in...

Страница 22: ......

Отзывы: