background image

GHDD1785DVBT User Guide 

13 

Using the PVR 

The PVR comes with an easy to use on screen display (OSD) which allows you to access all the PVR's 
functions with the remote control. 

Navigating the OSD 

Most of the OSD functions are controlled by the following keys on the remote control: 

Up/Down arrow keys 


Move one item up or down 


Move one channel up or down 

Left/Right arrow keys   

Move one item left or right 


Change the setting of a configurable item 

OK key  


Confirm the current action 

Exit key  


Abort the current action 


Close the active OSD window 

Colour keys 

Functions differ depending on the current OSD window, please see the I-Bar 

at the bottom of the screen for details 

i-key 


Show help guide for OSD (where available) 

Number keys   


Switch to a specific channel 


Enter number values for timers 


Enter letters for channel and recordings´ names as follows: 


1- abc 


2- def 

3- ghi 

4- jkl 

5- mno 

6- pqr 

7- stu 

8- vwx 

9- yz 

0-   + - * / ! 

Содержание GHDD1785DVBT

Страница 1: ...GHDD1785DVBT Twin Freeview Tuner Digital Tapeless Video Recorder User Guide www goodmans co uk ...

Страница 2: ......

Страница 3: ... 14 I Bar Record Playback I Bar 15 Channel list 16 Favourites 17 Guides EPG 18 List Schedule 18 Now Next 19 Timers 20 Recording Playback 21 Timeshift 22 Recordings list 22 Setting the audio volume 23 Configuration 24 Settings 24 Parental settings 26 Front panel settings 27 Receiver upgrade 28 Language 29 Installation 30 Automatic search 30 Manual search 31 Troubleshooting 32 Technical Specificatio...

Страница 4: ...GHDD1785DVBT User Guide 4 Quick Guide Connecting to a TV set ...

Страница 5: ...tures Safety is Important To ensure your safety and the safety of others please ensure you read the Safety Instructions before you operate this product Keep this information in a safe place for future reference Safety Considerations Position the cables so that they cannot be walked on or pinched by items placed on or against them Do not use the PVR in humid or damp conditions for example in a bath...

Страница 6: ...power consumption please switch the PVR to standby when not in use If you will not be using the PVR for a long period of time we recommend unplugging it from the mains outlet This symbol indicates that the PVR is double insulated and does not require an earth connection This symbol indicates that the PVR is for indoor use only This symbol indicates that the PVR conforms to CE regulations Environme...

Страница 7: ...ing items PVR Remote Control AAA batteries SCART to SCART cable for PVR to SCART input connector on TV set User Guide This publication If any of these items are damaged or missing please contact the place where the PVR was purchased Identification of Parts Remote Control v 6 7 Activity LED 1 4 2 3 5 8 9 10 11 12 13 14 15 16 17 18 19 20 21 22 23 24 25 26 27 ...

Страница 8: ...ording the current channel Press repeatedly to set record duration Whilst viewing the EPG set a timer to record the currently highlighted programme 15 Play Display the previous recording list Commence playback 16 Pause Pause playback Enter timeshift mode for details see page 22 17 Rewind Search backwards rewind at high speed 18 Stop Stop playback recording 19 Fast Forward Search forwards fast forw...

Страница 9: ...on the remote control unit The last four keys functions change what is shown on screen On Off Switches the PVR on or off Menu Open close OSD menu Left Up Press once to move the cursor up when viewing a menu press while holding down the menu button to use a left cursor key with a menu option highlighted Right Down Press once to move the cursor down when viewing a menu press while holding down the m...

Страница 10: ...a RCA phono cable 4 Video OUT RCA phono connect to an external video device via RCA phono cable 5 Digital Audio OUT RCA phono connect to an external audio device e g surround decoder via RCA phono cable Please note at present surround sound is not broadcast on freeview 6 Digital Audio OUT Coaxial connect to an external audio device via coaxial cable 7 VCR SCART SCART connect to VCR DVD Recorder 8 ...

Страница 11: ... PVR The following diagram shows typical configurations only and may differ slightly to your existing external equipment If you are unsure on how to connect to your PVR always consult your manufacturer s user guide supplied with your equipment ...

Страница 12: ... that is supplied with your TV The First Time Installation dialogue will be shown on the screen Use the left right arrow keys on the remote control to select the type of TV connected to the PVR and press OK confirm the setting The PVR will then ask you to start an automatic channel search which will check for available channels and update the channel list accordingly Press OK to start the automati...

Страница 13: ...wn Left Right arrow keys Move one item left or right Change the setting of a configurable item OK key Confirm the current action Exit key Abort the current action Close the active OSD window Colour keys Functions differ depending on the current OSD window please see the I Bar at the bottom of the screen for details i key Show help guide for OSD where available Number keys Switch to a specific chan...

Страница 14: ...is shown on screen press the red colour key to access this service Use the arrow and colour keys to navigate through the service Changing channels There are several ways to change channels 1 Use the up down arrow keys or the P keys to advance one channel up or down 2 Enter a channel number with the number keys Each number can be composed of up to 3 digits 3 Use the Swap key to change back and fort...

Страница 15: ...e It also displays a horizontal bar indicating signal strength as well as the title and schedule for the current and following event Pressing the yellow or blue colour keys displays a detailed description for the events This event information may not be provided by every channel If a recording is being made the i key will also display the record playback I Bar additionally at the top of the screen...

Страница 16: ...nnel by accident perform a channel search to add it to the list again Edit a channel name by selecting it and then choosing Edit Name from the function tabs using the left right cursor keys Press OK to open the editing window Use the left right cursor keys to select the letter to be changed Use the up down cursor keys or the numerical keys to change the letter Press OK to store the entered name Lo...

Страница 17: ...by pressing Exit 5 Now press the Menu key to bring up the OSD menu 6 Select Settings and then Configuration in order to bring up the configuration screen 7 Select the item Favourite Mode and use the left right arrow keys to change the setting to the list number that has been created Change the setting to off in order to deactivate the favourites list and view all channels Press OK to confirm the s...

Страница 18: ...ys to advance one day forward or backward The currently selected day is shown next to the time period above the programme information A reminder or timer for a future programme can be directly set from this list Press right to move into the list of programmes Using up down move to the required programme of choice and press either OK to set a reminder a small clock will appear by the programme name...

Страница 19: ...ear if the unit finds another programme with the same name in the guide to warn you that this may be a split programme However it is not guaranteed that it will find all ocourances Now Next The now next EPG provides information about the current event on the selected channel containing the event s title running time and a short description The channel list shows the current and the following event...

Страница 20: ...wn arrow keys 3 Press OK to open the timer dialogue window 4 Select the channel using the left and right cursor button 5 Select the start time option using the up down cursor keys Enter the time to start the timer using the numerical buttons 24 hours format Repeat to set the end time and the options 6 Select the mode as follows using the left right cursor keys Once Create a timer for a single even...

Страница 21: ... shown in the display on the front panel to the right of the channel being viewed and also the record I Bar will be shown when the i key is shown The main tuner can then be controlled as normal and the second tuner will continue to record in the background on the channel selected when the record button was pressed allowing you to watch a different channel to the one being recorded Playback Mode Th...

Страница 22: ...t is ahead of the current position Press play to resume watching the programme The fast forward and rewind keys can also be used to move forward or backward in the part of the programme that has been recording during timeshift If the number display reaches 00 00 00 the live TV broadcast has been caught up Recordings list The recordings list is library of all the records that have been created with...

Страница 23: ...ame Press OK to store the newly entered name To delete a file simply select the file using the up down cursor keys and press the yellow coloured key A pop up will shown asking to confirm this action before the recording is actually deleted To lock a recording press the blue button and then the PIN code if requested Once locked the PIN code will have to be entered before the recording can be viewed...

Страница 24: ...ey on the remote control Select the settings menu using the up down cursor keys and press OK This opens the setting menu Settings Select Configuration from the menu using the up down cursor keys and press OK This opens up the following menu In order to change a setting use the cursor keys up down to select it and left right to change its value See below for a list of all possible settings ...

Страница 25: ...ets RGB normally gives a better picture however some TVs especially older ones cannot display RGB pictures If this is the case select CVBS Please check with the instruction manual for the connected TV to see if it can display RGB signals Favourite Mode Off List 1 List 2 List 3 List 4 List 5 Set to the favourites list to be used or set to off to use the full channel list See chapter Favourites for ...

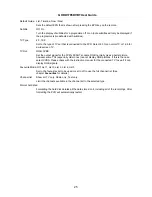
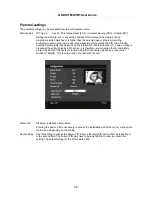
Страница 26: ... that is broadcast If no age or rating is broadcast the unit will display all channels it is therefore recommended that to completely protect the box that channels are locked using the channel list please see channel list section for details This is normal and not a fault with the unit Menu lock Disabled Installation Main Menu Entering the device PIN is necessary to access the installation part of...

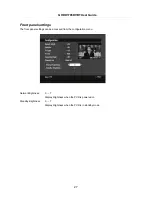
Страница 27: ...ront panel settings The front panel settings can be accessed from the configuration menu Normal Brightness 0 7 Display brightness when the PVR is powered on Standby Brightness 0 7 Display brightness when the PVR is in standby mode ...

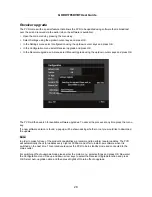
Страница 28: ...available software upgrades To cancel the process at any time press the menu key If a new software version is found a pop up will be shown asking whether or not you would like to download the update Note In order to make full use of the product s capabilities we recommend to perform regular updates The PVR will automatically check for updates every night at 03 00am and offer to install new softwar...

Страница 29: ...ge is fixed to English Preferred English German French Italian Spanish Welsh Gaelic Sets the preferred language for audio and subtitles If a programme offers this language it will be automatically used Current English Welsh if available Gaelic if available Sets the language for the current programme without changing the preferred language ...

Страница 30: ...me Installation will delete your channel list and reset every menu setting to its factory default Automatic search We recommend using the automatic search if several channels in your channel list are no longer being broadcast or if more than one or two new channels have become available The automatic search will create a new channel list out of all available channels and replace the previous chann...

Страница 31: ...d therefore this is only designed for more advanced users Use the number keys to enter a channel number and press OK to start the search The manual search can also be aborted by pressing the menu key On this page there are also signal guides that can be used to tell how good the reception is for the selected channel The signal level will show how strong the reception is for the selected channel nu...

Страница 32: ...r facility or an equally qualified specialist Any electronical device is possibly susceptible to errors However not every error represents a defect Very often the cause for errors are faulty cables connector cables sockets or errors in connecting the device The following list should solve more of the common problems that can occur If the problem is not listed below please contact Goodmans Website ...

Страница 33: ...atic channel search see page 27 SCART connector not fully plugged in Check SCART connector No reception of channels that were previously available Channel is no longer broadcast None Remote control is not working Obstacle between remote control and receiver Remove obstacle Flat battery Replace batteries Certain stations cannot be received from time to time Some services are not transmitted 24 hour...

Страница 34: ...o VCR SCART out CVBS Audio o VCR SCART in pass to TV SCART CVBS Audio o Switching signal at PIN8 0 6 12 V at PIN16 0 1 3 V Loop Through of RF signals STB mode functionality DVB terrestrial TV reception Integrated Hard Disk Drive for Recording and Playback support PVR functionality MHEG support Electronic Program Guide EPG PVR mode functionality Time shift recording One Touch Recording Timer progra...

Отзывы: