background image

15

D

VD+R/R

W


Rec

ord

er

RW

Getting Star

ted

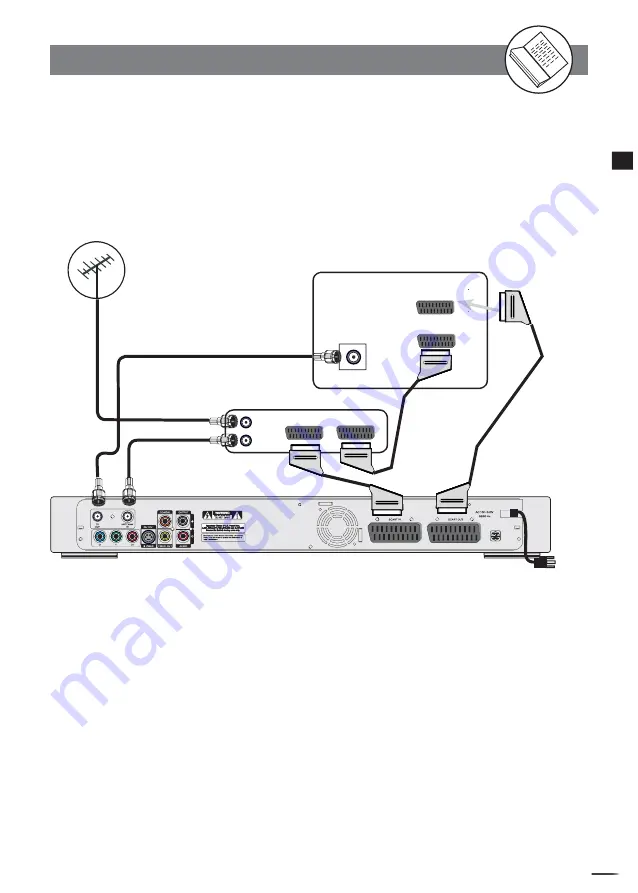
Connecting External Equipment

Connecting to a SKY Box


 Turn the power off to your TV / Recorder before making any connections.

60-178-C0206 XA

Aerial In

TV

301R


Scart Cable

 (supplied)

21-pin Scart (DVD) to 21-pin 

Scart (TV)

Aerial Lead

(not supplied)

TV

Aerial

RF Loop through 

Aerial Cable

(supplied)

SCART 1

AV1

AV2

SCART 2

SKY Box

RF Loop through 

Aerial Cable

Scart Cable

Scart Cable

Содержание GDVD301R

Страница 1: ...GDVD301R Digital Versatile Disc Recorder with Remote Control User Guide 82 178 00110 Goodmans product information helpline 0870 873 0080 ...

Страница 2: ...portant Safety Instructions 7 Precautions 8 About This Manual 9 How to Proceed in This Manual 9 Package Contents 10 Parts and Controls 11 Front View 11 Rear View 11 Remote Control 12 The Remote Control 13 Connecting External Equipment 14 Connecting to a TV 14 Connecting to a SKY Box 15 Connecting to a TV Using S Video Cable 16 Connecting to a TV Using Component Video Cable 17 Connecting to an AV A...

Страница 3: ...ting 54 Fine Tune Setting 55 Programme Swap Setting 55 Erase Programme Setting 55 4 2 Record Disc Setup 56 Record Quality Setting 56 Auto Chapter Setting 57 Disc Info Setting 58 Finalise Setting 59 Make Compatible Setting 59 Protect Disc Setting 60 Erase Format Setting 60 4 3 Video Setup 61 TV Type Setting 61 TV System Setting 62 Subtitle Setting 62 Video Output Setting 63 4 4 System Setup 64 RATI...

Страница 4: ...plug should be connected as shown in the diagram The colours of the wires in the mains lead of the unit may not correspond with the coloured markings identifying the terminals in your plug Connect them as follows The wire which is coloured blue must be connected to the terminal which is marked with the letter N or coloured black The wire which is coloured brown must be connected to the terminal wh...

Страница 5: ...tore your DVDs in a cool area to avoid damage from heat Important Notes For safety reasons do not remove any covers or attempt to gain access to the inside of the product Refer any servicing to qualified personal Do not attempt to remove any screws or open the casing of the unit there are no user serviceable parts inside refer all servicing to qualified service personal CAUTION CAUTION RISK OF ELE...

Страница 6: ...ing or discomfort in the ears indicates that the volume is maybe too loud Once your have established a comfortable listening level DO NOT INCREASE THE SOUND LEVEL FURTHER The following list of typical sound levels may assist you in recognising just how loud you have set the volume level DECIBEL Level dB Example 30dB Quiet library soft whisper 40dB Living room fridge freezer bedroom away from traff...

Страница 7: ...also North Korea Mongolia 6 China Never make or change connections with the power switched on CAUTION VISIBLE AND INVISBLE LASER RADIATION WHEN OPEN AVOID EXPOSURE TO BEAM WARNING LOCA TION INSIDE ON LASER COVER SHIELD This product incorporates copyright protection technology that is protected by method claims of certain U S patents and other intellectual prop erty rights owned by Macrovision Corp...

Страница 8: ... of this unit is dangerous and may cause serious damage to the unit Do not at tempt to disassemble the unit Do not put any foreign object on the disc tray Keep away from water magnet Keep the unit away from flower vases tubs sinks etc If liquids are spilled into the unit serious dam age could occur Never bring a magnet or magnetized object near the unit Stacking Place the unit in a horizontal posi...

Страница 9: ...or external damage If the discs are self burn self copy or are non original we can not guarantee that they will be playable How to Proceed in This Manual Using the DVD recorder and its features may be confusing at first Please follow the order below to help you get through the important stages of getting set up so you can start using your DVD recorder as soon as possible 1 Check the contents of th...

Страница 10: ...e connections and menu setups you can start to play DVD DVD R DVD RW DVD R DVD RW JEPG photo CD Video CD MP3 or CD discs with the recorder Refer to section of Chapter 2 1 DVD Playback or Chapter 3 1 Audio CD Playback 7 Benefit all the available features You can obtain all the benefits from advance features given by this recorder Refer to section of Chapter 2 4 Other Functions in the manual Package...

Страница 11: ...t RCA Vide Out Cr Y Cb Out S Video Out Coaxial Digital Out 60 178 C0206 XA TV Aerial Input TV Aerial Out 21 pin Scart In Socket 21 pin Scart Out Socket Parts and Controls STANDBY ON button S VIDEO input SOURCE button RECORD button L AUDIO R input VIDEO input STOP button PLAY button DV In Input ...

Страница 12: ...Y ENTER button Cursor buttons RETURN button DISC INFO button EDIT button STOP button SLOW button F FWD button F BWD button REPEAT A B button REPEAT 1 ALL button PROGRAM button GOTO button TITLE button ZOOM button ANGLE button Remote Control Parts and Controls continued NOTE If you encounter some difficulties while operating this recorder press Help Help button to obtain some useful tips such as DI...

Страница 13: ...allation of batteries We recommend the use of Alkaline batteries Using The Remote Control To use the remote control point it at the front of the DVD player towards the sensor situated to the right of the DVD drawer The remote control has a range of up to 6 metres from the DVD player and at an angle of up to 60 degrees Do not block the path of the beam from the remote control to the DVD player Note...

Страница 14: ... of the above mentioned options 1 or 2 to connect the recorder to your TV otherwise it will cause picture interference 60 178 C0206 XA VIDEO INPUT L R IN Option 1 RCA Audio Video cable supplied TV 301R Option 2 Scart Cable supplied 21 Pin Scart DVD to 21 Pin Scart TV White Red Yellow White Red Yellow Existing Outdoor Aerial Aerial Input RF Loop through Aerial cable supplied Scart In ...

Страница 15: ...our TV Recorder before making any connections 60 178 C0206 XA Aerial In TV 301R S c a r t C a b l e s u p p l i e d 2 1 p i n S c a r t D V D t o 2 1 p i n S c a r t T V Aerial Lead not supplied TV Aerial RF Loop through Aerial Cable supplied SCART 1 AV1 AV2 SCART 2 SKY Box RF Loop through Aerial Cable Scart Cable Scart Cable ...

Страница 16: ...o Input connect this DVD Recorder s S Video socket to your TV s S Video In socket this will provide a better viewing result on TV Make sure to set Video Output Settings to S Video from VIDEO Setup Screen Connecting External Equipment IN TV S VIDEO Existing Outdoor Aerial S Video Cable supplied Aerial Input RF Loop through Aerial cable supplied 301R ...

Страница 17: ...Y Cb sockets to your TV s Cr Y Cb In sockets this will obtain the best viewing result Make sure to set Video Output Settings to RCA Component from VIDEO Setup Screen Connecting External Equipment Cr 301R Y Cb IN TV Red Green Blue Existing Outdoor Aerial Component Video Cable supplied RF Loop through Aerial cable supplied Aerial Input 60 178 C0206 XA Red Green Blue ...

Страница 18: ...r or an AV amplifier for models that support built in decoding if the disc was recorded in Dolby Digital format Connecting External Equipment RF Loop through Aerial cable supplied VIDEO INPUT Existing Outdoor Aerial TV 301R Coaxial digital output to coaxial digital input supplied L R AUDIO INPUT VIDEO OUTPUT AV AMPLIFIER VIDEO INPUT RCA Audio Video cable supplied RCA Video cable not supplied Red Y...

Страница 19: ... Connecting to Other AV Equipment You can connect to a VCR or Camcorder or other AV device using RCA Audio Video cable Connecting External Equipment RCA Audio Video cable supplied 301R White Red Yellow White Red Yellow Camcorder VCR VIDEO L R AV OUT ...

Страница 20: ...r RW Getting Started Connecting to a DV You can use DV connection to copy DV recording onto DVD discs Connecting External Equipment IEEE1394 Output DV Out to IEEE 1394 Input DV In on DVD 301R DV DV OUT IEEE1394 Cable not supplied ...

Страница 21: ...several minutes to be done 4b A warning message appears when the aerial connection did not make properly 5 Press EJECT to open the disc tray 6 Place a recordable DVD RW or DVD R onto the disc tray Label side facing upwards This recorder is only compatible with DVD R and DVD RW for recording 7 Press EJECT again to close the disc tray Do not push the disc tray closed 8 Follow the Onscreen instructio...

Страница 22: ...JECT again to close the tray The DVD Recorder starts playback 5 If it does not start playback do the following If playing a DVD DVD R DVD RW a disc menu appears Press to select the preferred title and press to start playback If playing an Audio or MP3 CD Press to start playback 6 Press Volume buttons on your TV to adjust the volume 7 To stop playback press the STOP button To view other functions a...

Страница 23: ...Standard Long Play to record about six hours For details on how to do Record Quality OSD Setting please refer to Chapter 4 2 RECORD DISC Setup Disc Media Setting Only works when a DVD R or DVD RW is loaded Erase Format Setting Erasing formatting DVD discs can only be done through the OSD Setting Please refer to Chapter 4 2 RECORD DISC Setup for details Finalise Setting Before a non ReWritable DVD ...

Страница 24: ...iod of time Pressing the REC OTR button repeatedly will increase the record time in 30 minute increments Depending on the recording quality you selected each time you press the button the recording time will cycle through REC t 30 min t 60 min 120 mins 90 min To resume to regular recording Press RECORD OTR button until REC appears on the screen To stop OTR One Touch Recording Press STOP button to ...

Страница 25: ... doing this the timer recording will be complete To return to the Setup MENU screen Press button To finish the setup operation Press Timer to exit from Timer setup screen Exit Event Date Quality Prog Start End Freq 01 04 25 04 HQ Scart 07 00 08 00 Mon Fri 02 __ __ __ __ _____ __ __ __ __ ______ 03 __ __ __ __ _____ __ __ __ __ ______ 04 __ __ __ __ _____ __ __ __ __ ______ 05 __ __ __ __ _____ __ ...

Страница 26: ...ke sure Date and Time of this DVD Recorder be the same as your local time If not check Date Time Setting to correct it Refer to Timer Setup section Before schedule recording remember to put a recordable DVD RW or DVD R with free space disc into this DVD Recorder If not you can t do any recording even though schedule recording has set up While schedule recording make sure POWER of this DVD Recorder...

Страница 27: ... screen 6 Press SOURCE on the remote control to toggle different external A V input sources Press SOURCE repeatedly to scroll through various A V input including TV Scart CVBS1 CVBS2 S Video1 and S Video2 7 Press REC OTR on the remote control to start to record REC will appear on the TV screen 8 Press STOP on the remote control to stop recording WAIT will appear on the TV screen and wait until LIV...

Страница 28: ...title One is to edit a title while the title is playing the other is to edit a title while the title is not playing 1 3 Editing You have five options to edit a title Insert chapter Remove chapter Hide chapter Show chapter New Picture and Insert REC Mark Chapters are markers inside a title and you can jump from chapter to chapter within the title by pressing or button Insert chapter 1 Press S T to ...

Страница 29: ...to see the hidden chapter you have to select it by chapter number For details please refer to Chapter 2 2 Direct Selection of Scenes To playback hidden chapters refer to Play Full Title function To recover hidden chapters permanently refer to Show Chapter function Remove chapter 1 Press to select one title to play and press to start the playback 2 Press EDIT and the EDIT menu will be shown on the ...

Страница 30: ...do Play Full Tilte 2 Press EDIT the EDIT menu will be shown on the screen 3 Press to select Show chapter The hidden marks will be removed and hidden chapters will be recovered New picture You can create a new thumbnail or change the thumbnail for the selected title 1 Press to select one title to play and press to start the playback 2 Press EDIT and the EDIT menu will be shown on the screen 3 Press...

Страница 31: ...ess TITLE Title 2 S VIDEO2 8 20 49 PM Apr 10 2004 Length 0 20 18 Quality SP Rec mark Title 3 CVBS2 11 22 08 PM Apr 15 2004 Length 0 12 33 Quality EP Title 1 Prog02 2 36 11 PM Apr 9 2004 Length 0 30 42 Quality HQ Title 2 S VIDEO2 8 20 49 PM Apr 10 2004 Length 0 20 18 Quality SP Rec mark Remove REC Mark 1 Press to select the title with Rec mark then press 2 Press EDIT 3 Press to select Remove REC Ma...

Страница 32: ... Length 0 20 18 Quality SP Title 3 CVBS2 11 22 08 PM Apr 15 2004 Length 0 12 33 Quality EP Title 1 Prog02 2 36 11 PM Apr 9 2004 Length 0 30 42 Quality HQ DVDRW EDIT Protect Title Erase Title Play full title Edit Title Insert REC Mark Disabled Title 2 S VIDEO2 8 20 49 PM Apr 10 2004 Length 0 20 18 Quality SP Title 3 CVBS2 11 22 08 PM Apr 15 2004 Length 0 12 33 Quality EP Title 1 Prog02 2 36 11 PM A...

Страница 33: ...itle from the title menu 2 Press EDIT the EDIT menu will be shown on the screen Press to select Play full title and press 3 It will start playback the entire title including hidden chapters from the disc Hidden will appear on the screen while playing the hidden chapter To go back to Title Selection Menu press TITLE button DVD RW Edit Title 1 Press to select one title from the title menu 2 Press ED...

Страница 34: ... S VIDEO2 8 20 49 PM Apr 10 2004 Length 0 20 18 Quality SP Rec mark Title 3 CVBS2 11 22 08 PM Apr 15 2004 Length 0 12 33 Quality EP Title 1 Prog02 2 36 11 PM Apr 9 2004 Length 0 30 42 Quality HQ Title 2 S VIDEO2 8 20 49 PM Apr 10 2004 Length 0 20 18 Quality SP Rec mark Remove REC Mark 1 Press to select the title with Rec mark then press 2 Press EDIT 3 Press to select Remove REC Mark then press 4 P...

Страница 35: ...more titles recorded on it a menu screen will appear on the TV screen Proceed with steps 5 and 6 when a menu is available on the disc 5 Press to select the item you want to change and press The contents of the Menu may differ according to the DVD discs mostly including Play Movie Scene Selection Languages Subtitles and Special Features 6 Press to do your preferred setting and press To select a tit...

Страница 36: ...e control to turn to stand by mode When on stand by mode the power indicator of this DVD Recorder turns red The disc continues to rotate while the menu is displayed even after the player has finished playing a particular disc When no further selections are to be played be sure to press the STOP button to clear the menu screen If the disc is placed upside down and it is a single sided disc the play...

Страница 37: ...ed To return to normal playback Press Skipping Ahead or Back to Chapters You can skip a specific chapter or track to playback Skipping Ahead Press NEXT during playback Skips a chapter each time you press the button Skipping Back Press PREV during playback When you press the button once midway through a chapter this DVD Recorder returns to the previous chapter to playback The player skips a chapter...

Страница 38: ...To locate Chapter 12 press 0 1 and 2 T 012 C 001 00 48 45 To locate 01 hr 50 min 00 sec press 0 1 5 0 0 and 0 T 001 C 001 01 50 00 5 Press This DVD Recorder starts playback from selected title chapter time To return to normal playback Press Goto until the box disappears For some discs may not start from the specified position even when the steps above have been performed correctly For Your Referen...

Страница 39: ...T until the box disappears Repeat playback works only with discs for which the elapsed playing time appears on the player s display during playback Repeat playback may not work correctly with some DVDs 1 Press A B during playback at the point where repeat play is to start A appears on the right corner of the screen 2 Press A B again at the point where repeat play is to end B appears on the right c...

Страница 40: ... choose the preferred scene to see it in different sizes Zoom x2 Zoom x4 and Zoom x8 To return to normal playback Press ZOOM a number of times until the zoom window box disappears You can change the audio language from the one selected at the initial settings to a different language if available This operation functions only with discs on which multiple audio soundtrack languages are recorded 1 Pr...

Страница 41: ... the initial setting If you select a subtitle language which is not recorded on the disc the player will play back a prior subtitle language programmed on the disc You can change the subtitle language with the initial settings if available Some DVD discs may contain scenes which have been shot simultaneously from a number of dif ferent angles For these discs the same scenes can be viewed from each...

Страница 42: ...ted item To enter other menu screen Repeat steps 2 and 3 To return to the previous menu screen Press TITLE 1 Press MENU A DVD chapter menu with brief broadcast of each paragraph now appears You may see the introduction of each chapter and then decide with which chapter to start first 2 Press or number button s to select the preferred item The menu details vary depending on discs recorded Using a D...

Страница 43: ...D on the tray After few seconds the player starts play back the pictures in slide show automatically ZOOM 1 Press ZOOM repeatedly to view picture in different sizes Zoom x2 Zoom x4 Zoom x1 2 Zoom x1 4 and normal 2 Press to view different parts of the picture in its close up 3 Press NEXT and Press PREV to view the next or previous picture Pause Next and PREV 1 Press PAUSE to pause slide show To res...

Страница 44: ...ss EJECT to close the tray 5 Press TV DVDR to DVDR mode A Track List appears as above screen Track List Track 001 00 03 56 Track 002 00 03 16 Track 003 00 02 53 Track 004 00 03 42 Track 005 00 03 00 Track 006 00 04 04 Track 007 00 02 50 Track 008 00 03 23 Track 009 00 02 31 Track 010 00 02 50 T 008 020 ET 00 01 45 CD Use arrows to find a track Press to play track A List of the total songs in your ...

Страница 45: ... 02 Bye Baby MP3 003 A 03 When You Wish Upon a Star MP3 004 A 04 What a Wonderful World MP3 005 A 05 Baby Mine MP3 006 A 06 Humble Me MP3 007 A 07 Nighty Night MP3 008 A 08 Brahm s Lullaby MP3 009 A 09 Twinkle Twinkle Little Star MP3 Use arrows to find a track Press to play track T 008 020 ET 00 01 45 Brahm s Lullaby MP3 A List of the total songs in your Audio CD including track numbers and name s...

Страница 46: ...e button Skipping Back Press PREV during playback When you press the button once midway through a track this DVD Recorder returns to the previous track to playback The player skips a track each time the button is pressed Skipping Ahead or Back to Tracks Pause Playback Press PAUSE during playback The player will pause playback To return to normal playback Press ...

Страница 47: ...list Select Play then press to start playback of the order from the programme list Press to clear all the programmed tracks Press to continue to the next page The Programme List according to your selection of tracks Track 003 Track 001 Track 007 Track 010 Track 015 Track 008 Play Clear All b b When programming a MP3 disc MP3 Playlist DIR 001 A 01 Somewhere Over The Rainbow MP3 002 A 02 Bye Baby MP...

Страница 48: ...urself On the contrary if you did set all the playback order of the available tracks this DVD Recorder will start playback of the order you specified To Remove the Programmed tracks Press to choose the preferred track and then press Or choose CLEAR ALL to remove all the programmes tracks To Exit the Programmed tracks Press PROGRAM to exit If you press PROGRAM to exit programmed tracks this DVD Rec...

Страница 49: ... box turns yellow you can t choose other options Selecting Music by Track 1 Press Goto during playback 2 Press to move the cursor to the time box Tr 001 00 48 45 1 2 Normal 3 Press the time box turns yellow Tr 001 00 48 45 1 2 Normal 4 Press the number button s to specify the starting position Example To locate 01 hr 30 min 12 sec press 0 1 3 0 1 and 2 Tr 001 01 30 12 1 2 Normal 5 Press This DVD R...

Страница 50: ...ayback press Goto while the box turns white If the box turns yellow you can t choose other options You could choose to playback your audio CD in random order 1 Press Goto during playback 2 Press to move the cursor to the Normal Random box Tr 001 00 48 45 1 2 Normal 3 Press the random box turns yellow Tr 001 00 48 45 1 2 Normal 4 Press to select to play in random order Tr 001 00 48 45 2 2 Random 5 ...

Страница 51: ...w 1 4 Remaining Track 1 3 Off 4 Press to select to display other information of the play ing disc 5 Press The information you selected will be displayed at the bottom CD T 002 016 RT 00 00 12 RT Remaining Track RD Remaining Disc ET Elapsed Track ED Elapsed Disc For your reference When appears while you are pressing a button it may indicate that the corre sponding operation is prohibited by the pla...

Страница 52: ...der RECORD DISC Setup a a When No Disc is placed B b b When a DVD R disc is placed B c c When a DVD RW disc is placed CHANNEL Auto Tuning System Fine Tune Programme Swap Erase Programme Exit Select Confirm RECORD DISC Record Quality Auto Chapter Disc Info Exit Select Confirm RECORD DISC Record Quality Auto Chapter Disc Info Finalise Exit Select Confirm RECORD DISC Record Quality Auto Chapter Disc ...

Страница 53: ...ting Select Confirm Exit In Advance 1 Press the STANDBY ON button on the DVD Recorder or the Standby button on the remote control to turn on your DVD Recorder 2 Turn on your TV and switch it to the correct Video In channel 3 Press Channel Record Disc Video System or Timer button in the stop mode to display the menus EJECT PLAY STOP UP DOWN SOURCE RECORD STANDBY ON S VIDEO AV INPUT VIDEO AUDIO R L ...

Страница 54: ...will erase and replace all previously stored channels 2 Before doing Channel Search make sure your TV connections has been made properly For Details on how to make TV connection to your DVD Recorder please refer to the Quick Guide 1 Press Channel in the stop mode to display the menus 2 Press to select Auto Tuning System 3 Press to select Start 4 Press 4a Channel Search then starts and your DVD Rec...

Страница 55: ...e Setup MENU screen Press button To finish the setup operation Press to exit from Channel setup screen Fine Tune Setting Exit Select Confirm CHANNEL Auto Tuning System Fine Tune Programme Swap Erase Programme FINE TUNE 0 Exit Confirm Fine tune Return Exit Select Confirm CHANNEL Auto Tuning System Fine Tune Programme Swap Erase Programme Exit Confirm Prg up down Return Programme Swap Current Progra...

Страница 56: ... insert no disc a DVD R or a DVD RW disc Please find the Discs you can use on top of each function that best suits your case DVD R DVD RW No Disc DVD R DVD RW No Disc a When a DVD R disc is placed b When a DVD RW disc is placed Once you ve inserted a DVD R or DVD RW disc a Title Menu automatically appears on the Screen For details on how to edit the titles please refer to Chapter 4 4 Editing If yo...

Страница 57: ...t Chapter markers after recording For details please refer to Chapter 1 3 Editing The OSD Example in the right is when No Disc is placed If you insert a DVD R or DVD RW disc the OSD will be shown as follows To return to the Setup MENU screen Press button To finish the setup operation Press Record Disc to exit from Record Disc setup screen Auto Chapter Setting a When a DVD R disc is placed b When a...

Страница 58: ...nfo Setting 1 Press Record Disc in the stop mode to display the menus 2 Press to select Disc Info and then press 2a If placed a DVD R disc 2b If placed a DVD RW disc 3 The related information about your disc will be shown on the screen including Disc type Total recorded title Pro tected title and Total recorded time 3a If placed a DVD R disc but Not yet finalised 3b If placed a Closed DVD R disc f...

Страница 59: ...nd then press The finalization function only works Once in DVD R discs You must finalise a DVD R disc before it can be played on another DVD player To return to the Setup MENU screen Press button To finish the setup operation Press Record Disc to exit from Record Disc setup screen Finalise Setting 1 Press Record Disc in the stop mode to display the menus 2 Press to select Make Compatible and then ...

Страница 60: ...d Protect Disc Setting 1 Press Record Disc in the stop mode to display the menus 2 Press to select Protect Disc and then press 3 Select Confirm and then press After the Disc is Protected the Erase function will be disabled To return to the Setup MENU screen Press button To finish the setup operation Press Record Disc to exit from Record Disc setup screen DVD RW DVD RW Exit Select Confirm RECORD DI...

Страница 61: ...y the movie in FULL size IMPORTANT If you select this setting for a conventional size TV this might result a distorted screen 3b 4 3 Letter Box Select 4 3 Letter Box if you want to play the movie in its original aspect ratio on a conventional size TV The entire frame will appear on the screen but you will see the black bars appear at the top and bottom of the screen 3c 4 3 PanScan Select 4 3 PanSc...

Страница 62: ...To return to the Setup MENU screen Press button To finish the setup operation Press Video to exit from Video setup screen TV System Setting DVD Subtitle Setting Allows you to set availabe languages for the on screen display OSD 1 Press Video in the stop mode to display the menus 2 Press to select DVD Subtitle then press 3 Press to select the preferred language and then press To return to the Setup...

Страница 63: ... ve connected this recorder s S Video Out jacks to your TV s S Video In jacks Select S Video Only if your TV does not provide Progressive nor component jacks For details on the way of connections please refer to the Quick Reference What if the screen turns black while setting the Video Output OSD Press TV Sys a number of times until the screen is back to normal To return to the Setup MENU screen P...

Страница 64: ...7 8 No Limit General Audience recommended as acceptable for viewers of all ages Parental Guidance suggested Material is unsuitable for children under the age of 13 Parental Guidance restricted recommended that parents restrict children under age 17 from viewing or allow children to view only when supervised by a parent or adult guardian No children under the age of 17 not recommended viewing for c...

Страница 65: ... ve inputted the wrong password the following screen will appear Please then re enter your password If you ve forgotten your password please select Factory Reset to restore to the default setting To return to the Setup MENU screen Press button To finish the setup operation Press System to exit from System setup screen 4 4 SYSTEM Setup continued Input 99999 Input The Same 5 digit numbers Exit SYSTE...

Страница 66: ...ton To finish the setup operation Press System to exit from System setup screen Factory Reset Setting Exit Select Confirm SYSTEM Rating Change Password Version Factory Reset Exit Return SYSTEM Rating Confirm Change Password Cancel Version Factory Reset 4 4 SYSTEM Setup continued Version Setting To display this recorder s model number part number and etc 1 Press System in the stop mode to display t...

Страница 67: ...gramming system may be various for example VCR Plus North South America G Code Asia Australia Video Plus United Kingdom and ShowView Europe Africa Important Make sure Date Time Setting be the same as your local time Otherwise the Video Plus recording will be invalid 1 Press Timer in the stop mode to display the menus 2 Press to select Video Plus and press An empty space appears to let you enter th...

Страница 68: ... Start End Freq 01 04 25 04 HQ Scart 07 00 08 00 Mon Fri Blank Disc space available 60 minutes HQ 60 minutes SP 121 minutes LP 121 minutes EP 243 minutes SLP 365 minutes Change selection Return Select field Confirm Exit Timer Important After finishing the schedule recording a reminder message Press Standby for timer recording will appear on the screen You have to press the POWER button on the remo...

Страница 69: ... automatically according to your setup date 4 Press Every time before doing timer recording you have to check the date and time setting again to make sure the information of the date and time is correct To return to the Setup MENU screen Press button To finish the setup operation Date Time Setting 4 5 Timer Setup continued Timer Video Plus Timer Event Setting List Date Time Setting Exit Timer Sele...

Страница 70: ...ings menu to make sure that the digital output is set to on Check if the audio format of the selected audio language matches your receiver capabilities Distorted picture Check the disc for fingerprints and clean with a soft cloth wiping from center to edge Sometimes a small amount of picture distortion may appear This is not a mal function Completely distorted picture or no color The disc format i...

Страница 71: ...l 5 1 Channel speaker Check if the speaker is properly connected Check if the audio output setting is right SYMPTOM COMMON REMEDY No key operation by the DVD Recorder Turn the unit off and then back to on Alternatively turn off the unit disconnect and or the remote control is effective the AC power cord and then re connect it The player may not be operating properly due to lightning static electri...

Страница 72: ...are likely to occur which will cause noise If the disc is brought from a cold to a warm environment moisture may form on the disc Wipe this moisture off with a soft dry lint free cloth before using the disc Improper disc storage You can damage discs if you store them in the following places Areas exposed to direct sunlight Humid or dusty areas Areas directly exposed to a heat outlet or heating app...

Страница 73: ...o 0 6 mm thin discs which are adhered to each other Since the thinner the disc the higher the density at which the information can be recorded a DVD disc has a greater capacity than a single 1 2 mm thick disc Since the two thin discs are adhered to each other there is the potential to achieve double sided play sometime in the future for even longer duration play DVD R This means DVD Recordable The...

Отзывы: