background image

Lenses 

Standard Control Elements and LED Indicators


Page 12 (40) 


at

os

_cs

_r

ev

01_en

_r

ev

-c

   2012

-09

-03


6.


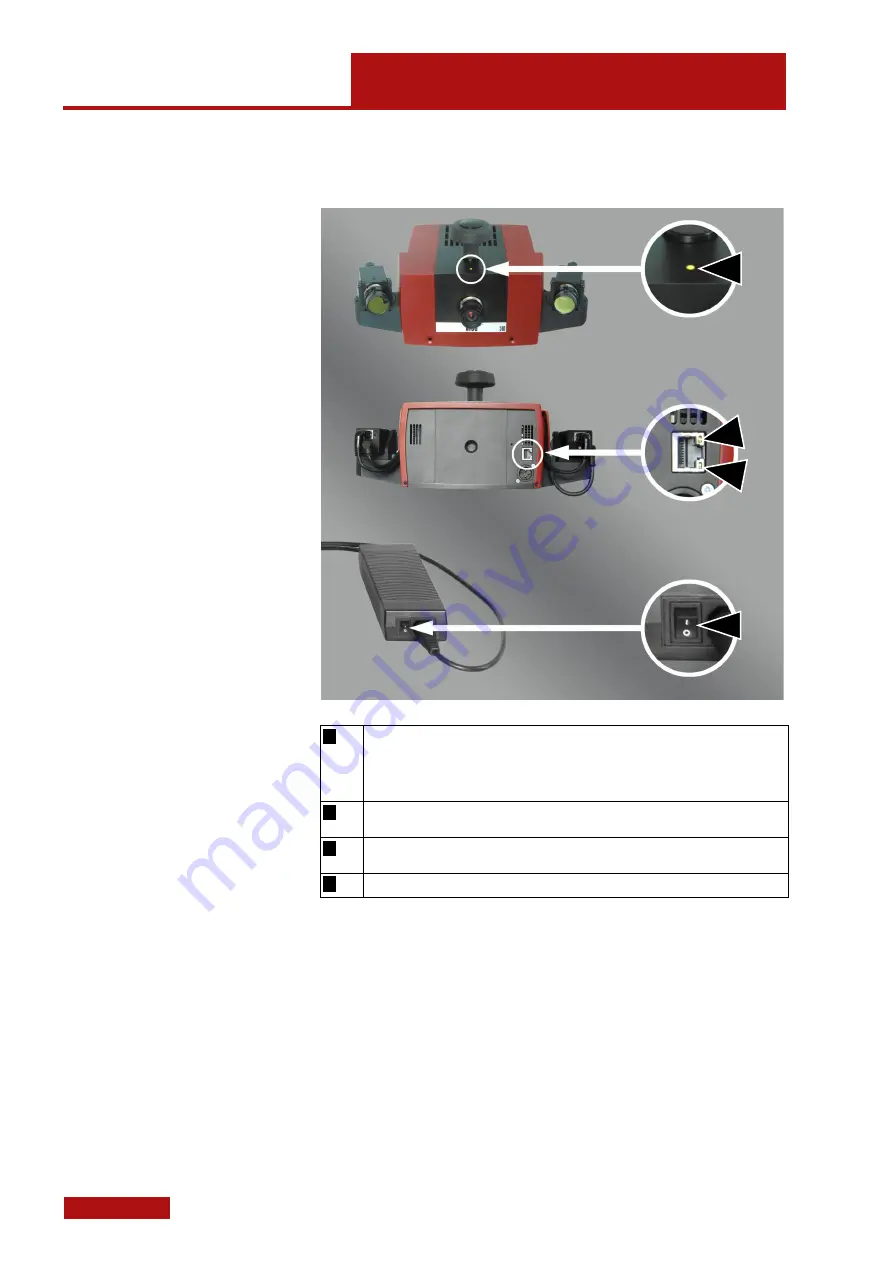
Standard Control Elements and LED Indicators 


a


Shows green light if the sensor is ready for operation. 


Shows orange light while the operating system of the sensor starts. 


Shows red light in the moment of being switched on or in case of a failure. You 

will find additional status information on the Web interface of the sensor, see 6.1. 


b


Yellow LED, illuminates in case of active Gigabit transmission at interface CAM L. 


c


Green LED, illuminates in case of data transmission at interface CAM L. 


d


Power switch to switch the sensor on and off. 


a  


b   


c   

d   

Содержание ATOS COMPACT SCAN 5M

Страница 1: ...unschweig E Mail info gom com Germany www gom com Tel 49 0 531 390 29 0 Fax 49 0 531 390 29 15 atos_cs_rev01_en_rev c 2012 09 03 ATOS User Manual Hardware ATOS COMPACT SCAN 5M 2M With Camera Supports...

Страница 2: ...harmful for your eyes See also 2 Technical Data Check cables and if damaged replace them by all means Protect the cables from mechanical load squeezing ten sion etc Damaged cables may cause short cir...

Страница 3: ...rt SO_________________________ 20 8 3 6 Fix Camera Support SO ___________________________ 20 8 3 7 Insert Camera Screws ____________________________ 21 8 3 8 Fix Cameras ______________________________...

Страница 4: ...Table of Contents Page 4 40 atos_cs_rev01_en_rev c 2012 09 03...

Страница 5: ...tion 2 and 3 describe the system variants Section 4 contains general information about the sensor Section 5 informs about how to handle the lenses Section 6 describes the control elements and LED indi...

Страница 6: ...nterface card for the Gigabit data link The factory settings of the separate network interface card are op timized for the Gigabit data link and must not be changed For more information see section 12...

Страница 7: ...mera position 300 Measuring volume in mm 125 x 90 x 90 mm to 500 x 380 x 380 mm 150 x 110 x 110 mm to 600 x 400 x 400 mm Measuring point distance 75 309 m 62 250 m Camera position SO Measuring volume...

Страница 8: ...g the sensor A complete sensor setup is only required if the corresponding set of lenses has never been adjusted before or is decalibrated wrong ad justments For a complete sensor adjustment you need...

Страница 9: ...50 3 590 25 8 6 CP40 MV560 CC30 MV500x500 300 300 x 230 x 230 0 124 1 5 590 25 17 12 CP40 MV320 CC30 MV300 150 150 x 110 x 110 0 062 0 8 590 25 35 23 CP40 MV170 SO 150 150 x 110 x 110 0 063 0 8 420 23...

Страница 10: ...nter of the measuring volume Camera lens right R Camera lens left L Center of the measuring volume Height H measuring volume Width W measuring volume Length L measuring volume Projector lens P Camera...

Страница 11: ...sitions e g SO 300 500 and screw it into the cameras and the projector To avoid getting dirt into the cameras and the projector always equip the devices with lenses or blind caps even when they are sw...

Страница 12: ...while the operating system of the sensor starts Shows red light in the moment of being switched on or in case of a failure You will find additional status information on the Web interface of the senso...

Страница 13: ...Help Sys tem Analysis ATOS Sensor Analyze System Sensor Status Prerequisite The sensor must be switched on and connected to the computer The ATOS software is running but the sensor is not initialized...

Страница 14: ...one of the sensor handles and the other hand at the locking screw of the 3D ball head Only this way you can position the sensor safely Adjustment of sensor on stand 7 2 Sensor Fixture 7 2 1 Mechanism...

Страница 15: ...5 40 atos_cs_rev01_en_rev c 2012 09 03 Functional principle of the clamping mechanism You may adjust the clamping force any time with the knurled thumb screw g 7 2 2 Mounting Direction of Sensor on Lo...

Страница 16: ...xture of Sensor on Locking Mechanism Steps for fixing the sensor Loosen the locking lever h unlock the mechanism using the latch i and move the sensor with the wedge plate k to the stop Clamp the wedg...

Страница 17: ...lenses has never been adjusted before or is decalibrated 8 2 Measuring Volume Use the table in section 4 1 to determine a measuring volume You create larger measuring volumes with camera positions 500...

Страница 18: ...en_rev c 2012 09 03 All camera supports have factory adjusted stops for the required camera angles Never loosen these stops 8 3 1 Initial Situation Sensor in Position 300 ATOS COMPACT SCAN sensor with...

Страница 19: ...r Setup Changing the Camera Positions Step by Step Page 19 40 atos_cs_rev01_en_rev c 2012 09 03 8 3 3 Remove Camera Screws and Loosen Support View from below 8 3 4 Remove Camera Support 300 View from...

Страница 20: ...mera Positions Step by Step Sensor Setup Page 20 40 atos_cs_rev01_en_rev c 2012 09 03 8 3 5 Insert Camera Support SO Sensor view from below SO camera support view from top 8 3 6 Fix Camera Support SO...

Страница 21: ...m l for the re quired camera angles Never loosen these stops Set the camera on the centering pins n o and stops m l and fix the cameras lightly at first Now turn camera L in the direction of the red a...

Страница 22: ...9 03 While holding the camera turned against the stop m fix the corre sponding camera screws with a torque of max 1 2 Nm View from below Rotation direction of the cameras red arrow when tightening the...

Страница 23: ...determined by the software measuring distance filters focuses A software dialog guides you through the required individual steps If you use a set of lenses that has never been adjusted before or that...

Страница 24: ...right camera Adjust projector focus Not required for COMPACT SCAN sensors Not required for COMPACT SCAN sensors Adjust left camera aperture Adjust right camera aperture 8 4 1 Camera Angle The camera...

Страница 25: ...ustment possibilities for the laser pointers The adjustment screws p and q move the laser beam with respect to each other Steps to adjust the laser pointers You already set up the sensor according to...

Страница 26: ...ntrol The remote control allows for measure ments without using the mouse or key board 1 x receiver for the wireless remote con trol The receiver is operated at a USB connection of the measuring compu...

Страница 27: ...ess Function Remote control on off Snap images during calibration and start function Measure Control the button functions in error dialogs according to the display Control the button functions in erro...

Страница 28: ...s you about which calibration object is required for your measuring volume Crosses are used for system types for mobile operation because the panels are too large for measuring volumes MV 250 Panels w...

Страница 29: ...or The measuring object defines the measuring volume and thus the set of lenses to be used Depending on the field of application of the measuring system mobile stationary you either need to use a cali...

Страница 30: ...ry sensitive Therefore nev er touch the surface directly with your hands Calibration panels for measuring volumes MV 250 and larger remain in the case during the calibration process Only the case cove...

Страница 31: ...measuring volume and which camera position you want to use Based on this in formation the software determines the required focal lengths of the lenses Open the calibration dialog in workspace Set Up C...

Страница 32: ...n optimum exposure time is given when the red overexposed areas are just no longer visible In the subsequent steps you are then asked to place the calibration object in defined positions to the sensor...

Страница 33: ...ross folded and unfolded Calibration with calibration cross CC30 in horizontal position During calibration the sensor configuration is determined This means that the camera positions and the orientati...

Страница 34: ...ressure The calibration cross must be totally unfolded If you use multiple ATOS sensors please check that your calibration object matches the calibration data you entered in the software Make sure tha...

Страница 35: ...al lengths Place the calibration object at the measuring distance in front of the sensor using a stand As the laser pointers are already adjusted to this distance see section 8 4 2 you only need to mo...

Страница 36: ...the lenses are mounted tight You reach the calibration results with Acquisition Sensor Calibration Show Calibration Information As of software version V7 5 and higher the calibration is stored in the...

Страница 37: ...of the sensor in regular intervals We recommend cleaning the filter every 3 months or more often You thus avoid a shutdown of the sensor due to overtemperature during operation 11 1 Removing the Air F...

Страница 38: ...0 atos_cs_rev01_en_rev c 2012 09 03 12 Cabling Network Port The complete data is transferred from the ATOS COMPACT SCAN sensor to the PC Laptop camera parameters control via a common GigE data link 12...

Страница 39: ...Cabling Network Port Page 39 40 atos_cs_rev01_en_rev c 2012 09 03 12 1 2 Cabling with 19 PC...

Страница 40: ...igE data link of the high resolution cameras If there are specific domain regulations in your company please make sure that these settings do not affect the firewall settings of the GigE camera data l...

Отзывы: